Jump to content


Photo

Body resto on rusty 1969 Camaro


  • Please log in to reply
324 replies to this topic

#101 Bart

Bart

    Shit a brick

  • Members
  • PipPipPipPipPipPip
  • 2,559 posts
  • Location:Sydney
  • Car:LJ Torana
  • Joined: 20-November 05

Posted 15 July 2010 - 10:14 PM

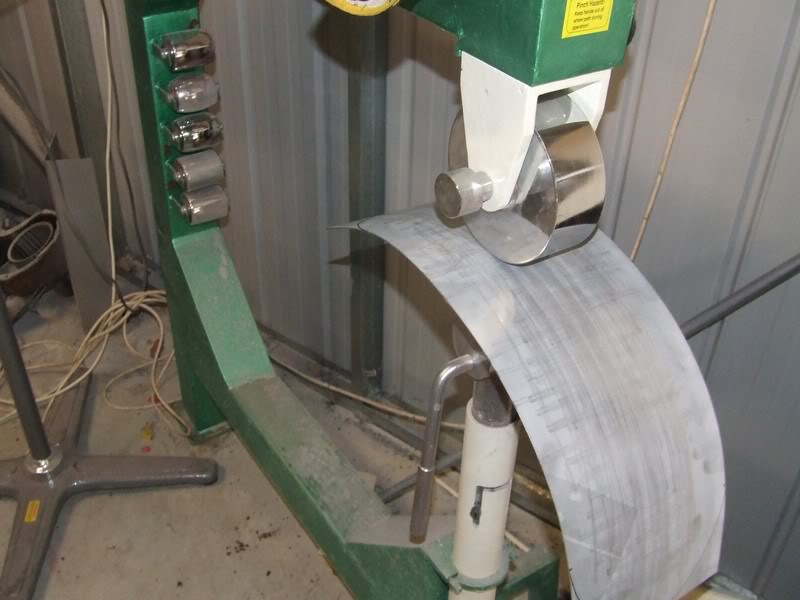
mmmm....english wheel. Mine's not a super dooper mega dollar one, but it does me fine.

Take a pic of it, show us your goods mate
I've been watching too much Biker build off, love the way they shape the "gas tank"
Have you seen Scotty's Choppers? They hand fab their guards, tanks etc, he's in NSW near Port Macquarie

Edited by Bart, 15 July 2010 - 10:16 PM.


#102 dirtbag

dirtbag

    Street Machines current Biatch!

  • Members
  • PipPipPipPipPip
  • 1,927 posts
  • Name:Tim
  • Location:Sunshine Coast
  • Car:1995 V8 2wd hilux, LH torana ute, 1970 Volksrod, MK1 2 door escort, CJ6 Jeep, VX commodore wagon.
  • Joined: 29-December 09

Posted 16 July 2010 - 08:12 AM

It's not a great pic but you can still sort of see it.

This is the start of one of the cycle guards for my volksrod.


Posted Image


Yeah, I love the work Scotty does. The aluminium fabrication is amazing.

#103 _salts_

_salts_
  • Guests

Posted 16 July 2010 - 09:37 AM

Hey dirtbag, I thought I should ask you because you seem like an expert on rust fixing =) And I like the Camaro!!!

I had some minor rust which was mainly surface rust in the inner wheel guard of my LJ torana, and I used K&H rust converter and left it, what am I supposed to do with it now? Leave it converted? K&H dosnt say what to do after it is applied so thought I would ask if there is something necessary I need to do now like sand it off or paint over it etc...

Cheers

#104 dirtbag

dirtbag

    Street Machines current Biatch!

  • Members
  • PipPipPipPipPip
  • 1,927 posts
  • Name:Tim
  • Location:Sunshine Coast
  • Car:1995 V8 2wd hilux, LH torana ute, 1970 Volksrod, MK1 2 door escort, CJ6 Jeep, VX commodore wagon.
  • Joined: 29-December 09

Posted 16 July 2010 - 12:15 PM

Hi Michael. I've never used K&H rust converter but if it's just a clear(ish) liquid then I'd give it a quick sand and etch prime then topcoat/seal it.

If it's been on there for a long time, re apply it, then after it's dry give it a quick sand (180 dry or something similar) and then etch etc.

Maybe see if there's any info on a K&H website perhaps about whether it needs to be washed off or not?

#105 _lxefi304_

_lxefi304_
  • Guests

Posted 16 July 2010 - 02:24 PM

Wow u realy don't farrk around do ya. The progress you have made in such a short time is amazing. let alone the quality of your work on this and the Torana.

I rely on other people to do my paint/panel work. my Torana hasn't been touched in over 7Month's as my old man is so unreliable and slack.

Thats why i bought a new Torana so i could drive one

#106 Bart

Bart

    Shit a brick

  • Members
  • PipPipPipPipPipPip
  • 2,559 posts
  • Location:Sydney
  • Car:LJ Torana
  • Joined: 20-November 05

Posted 16 July 2010 - 07:30 PM

Looks great dirtbag
Have you shaped anything a little more intricate?

#107 dirtbag

dirtbag

    Street Machines current Biatch!

  • Members
  • PipPipPipPipPip
  • 1,927 posts
  • Name:Tim
  • Location:Sunshine Coast
  • Car:1995 V8 2wd hilux, LH torana ute, 1970 Volksrod, MK1 2 door escort, CJ6 Jeep, VX commodore wagon.
  • Joined: 29-December 09

Posted 16 July 2010 - 07:53 PM

Not on this car. Well, not yet anyway : )

#108 _Bomber Watson_

_Bomber Watson_
  • Guests

Posted 16 July 2010 - 10:03 PM

I want one of them to.

Not enough shed space.....

#109 Bart

Bart

    Shit a brick

  • Members
  • PipPipPipPipPipPip
  • 2,559 posts
  • Location:Sydney
  • Car:LJ Torana
  • Joined: 20-November 05

Posted 17 July 2010 - 01:48 PM

I want one of them to.

Not enough shed space.....

You need a bigger shed mate :spoton:
Our work place joke is, we need a bigger shed and a smaller house. :spoton:

#110 _Bomber Watson_

_Bomber Watson_
  • Guests

Posted 17 July 2010 - 02:52 PM

Yeah i know the feeling...Butt...

House is 80 sq/mt, shed is 160 sq/mt......

Just waiting for the house to accidentally burn down so i can build another shed there :D

Cheers.

#111 Bart

Bart

    Shit a brick

  • Members
  • PipPipPipPipPipPip
  • 2,559 posts
  • Location:Sydney
  • Car:LJ Torana
  • Joined: 20-November 05

Posted 17 July 2010 - 02:58 PM

Yeah i know the feeling...Butt...

House is 80 sq/mt, shed is 160 sq/mt......

Just waiting for the house to accidentally burn down so i can build another shed there :D

Cheers.

Um, maybe you should edit that little burny thingy

#112 dirtbag

dirtbag

    Street Machines current Biatch!

  • Members
  • PipPipPipPipPip
  • 1,927 posts
  • Name:Tim
  • Location:Sunshine Coast
  • Car:1995 V8 2wd hilux, LH torana ute, 1970 Volksrod, MK1 2 door escort, CJ6 Jeep, VX commodore wagon.
  • Joined: 29-December 09

Posted 19 July 2010 - 06:26 PM

Well I finished that panel behind the tub today.


Posted Image


And gave it a coat of rust converter.


Posted Image


That was all I did on the 69 today as I had to get something else done.

I've been working on a friends 1975 Pontiac Firebird on and off for a while now and the next job I have to get done is to fix the rust in the radiator support panel.


I know it's a bit off topic, but hey, it's something to look at : )


Posted Image


Here's the new piece I made welded in. I made the new piece from 1.6mm. It made shaping the roll on the edge of the opening a bit harder, but will be stronger than before.


Posted Image


The other side was a lot worse. The whole front section had totally rusted away and wasn't joined to the lower main support any more. Not ideal : )


Posted Image


I replaced a bit of the main support, where it mounts to the chassis.


Posted Image


Here's most of the repair done. There's still a couple of little things to do, but at least it's all joined together again. I love using my new panbrake for folding this stuff up : )

Posted Image


After a bit of the usual rust converter.


Posted Image


Posted Image


It's not super pretty, but it'll do the job.


Well the next few days at least will be working on the hatch, so nothing will be happening here for a little while, but wont be too long : )

#113 Statler

Statler

    Heckler Extraordinaire

  • Administrators
  • PipPipPipPipPipPipPip
  • 6,282 posts
  • Name:Col
  • Location:Mackay Qld. Whitsundays for all you back packers!
  • Joined: 20-May 06

Posted 19 July 2010 - 07:28 PM

I'm envious of your brake press!

You can retire & make droptanks now. :)

#114 dirtbag

dirtbag

    Street Machines current Biatch!

  • Members
  • PipPipPipPipPip
  • 1,927 posts
  • Name:Tim
  • Location:Sunshine Coast
  • Car:1995 V8 2wd hilux, LH torana ute, 1970 Volksrod, MK1 2 door escort, CJ6 Jeep, VX commodore wagon.
  • Joined: 29-December 09

Posted 19 July 2010 - 07:54 PM

That would be nice. Clean too, not like this rusty stuff. Pity I don't have an AC/DC TIG : )

#115 _Kush_

_Kush_
  • Guests

Posted 19 July 2010 - 08:18 PM

That would be nice. Clean too, not like this rusty stuff. Pity I don't have an AC/DC TIG : )


that's ok, dirtbag. You can just fold mine up and post it to me, I'll do the rest :) Whats the deal with you mentioning last week that you were going to work on the Rana this weekend? What happened? Where are the pics?

#116 _mick74lh_

_mick74lh_
  • Guests

Posted 19 July 2010 - 11:08 PM

Its not super pretty? Its not bad! Some more awesome metal work.

I'm a bit confused. You've mentioned your wife's Firebird/Camaro with the Nissan V8 here and there. Is that a different car again?

#117 dirtbag

dirtbag

    Street Machines current Biatch!

  • Members
  • PipPipPipPipPip
  • 1,927 posts
  • Name:Tim
  • Location:Sunshine Coast
  • Car:1995 V8 2wd hilux, LH torana ute, 1970 Volksrod, MK1 2 door escort, CJ6 Jeep, VX commodore wagon.
  • Joined: 29-December 09

Posted 20 July 2010 - 01:16 AM

Kush, I did get the other headlight in the hatch : )


Mick, yes, my wife's firebird is a different car again. It's a 68 model.


Here it is the day it arrived.


Posted Image


It was a bit of a mess. Not as bad as the 69 I'm doing now, but not far off it either.


Posted Image

Posted Image


New floors too.


Posted Image


I made new tubs that were a bit taller with square edges so the 20s could go up under the guard further without hitting.


Posted Image


I also replaced the pontiac rear quarters with camaro ones, as the camaro ones don't have the stupid vents in from of the rear wheels. Smooth is good : )


Posted Image


The chassis before cleaning and modifying.


Posted Image


I had to section and reinforce the main crossmember a fair bit to fit the nissan V8. I also modified the nissan power rack as well. It had to be shortened 35mm each side and use different tie rod ends to fit. I also modified the nissan steering column and am running that as well.


Posted Image


The sump was in for a major workover, but the good thing about the VH45 motor over the lexus is these have a full sheetmetal sump, not a half alloy one, so it's a lot easier to do this conversion.


The sump had the pan at the front and it needed to be at the back, so I screwed it to a piece of form ply and cut the whole thing off except the lip. I rotated it 180 degrees, added 30mm to it's depth and took the hump out of the centre section. Then it fitted like a bought one : )


Posted Image

Posted Image

Posted Image

Posted Image


Posted Image


I'm in the process of converting the dash to RHD. The steering itself is finished, but the dash now needs to be changed. I'm also running the nisan guage cluster. Just to try and keep everything compatible.


Posted Image

Posted Image


The rear will be about an inch and a half lower than it is in this pic when it's finished.


Posted Image


There's a lot more to this story than what I've shown, but it gives you some idea of what's going on.

Edited by dirtbag, 20 July 2010 - 01:17 AM.


#118 dirtbag

dirtbag

    Street Machines current Biatch!

  • Members
  • PipPipPipPipPip
  • 1,927 posts
  • Name:Tim
  • Location:Sunshine Coast
  • Car:1995 V8 2wd hilux, LH torana ute, 1970 Volksrod, MK1 2 door escort, CJ6 Jeep, VX commodore wagon.
  • Joined: 29-December 09

Posted 20 July 2010 - 11:25 AM

As for the 75 firebird I did the radiator support for, it's one of my friends cars. He's had it for over 8 years and I've been toying with it for him over the last 2 years.

It needed lots of little rust repairs. You know, the really annoying ones. A hole here, a tiny hole there, but it all needs to be fixed properly so took a little while. There were some previous repairs that needed touching up, but it only took about 3 days to get the shell into primer.

I also painted the inside and underside in a dark grey 2 pac with 20% flattening base. Looks nice enough, but if it were mine I wouldn't have gone with the flattening base. The chassis and engine bay bits - inner guards, radiator support etc will be in the same colour.


Couple of the rusty bits.


Posted Image


Nothing is as fun as having to unpeel panel skins (in this case the bootlid) to fix small bits of rust underneath.

Posted Image


Posted Image

Posted Image

Posted Image

Posted Image

Posted Image

Finally having it in primer meant I could paint the door and boot jams. I also did the top of the dash.


Posted Image


The colour is called Lapis blue from mazda. Nice colour. Looks really good in the flesh. It's painted in COB.

Posted Image

Posted Image

Posted Image


The car used to be white with blue stripes over the top. It runs a formula 400 bonnet, which looks like it has 2 small hornet scoops at the front. That's where the stripes start, one on each scoop, and finished on the boot. The new paint will have the blue with sparkle silver base for the stripes, and this time they'll go right over the rear to under the bumper.

Just for fun, and without telling the owner, I painted the stripes on the dash top. Wasn't sure how he'd take it. I liked it, and luckily for me so did he when he saw it : )


Posted Image

Posted Image

Posted Image


So there you go. That's all the firebirds and camaros in my life at the moment : ) I did do a full resto on a 67 convertible firebird a little while ago, but it's all finished now luckily.

I still have the 63 Bonneville 2 door to finish off having finished the metal work on a 1959 Plymouth Suburban wagon to fit a set of 20x16s under the back and still have the 3 rows of seats. That was a mission : ) It's owned by the same guy that owns the Bonneville. Lucky bastard....

As for the 75 firebird I did the radiator support for, it's one of my friends cars. He's had it for over 8 years and I've been toying with it for him over the last 2 years.

It needed lots of little rust repairs. You know, the really annoying ones. A hole here, a tiny hole there, but it all needs to be fixed properly so took a little while. There were some previous repairs that needed touching up, but it only took about 3 days to get the shell into primer.

I also painted the inside and underside in a dark grey 2 pac with 20% flattening base. Looks nice enough, but if it were mine I wouldn't have gone with the flattening base. The chassis and engine bay bits - inner guards, radiator support etc will be in the same colour.


Couple of the rusty bits.


Posted Image


Nothing is as fun as having to unpeel panel skins (in this case the bootlid) to fix small bits of rust underneath.

Posted Image


Posted Image

Posted Image

Posted Image

Posted Image

Posted Image

Finally having it in primer meant I could paint the door and boot jams. I also did the top of the dash.


Posted Image


The colour is called Lapis blue from mazda. Nice colour. Looks really good in the flesh. It's painted in COB.

Posted Image

Posted Image

Posted Image


The car used to be white with blue stripes over the top. It runs a formula 400 bonnet, which looks like it has 2 small hornet scoops at the front. That's where the stripes start, one on each scoop, and finished on the boot. The new paint will have the blue with sparkle silver base for the stripes, and this time they'll go right over the rear to under the bumper.

Just for fun, and without telling the owner, I painted the stripes on the dash top. Wasn't sure how he'd take it. I liked it, and luckily for me so did he when he saw it : )


Posted Image

Posted Image

Posted Image


So there you go. That's all the firebirds and camaros in my life at the moment : ) I did do a full resto on a 67 convertible firebird a little while ago, but it's all finished now luckily.

I still have the 63 Bonneville 2 door to finish off having finished the metal work on a 1959 Plymouth Suburban wagon to fit a set of 20x16s under the back and still have the 3 rows of seats. That was a mission : ) It's owned by the same guy that owns the Bonneville. Lucky bastard....

#119 _2DR_

_2DR_
  • Guests

Posted 20 July 2010 - 04:02 PM

hey dirt bag nice work just a few questions on your welding it looks like your most often using multiple tacks over the top of each other instead of full welds is this correct as this is the process i use to some good effect just wondering if it is the best option also your plug welds do you have a bit of info on how to get them nice as i dont have a spot welder and will need to do some in the future i have had a go but would enjoy a bit of info on how to get them looking the goods.

cheers for any info and again love your work

2DR

#120 Bart

Bart

    Shit a brick

  • Members
  • PipPipPipPipPipPip
  • 2,559 posts
  • Location:Sydney
  • Car:LJ Torana
  • Joined: 20-November 05

Posted 20 July 2010 - 05:12 PM

Love to see the Bonneville :spoton:

#121 dirtbag

dirtbag

    Street Machines current Biatch!

  • Members
  • PipPipPipPipPip
  • 1,927 posts
  • Name:Tim
  • Location:Sunshine Coast
  • Car:1995 V8 2wd hilux, LH torana ute, 1970 Volksrod, MK1 2 door escort, CJ6 Jeep, VX commodore wagon.
  • Joined: 29-December 09

Posted 20 July 2010 - 05:46 PM

Not sure how I managed to put the same thing in there twice, but hey, if something can be screwed up on a computer, I'm your man : )


Hi 2DR. It depends what I'm welding as to whether I'll do full welds or spot welds. If I'm doing structural/chassis work I'll do full welds, but for little things like this radiator support I find spot welds easier, as I can make sure the 2 pieces are in line all the way along easier, and it's going to get ground down anyway, so I don't really care how crap it looks after I've welded it : ) Plus, there's a lot less chance of distortion doing the spot welds. If I'm doing more involved panel work, like a sunroof fill or 2 door conversion I'll tack things together with the mig but then weld it with the oxy, as it's a much better weld for panel work. It can be panel beaten as opposed to the mig weld which cracks when hammer and dollied.

As or plug welding, it's very handy and very easy. For thin panel work I use an 8mm drill to drill the holes. Then once the panel is ready to get welded on, make sure the new piece being welded in is sitting flat on the existing piece (you can look through the 8mm hole to check that there's no gap between the two pieces) and then weld away. The only hint I can give though is make sure you start the puddle (weld) inside the hole on th existing metal, not on the new metal, or you'll most likely just fill the hole and not get good penetration, meaning a weak join. Start the weld right in the middle of the hole, then once it's started a good weld rotate the mig in a circle outwards until you've welded the edge of the hole to the existing metal. I really suck at explaining things, so I hope you can make some sense of that????

#122 _mick74lh_

_mick74lh_
  • Guests

Posted 20 July 2010 - 07:11 PM

Wow, yeah i can appreciate that what you've posted there of your wife's car is a very brief summary of the work involved but that will be a really impressive car when its done. And your mate's 75 Firebird's impressive. Nice work

#123 _2DR_

_2DR_
  • Guests

Posted 20 July 2010 - 07:59 PM

:spoton: cheers dirtbag clears a few things up for me

#124 Bart

Bart

    Shit a brick

  • Members
  • PipPipPipPipPipPip
  • 2,559 posts
  • Location:Sydney
  • Car:LJ Torana
  • Joined: 20-November 05

Posted 20 July 2010 - 09:35 PM

Nice conversion, shit a brick you got more room in your engine bay than i have thats for sure
Theres a bloke in NZ who makes stroker canks for the VH engine. Cant remember his name, he has a race boat with a VH stroked and bored to 400 cubes and makes 800 + hp.

Edited by Bart, 20 July 2010 - 09:37 PM.


#125 dirtbag

dirtbag

    Street Machines current Biatch!

  • Members
  • PipPipPipPipPip
  • 1,927 posts
  • Name:Tim
  • Location:Sunshine Coast
  • Car:1995 V8 2wd hilux, LH torana ute, 1970 Volksrod, MK1 2 door escort, CJ6 Jeep, VX commodore wagon.
  • Joined: 29-December 09

Posted 21 July 2010 - 04:51 AM

Love to see the Bonneville :spoton:


Hi Bart. Well I stick up a few pics of the old rusty mongrel for you : )


Posted Image


Here's a quick look at some of the rust.


Posted Image

Posted Image


This repair was so solid I was able to rip it off with my bare hands : )


Posted Image


This is the underside of that same repair. If you can call it that.


Posted Image


You know how big these things are, so can appreciate what a crap job it was stripping it back to bare metal with a 7" grinder : )


Posted Image


While I was propping the body up to take it off the chassis I got a clearer look at the chassis. Nothing left. In fact, it broke in 2 once I'd put the blocks of wood in there to lift the body. Luckily the owner has another chassis.


Posted Image


And here it is bent in half : )


Posted Image


It was nice to be rid of the old chassis and have it mounted on the rotisserie. Now the real fun begins : )


Posted Image

Posted Image

Posted Image


It doesn't really look too bad in this next pic, but it shows the inner sill and floor are trashed, and the floor supports and seat mounts also have chronic rust issues too.


Posted Image


I don't know how many pics I can put in one post so I might leave it at that for now and come back later and do more.


0 user(s) are reading this topic

0 members, 0 guests, 0 anonymous users