
Nice work!
Are you using a sander? I've only been using flexidiscs on my grinder but yours looks to come a lot nicer.

1974 LH TORANA RESTORATION
Started by
_LH SLR 3300_
, Dec 04 2010 05:58 PM
320 replies to this topic
#52
 _Kush_
_Kush_
-

- Guests
Posted 17 April 2011 - 06:22 PM
Nice work!
Are you using a sander? I've only been using flexidiscs on my grinder but yours looks to come up a lot nicer.
#53
_LH SLR 3300_
_LH SLR 3300_
-
- Guests
Posted 17 April 2011 - 06:34 PM
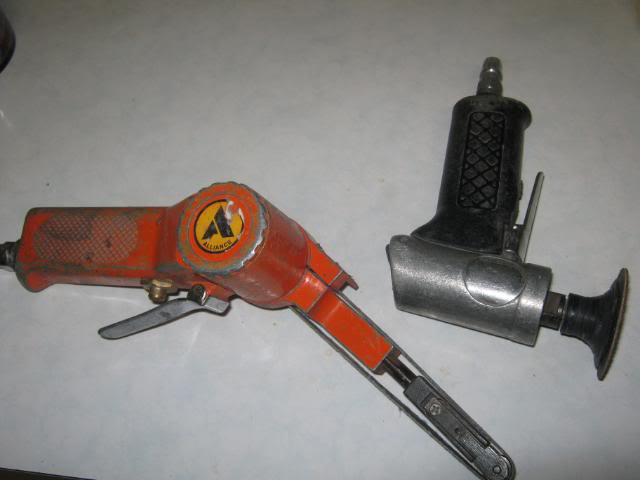
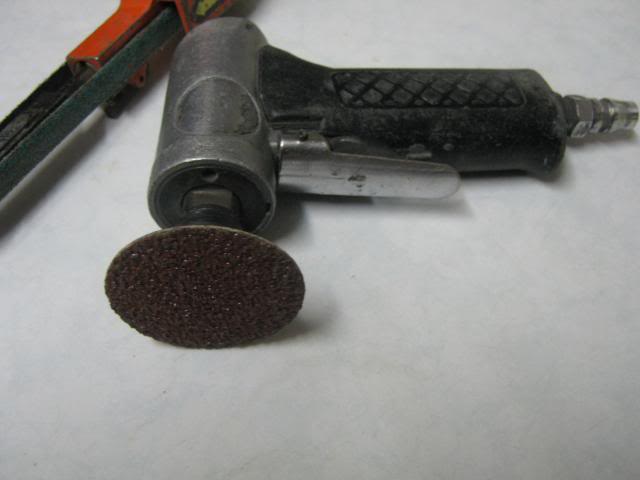
Thanks mate, i use an air grinder to take the top off the welds & finish with either my belt sander or small air sander. I use P24, P40 & P80 grit belts & Roloc discs. I generaly try to metal finish repairs like this as this area is prone to alot of flex from heavy bonnets on tight springs, so anymore than a very thin film of filler will crack & allow moisture in. Cheers Matt.
#54
_TUFF75LH355_
_TUFF75LH355_
-
- Guests
Posted 17 April 2011 - 08:04 PM
what did you use to get the old sound deadening bitumen off from the inner gaurds mate..?? cheers ben
#55
_LH SLR 3300_
_LH SLR 3300_
-
- Guests
Posted 17 April 2011 - 08:24 PM
Hi Ben. I used a heat gun i bought from Supercheap & a variety of paint scrapers to get 95% off, then multi thinners & plenty of rags to wipe the residue off. Paitence is the key here, it took me most of yesterday to clean them up.
#56
wot179
-

- Members
-

- 6,784 posts
Green Eggs and Spam
- Name:Jesus Bloody Christ
- Location:Sunny Santa Maria
- Car:Goon
- Joined: 06-February 09
Posted 17 April 2011 - 08:28 PM
That little airsander looks like its done some miles,matt...
What brand is it?
What brand is it?
#57
_LH SLR 3300_
_LH SLR 3300_
-
- Guests
Posted 17 April 2011 - 08:50 PM
Hi Craig, yes my sander has done some miles, but then i've owned it for around ten years. It's a Shinano brand.
#58
_TUFF75LH355_
_TUFF75LH355_
-
- Guests
Posted 17 April 2011 - 09:25 PM
Cheers Matt love your work mate always very informative
Cheers Matt love your work mate always very informative
Cheers Matt love your work mate always very informative
Cheers Matt love your work mate always very informative
Cheers Matt love your work mate always very informative
#59
notna
-

- Members
-
- 706 posts
Forum Fixture
- Name:Reverse of username
- Location:Sydney
- Car:1976 LX L32 SL/R
- Joined: 21-May 07
Posted 21 April 2011 - 08:46 AM
Inspirational....!
You know I'm going to copy you now with my own resto... I'm at the same stage
You know I'm going to copy you now with my own resto... I'm at the same stage
#60
_LH SLR 3300_
_LH SLR 3300_
-
- Guests
Posted 21 April 2011 - 04:41 PM
Thankyou & by all means, copy away  . I always admire a well done original spec resto more so than a custom. Hoping to have the engine bay in hi-fill this weekend, if the weather is good.
. I always admire a well done original spec resto more so than a custom. Hoping to have the engine bay in hi-fill this weekend, if the weather is good.
#61
wot179
-
- Members
-
- 6,784 posts
Green Eggs and Spam
- Name:Jesus Bloody Christ
- Location:Sunny Santa Maria
- Car:Goon
- Joined: 06-February 09
Posted 21 April 2011 - 04:53 PM
Ive been thinking of getting one,Matt.
So Shinano it is.
I should have guessed,they make pretty good stuff.
Thanks for the heads up.
So Shinano it is.
I should have guessed,they make pretty good stuff.
Thanks for the heads up.
#62
_LH SLR 3300_
_LH SLR 3300_
-
- Guests
Posted 21 April 2011 - 08:45 PM
No probs Craig. Started on the prep work on the engine bay tonight. The original paint finish has broken down badly & there is evidence of surface rust appearing in places, so to do the job properly rubbing it back wouldn't be good enough, the paint has to come off back to steel. I can't afford to have the car media blasted, so i'm chemically paint stripping the bay, it's a messy shite of a job, but then so is mechanicaly sanding. I started on the firewall by masking any & all holes etc so the stripper won't run inside the cabin etc.


I poured the stripper into an old ice cream container & brushed on a reasonably thick coat allowing around 10 minutes for it to do it's stuff.


Now this is the fun part, wearing disposable latex gloves so i don't burn the crap out of my hands, i remove as much of the paint with a variety of scrapers. An old cardboard box comes in handy for disposing of the waste.

As you can see, there is still alot of mess left, so to remove this i use a coarse steel wool pad like you use to scrub your pots with, hot water & a couple of rags. The benefit of this method is not only does it clean the stripper & paint residue quickly, the water also neutralises the paint stripper which is important.

Then i use an air blower & dry rags to dry off the panel before wiping it over with some gun wash thinners on a rag.


In the pics areas of surface rust can be seen, alot of which wasn't visible until the paint was removed. Once i've finished stripping the bay, i'll use wire wheels, Roloc discs, Deoxidine & Scotchbrite pads to remove the surface rust.
I poured the stripper into an old ice cream container & brushed on a reasonably thick coat allowing around 10 minutes for it to do it's stuff.
Now this is the fun part, wearing disposable latex gloves so i don't burn the crap out of my hands, i remove as much of the paint with a variety of scrapers. An old cardboard box comes in handy for disposing of the waste.
As you can see, there is still alot of mess left, so to remove this i use a coarse steel wool pad like you use to scrub your pots with, hot water & a couple of rags. The benefit of this method is not only does it clean the stripper & paint residue quickly, the water also neutralises the paint stripper which is important.
Then i use an air blower & dry rags to dry off the panel before wiping it over with some gun wash thinners on a rag.
In the pics areas of surface rust can be seen, alot of which wasn't visible until the paint was removed. Once i've finished stripping the bay, i'll use wire wheels, Roloc discs, Deoxidine & Scotchbrite pads to remove the surface rust.
#63
_SLR Torrie_
_SLR Torrie_
-
- Guests
Posted 22 April 2011 - 10:34 AM
Looks great mate! I've been stripping my LH in a very similar manner but picking up some good tips from your topic.
Keeping a close eye on this thread. Keep up the good work.
John.
Keeping a close eye on this thread. Keep up the good work.
John.
#64
_TUFF75LH355_
_TUFF75LH355_
-
- Guests
Posted 22 April 2011 - 02:09 PM
what brand paint stripper are you using matt..??
#65
Ruts
-

- Moderators
-
- 1,118 posts
How Fast!?
- Location:Bargo, NSW
- Car:Blown A9X replica, Black SS hatchback, LH SLR5000
- Joined: 23-December 06
Posted 22 April 2011 - 06:38 PM
Great work mate. That Torana will be ready to pick up next week so I'll let Joe know when it's ready.
Ruts
Ruts
#66
_LH SLR 3300_
_LH SLR 3300_
-
- Guests
Posted 26 April 2011 - 06:35 PM
Rain for four out of five days of my long weekend mean't i didn't get the engine bay in hi-fill & the fact the car is in an open carport means what work i did will have to be redone. Started out OK, whole bay was in bare steel by 1am friday morning, spent friday removing surface rust & deoxidising, rubbing back with P240 & scotchbrite & etch primed it thinking i'd hi-fill the next day. It was not to be & as etch primer is porous, i'll have to wipe it off with thinners & deoxidine the whole bay again. IF it doesn't rain next weekend! I'd almost give my right arm for a half decent shed to work in.


There was a fair amount of surface rust lurking under the factory paint.


Decided to repair the rust at the base of the L/H/F door pillar so as the weekend wouldn't end up a total waste of effort.

Started by making a paper template of the repair section & transfered it onto an old Commie door skin. The section that needed replacing has some intricate shapes to it, but i wanted to make the repair section out of one piece of steel so using vice clamps, block of wood & hammer & dolly i started shaping it using the opposite side as a reference. This is about half way through the process.


An hour or so of "fine tuning" & i was reasonably happy with the shape & fit, so i started cutting away the rusted area with the new section self tappered in place as a guide. This way, i know the new section will "butt up" near perfectly to the original panel.


Once i finished cutting, the new & old come away together & it's a simple matter of removing the self tappers & rusted metal & the repair section is almost ready to weld in.


Even though this area isn't visible once the guard is bolted in place, it was important to me to get the overall shape of the repair section as close as possible to original without needing any filler. I think it turned out OK, good enough for this car anyhow.


A coat of primer to seal it & show any imperfections. Of course there are a few, nothing major only some pitting in the welds & some small hammer marks from the shaping process, a smear of fine putty will fix these


There was a fair amount of surface rust lurking under the factory paint.
Decided to repair the rust at the base of the L/H/F door pillar so as the weekend wouldn't end up a total waste of effort.
Started by making a paper template of the repair section & transfered it onto an old Commie door skin. The section that needed replacing has some intricate shapes to it, but i wanted to make the repair section out of one piece of steel so using vice clamps, block of wood & hammer & dolly i started shaping it using the opposite side as a reference. This is about half way through the process.
An hour or so of "fine tuning" & i was reasonably happy with the shape & fit, so i started cutting away the rusted area with the new section self tappered in place as a guide. This way, i know the new section will "butt up" near perfectly to the original panel.
Once i finished cutting, the new & old come away together & it's a simple matter of removing the self tappers & rusted metal & the repair section is almost ready to weld in.
Even though this area isn't visible once the guard is bolted in place, it was important to me to get the overall shape of the repair section as close as possible to original without needing any filler. I think it turned out OK, good enough for this car anyhow.
A coat of primer to seal it & show any imperfections. Of course there are a few, nothing major only some pitting in the welds & some small hammer marks from the shaping process, a smear of fine putty will fix these
#67
antelopeslr5000
-

- Members
-
- 1,022 posts
Forum Fixture
- Location:Toowoomba, Queensland
- Car:1977 LX SL/R 5000
- Joined: 10-November 05
Posted 26 April 2011 - 07:24 PM
I'd almost give my right arm for a half decent shed to work in.
I know exactly how you feel!. My project is waiting in the wings because I've had no room to work on it. The unit I'm living in at the moment has a small garage which has barely enough room to open the car doors let alone do any work to my car.
I've just recently purchased a house though, complete with a 3 bay shed and 3 bay carport. Move into the place next week. Can't wait!
#68
_LH SLR 3300_
_LH SLR 3300_
-
- Guests
Posted 26 April 2011 - 07:43 PM
Yeah it's really stressful trying to work in these sort of conditions, i do have a garage but like your's, i can barely open the car doors add to which it has no light/power due to the rusted tin roof leaking when it rains & shorting out the power. All my power etc to the carport is via extention cords & if i run more than two things off it at once, it trips the circuit board. The carport is actually easier to work in & not as dingy & damp as the garage.
#69
_LH SLR 3300_
_LH SLR 3300_
-
- Guests
Posted 01 May 2011 - 06:20 PM
Caught a break today with the sun out & minimal cloud, so crossed my fingers & stripped off the black etch primer i applied last week using thinners & a heap of rags. I decided to take some advice i was given & apply 2K epoxy etch primer instead of the 1K pressure pack stuff i'd been using, so after wiping off all traces of the 1K, i scuffed back the whole engine bay again with P240 & scotchbrite. After filling a couple of minor rust pitted areas with fine filler, blowing off the bay & wiping down with thinners, i masked it up & applied the 2K epoxy.


I had to give this epoxy at least 30mins before applying the hi-fill, i helped the process along with a heat gun & finally got the hi-fill on just as it was getting dark.


Have the lower tiebar, lower firewall & chassis rails to do still but at least the bulk of the engine bay is in hi-fill, hopefully i'll drop the k-frame out during the week & finish these areas off so i can start thinking of applying some colour. Thanks Bomber for steering me in the right direction.
I had to give this epoxy at least 30mins before applying the hi-fill, i helped the process along with a heat gun & finally got the hi-fill on just as it was getting dark.
Have the lower tiebar, lower firewall & chassis rails to do still but at least the bulk of the engine bay is in hi-fill, hopefully i'll drop the k-frame out during the week & finish these areas off so i can start thinking of applying some colour. Thanks Bomber for steering me in the right direction.
#70
SmacT
-

- Members
-
- 1,005 posts
Forum Fixture
- Name:Sam
- Location:Sydney
- Car:LX 4dr 355, TKX, BW
- Joined: 24-December 08
Posted 01 May 2011 - 06:38 PM
Nice work (as usual) mate. Is the 2k epoxy better because it's not porus? Or are there other reasons? Can't wait to see this progress.
#71
_LH SLR 3300_
_LH SLR 3300_
-
- Guests
Posted 01 May 2011 - 07:06 PM
Thanks mate, i believe 2K epoxy has superior adhesion & anti-corrosion properties than 1K. As it's only an engine bay, i figured that a 1K etch would've been OK if i was able to hi-fill over it straight after. I decided on using the 2K in case i was unable to hi-fill the engine bay today, that way it could've been left until another day & simply scuffed with P240 before hi-filling instead of having to completely remove it as i had to with the 1K.
#72
_Bomber Watson_
_Bomber Watson_
-
- Guests
Posted 01 May 2011 - 07:21 PM
That looks very nice.
Worth the extra work to use the 2k Epoxy me thinks.
Cheers.
Worth the extra work to use the 2k Epoxy me thinks.
Cheers.
#73
_LH SLR 3300_
_LH SLR 3300_
-
- Guests
Posted 01 May 2011 - 07:27 PM
Thanks mate, i think it was worth the extra work too. I reduced it 15% to get it to lay down smooth & even, same with the hi-fill. I made sure all repairs were finished off with fine paper so as the hi-fill is more of a surfacer than a filler. Six hours flat chat work but i'm relieved it's one step closer to being painted.
#74
_LJ355_
_LJ355_
-
- Guests
Posted 01 May 2011 - 10:07 PM
looks great matt whats the plan for this one are you painting the whole car ?
If so what colour
If so what colour
#75
_honda400_
_honda400_
-
- Guests
Posted 02 May 2011 - 06:52 AM
Looking good mate. I used the ppg epoxy primer on my car, its very good stuff. What hi fill are you using.


0 user(s) are reading this topic
0 members, 0 guests, 0 anonymous users

