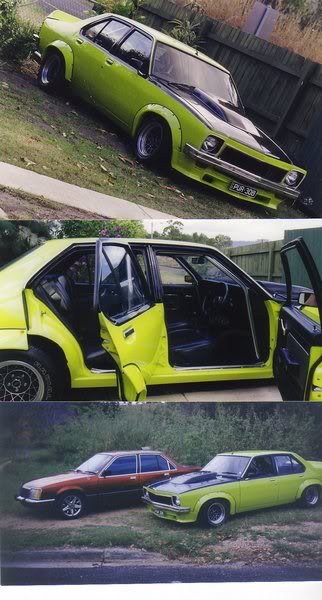
LX sedan body resto
#26 _dirtbag_
Posted 25 January 2011 - 06:30 PM
Hi Ruts, no it's not the camera angle, and the flare isn't too far back, it's just whoever cut the guards cut the whole edge of the wheel arch off, meaning the sill is shorter than standard. Plus these flares are so incredibly the wrong shape I'm amazed they line up with anything : )
Speaking of flares, I refitted the right rear flare after fibreglassing it yesterday. I added some filler to the rear part and it's going to be an improvement, but the front piece was a problem. I don't know if fibreglass "pulls" as it drys, but the front piece was a different shape from yesterday so I recut it and glued i into shape with some more bog.
The edge of the door flare lines up a lot better with the rear flare section now.
I didn't get to spend all day on it today due to other car but I'll get back to this on thursday.
#27
Posted 25 January 2011 - 06:56 PM
#28
Posted 25 January 2011 - 07:03 PM
Different kind of flare mate, where it mounts to the door is different to yours.
Yes I totally agree. Mine is the L34 type and Tim's is an A9X style. I may be wrong but I thought both styles lined up with the edge of the door. Anyone have photo's of an original A9X to show me how they sit to put my mind at ease?.
#29
Posted 25 January 2011 - 07:07 PM
Ruts
#30 _dirtbag_
Posted 25 January 2011 - 07:38 PM
When I built my old LH LSR5000 (avatar car) I knew I wanted 10s on the back with 265s but I also wanted it LOW!!!! I used A9X flares and cut right up to the bolt holes. You can sort of see it in the middle pic. Sorry there's 3 pics but I scanned them all in together ages ago so this is all I have. The cut looks really bodgy, I don't remember it being that bad : ) Oh how we live and learn hahaha. I also cut the door up to the bolt holes too.
Edited by dirtbag, 25 January 2011 - 07:40 PM.
#31
Posted 25 January 2011 - 08:03 PM
#32
Posted 26 January 2011 - 09:17 AM
http://australianmus...5628-a9x-torana
Edited by Ruts, 26 January 2011 - 09:20 AM.
#33 _Big Fella_
Posted 26 January 2011 - 10:14 AM
#34 _dirtbag_
Posted 07 February 2011 - 08:10 PM
Big Fella, you can buy GTS wheels (but they're known as rally 2) from classic industries in USA. Californian Image in Qld here deal with them a lot and can get them in easily enough. They come in sizes from 14x6 up to 15x10.
Well I had to have a bit of an op last week so was stuck on my ass for a week but went back in today and started chopping one of the front flares, seeing as they fit so well.
Here's a before shot. I've even moved the flare a bit here to improve it. It was worse.
You can see the front and rear of the flare are totally the wrong shape.
I took the flare off and found quite a collection of flare bolt holes.
Along with some nice big cracks in the paint.
While sanding the paint off the old holes before I welded them up I found some filler. Not good to have around when you need to weld up holed so it got sanded back a bit away from the holes.
The front of the flare was so twisted it was physically impossible for me to bend it back into shape by hand. I started by making some long cuts along the flare so I could twist it straight. I'll end up putting a lot of cuts in the flare to reshape it, but i don't mind. It has to be done.
I also cut a wedge out f the back of the flare where it curled back in towards the wheel. After seeing it back on the car I could tell it needs to move back a bit more so I'll cut more before I fibreglass it up.
I made about 8 cuts in the front of the flare so it would line up with the spoiler and pull the lower corner out so the tyre doesn't hit it. I then taped the front and back of the flare into shape to have a look.
I then did the old tape and bog trick to hold it in place to get fibreglassed.
At least now it holds a much better shape, even without the clamps on it.
Here's an old pic to show how it was. You can see how far in the lower part of the flare is behind the spoiler.
Now there's only one set of holes : )
Here's the inside of the rear of the flare. I did cut a bit more out to pull the lower part away from the tyre.
And here's the mess I had to make of the front of the flare. I'm sure there's a simpler way of doing this but I know NOTHING about fibreglass. I just kept the cuts long so the flare could move a lot and still keep it's shape. I don't want to have to pull the flare into shape to bolt it on, that's when they and/or the paint will crack.
I know it looks bad, but it really was that badly out of shape. It was more out of shape than me if you can believe that : )
It looks good now though.
Well tomorrow I'll peel the tape and bog off and bolt it back on, with my fingers crossed : )
#35 _Bomber Watson_
Posted 07 February 2011 - 08:53 PM
Cheers.
#36 _L32M20_
Posted 07 February 2011 - 08:57 PM
Edited by L32M20, 07 February 2011 - 09:02 PM.
#37 _dirtbag_
Posted 07 February 2011 - 09:11 PM
L32M20 yes the wheel arch can be blended in. I'll just have to add more metal. I think it would make it look a lot neater with it done so there's no step in under the flare.
#38 _Bomber Watson_
Posted 07 February 2011 - 09:22 PM
That and ply wood.
Cheers.
#39
Posted 07 February 2011 - 09:33 PM
Ruts
#40 _dirtbag_
Posted 07 February 2011 - 09:44 PM
Thanks for the offer of the sill panels, but they'll be easy enough to fabricate. I appreciate the offer though, thanks.
I don't suppose you have a decent sedan body and a couple of hatch doors? I really want to make a torana 2 door sedan delivery to go with my ute : )
#41
Posted 08 February 2011 - 07:38 PM
#42
Posted 09 February 2011 - 02:17 AM
#43
Posted 09 February 2011 - 08:27 AM
Ruts can't you see Dirtbag loves rusty shells. Seems that's all he works on.
Sorry how silly of me I should know better shouldn't I, LOL
#44 _dirtbag_
Posted 15 February 2011 - 09:08 PM
Here's how the left flare now sits.
It's had a bit of filler put on it now. As have the old bolt holes in the front guard.
I thought I'd better do something about the right front flare. Here's another shot of how good it is.
I took the flare off to discover there was too much of the guard cut away to mount the flare.
The easiest way I could think of to get around this was to weld some washers onto the guard to mount the flare.
It's not pretty, but I don't have unlimited time to spend on this and the flare sits on there fine now anyway so I'm happy enough with it.
After a few cuts to allow the flare to sit in the right spot.
Had to make the usual cuts in the rear of the flare too.
Got one of the seats mounted too. They're recaro seats and will look good in there once trimmed.
I used some 8mm nutserts in the front of the seat mount as the front mounts lined up perfectly there.
I had to cut the rear mounts off the seat runners and move them forward so they'd line up with the stock torana mounts in the floor. The good thing about this is the original seats can just bolt back in if needed as none of the factory mounts are changed.
That's it for now : )
#45 _nzstato_
Posted 16 February 2011 - 05:34 AM
#46
Posted 16 February 2011 - 06:27 PM
#47 _Bomber Watson_
Posted 16 February 2011 - 09:13 PM
#48
Posted 17 February 2011 - 08:45 AM
#49 _dirtbag_
Posted 17 February 2011 - 06:43 PM
Speaking of what i was given, I fibreglassed up the last flare today.
Instead of using tape and bog to hold the flare in place after cutting it I just used fibreglass. It can be ground into shape easily enough.
Once that was dry taped up and fibreglassed the inside.
Of course I had to cut a wedge out of the rear of the flare.
Seeing as the car will be coming off the hoist soon I thought it made sense to mask up the tank and pipes while it was up nice and high.
Here's the inside of the right front flare after I trimmed the new fibreglass. I'm happy enough with this.
This is just a random shot just because I like it : )
#50
Posted 17 February 2011 - 07:11 PM
Did you get the Flares for your uterus?
0 user(s) are reading this topic
0 members, 0 guests, 0 anonymous users