Jump to content


- - - - -

Torana hatch in California...


  • Please log in to reply
794 replies to this topic

#1 _LS1 Hatch_

_LS1 Hatch_
  • Guests

Posted 08 February 2011 - 01:19 PM

Thought I'd introduce myself....my name is Jeff and I'm from Garden Grove (So.Cal) in the US, and I came across a thread here California LS1 hatch and thought I'd join up to thank folks for the good words about my car, and just hang out and see what there is to learn, etc as well!

I'm an exporter and work with a mate in Lilydale (Eastern suburbs of Melbourne of course) and have been there a heap of times for decent periods of time too, so pretty familiar with things...I'm an exporter by trade too...shipping stuff over there (and back here now and then as well of course) and aside from my Torana I've brought over a heap of Valiants here (I was really into Mopars originally here) and another couple Torrie hatchbacks besides my red one (which I have had over here since around early 2000 or so)

As for my car and what I've done to it....well, I've done just about everything I could think of so far.. :lol:

It started out as a 253/4 speed car which I did a cam swap, extractors and a few other little things and drove it around that way for years..the engine was getting abit tired, and after building an blown LS1,6 speed '69 Camaro (that was for my mate there) I got the LS1 bug...(and my daily driver for a few years was a 2000 Camaro SS convertable) so I pulled the 253 out of the Torana and just went at it.

I paint stripped the engine bay to bare metal (it was mint) to start with and just primered it and rolled the car into the garage. I looked around a little to find a good low mile LS1/T56 donor, and after finding one I went ahead and built mounts, modified the trans tunnel for room, etc.
I have done every thing on the car from start to finish so far, aside from welding up the air cleaner box (I designed it and made a cardboard mock up) but I only have a mig welder and wanted it done with tig, so had it done locally. I built the wiring loom for the car using a Camaro donor and just used the service manual and went wire by wire and picked out what I needed or didn't.

Aside from the LS1 and T56 six speed...I've got a drop tank, which I bought on one trip there (had it made by a guy near Mt Evelyn) fuel system is all Aeromotive...A1000 pump, twin filters, fuel pump controller, and regulator. I made up all the braided and hard lines for it as well. The engine itself is stock inside, aside from the Edelbrock intake I went with..also I moved/hid the coil packs as you can see as well.

Exhaust is some stainless extractors I built...into an X pipe feeding into Spintech side outlet mufflers. (no worries here with exhaust exit in front of the rear wheels!)

Speaking of wheels, they are custom made ones I had done by a local wheel company. They are a forged aluminum center and are light and strong. 18" x 10" in the back and 18" x 8" in the front.

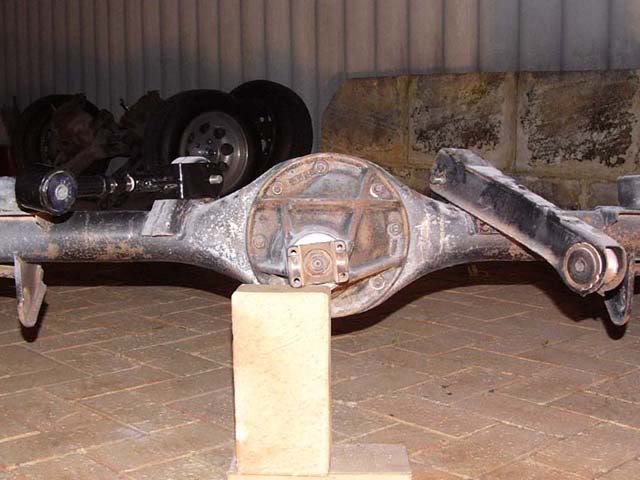
Diff....I got a 9" housing one trip I was there and bought all new bits for it here.. new 31 spline axles, new Strange nodular center, new Tru-Trac limited slip, 3.55 gears, billet pinion support, the lot..

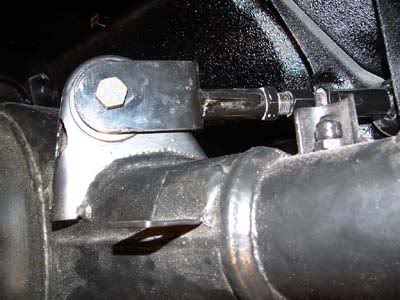
For brakes...the rear I just used an off the shelf kit with 330mm rotors. The front is abit unusual, but worked out good in the end. I used some billet hubs from there with 5 on 4.75" stud pattern (HQ/Chev) and after alot of research I found a rotor with the perfect offset to suit the caliper choice and my wheel...which is a 360 x 36mm rotor from a 2009 Mercedes AMG. Cool thing is they are factory drilled and really quite cheap even right from the Benz dealer! Calipers are 4 spot Brembo's. I would have liked to use the matching 8 piston AMG Brembo calipers, but the price was sorta outa hand for me (at the moment at least) so this combo worked out well. Just made a caliper bracket out of 5/8" thick plate steel.

Hmmmmm...what else... Oh...car has air conditioning too. I used a street rod style a/c-heater unit mounted up under the dash and spent a fair amount of time building and hiding all the lines in the engine bay aside from a couple short runs from the compressor to the inner skirt area. Power windows and remote door locks was a pretty easy step as well. Also on the interior..I was able to use the factory console as well after some minor trimming.

For cooling, I went with a dual pass Afco radiator and twin Spal fans (with a Spal fan controller) it works excellent. On a very hot day with the air con on..I let the car sit and idle in the driveway for an hour and it didn't flinch.

I wanted to keep all the factory SS gauges in my car too...so I used a tach adaptor from Dakota Digital to run the tacho from the output from the LS1 computer (and it runs the fuel pump controller too) and for the speedo, I use a electronic to mechanical adaptor...pretty much a little box with a motor in it that takes the signal from the computer and converts it to a standard type mechanical speedo cable output. Nice bit of gear.

Sure there is a heap more, that's a start at least...and hope I didn't ramble on too much, ha ha....I have hundreds and hundreds of pics I took during the build and of course be happy to share if anyone is curious about any of it !

I've been around the block in it, but have a few more little things to finish off then will start putting some miles on it to see how it all works out. Once I see everything is good, I have some engine upgrades in mind to take advantage of the intake too...some worked heads and a cam swap should put me in the 500 - 550 hp range I figure.


Posted Image

Posted Image

Posted Image

Posted Image

Posted Image

Posted Image

#2 Statler

Statler

    Heckler Extraordinaire

  • Administrators
  • PipPipPipPipPipPipPip
  • 6,282 posts
  • Name:Col
  • Location:Mackay Qld. Whitsundays for all you back packers!
  • Joined: 20-May 06

Posted 08 February 2011 - 01:39 PM

:welcome:

Nice job at improvising!

How do the seppo's react to the car?

#3 _LS1 Hatch_

_LS1 Hatch_
  • Guests

Posted 08 February 2011 - 01:42 PM

Everyone has really liked it, had a great reaction all around Posted Image

#4 _LS1 Hatch_

_LS1 Hatch_
  • Guests

Posted 08 February 2011 - 01:54 PM

Oh, and aside from the car stuff....I have abit of other Oz stuff around. Collect abit of beer stuff...have a couple hundred stubbies/cans/etc, all sorts of signs, etc.

Here is one of my light up VB signs!

Posted Image

Oh, and a few old street signs too outside, ha ha.. (got these from a recycle place, think it was off Canterbury Rd from memory?)

Posted Image

Some of my past cars too...

Posted Image

Posted Image

Posted Image


And one shot of my shed where I built the car... Anyone from Melbourne who ever took Ansett recognize my floor? The carpet tiles are from the old Ansett Tullamarine terminal. :)

Posted Image

#5 MRLXSS

MRLXSS

    The Render Garage

  • Members
  • PipPipPipPipPipPipPip
  • 12,396 posts
  • Name:Matt
  • Location:Upwey, Melbourne
  • Car:355 LX Hatchback, DeLorean DMC-12, LX SS Hatch, VY Cross8 Crewman
  • Joined: 09-November 05

Posted 08 February 2011 - 02:07 PM

Very Very Nice!

Thanks for starting the thread! Im super impressed with the work you have put in!

Also, are you an Aussie? Or are you American?

#6 _LS1 Hatch_

_LS1 Hatch_
  • Guests

Posted 08 February 2011 - 02:17 PM

American...just been working with an Aussie for ages. So sort of picked up alot of it all...

#7 _LS1 Hatch_

_LS1 Hatch_
  • Guests

Posted 08 February 2011 - 02:41 PM

Forgot to mention on the build notes on the car....for suspension, Up front I just sandblasted and painted the control arms, new Moog upper and lower ball joints, new bushes and Bilstein shocks. Out back, I fully boxed the lower arms with new bushes, used Edelbrock adjustable uppers (Chevelle ones) and Bilstein shockers as well. I have the factory sway bars off the car, but will go with something aftermarket next time I do a container back this way I figure, along with some different rear coils since it's about an inch or inch and a half too high for me.

Posted Image

Posted Image

#8 dattoman

dattoman

    Do I feel lucky? Well, do ya, punk?

  • Administrators
  • PipPipPipPipPipPipPip
  • 16,471 posts
  • Name:Neil
  • Location:Perth Western Australia
  • Car:LX SS , 76 Cadillac , 3 x dattos
  • Joined: 04-February 07

Posted 08 February 2011 - 03:26 PM

What engine mounts and sump have you used

Oh and extractors ??

#9 _LS1 Hatch_

_LS1 Hatch_
  • Guests

Posted 08 February 2011 - 03:36 PM

I built the extractors for it, built the motor mounts, and as for a sump...I went with this, http://www.summitrac...arts/MOR-20140/

All squeezed in ok.. :badabing:

#10 TerrA LX

TerrA LX

    Fulcrum Fixture

  • Members
  • PipPipPipPipPipPipPip
  • 14,241 posts
  • Location:Sid 'n' knee
  • Joined: 31-May 06

Posted 08 February 2011 - 03:44 PM

Very very nice job on the hatch there, love the custom 18"s, if it gets home sick just send it back to me to look after ok. :spoton:

#11 ozyozyozy

ozyozyozy

    Forum Fixture

  • Members
  • PipPipPipPipPip
  • 944 posts
  • Location:perth
  • Joined: 13-February 08

Posted 08 February 2011 - 07:50 PM

awesome job, love it. its good to know these cars are liked in other parts of the world also.

#12 rodomo

rodomo

    To advertise here, call 13TORANA

  • Members
  • PipPipPipPipPipPipPip
  • 17,999 posts
  • Name:R - O - B Dammit!
  • Location:Way out west of Melbourne Awstraylya
  • Joined: 10-December 05

Posted 08 February 2011 - 09:14 PM

What engine mounts and sump have you used

Oh and extractors ??


I thought you'd be more interested in the master cylinder? :dontknow:

#13 rodomo

rodomo

    To advertise here, call 13TORANA

  • Members
  • PipPipPipPipPipPipPip
  • 17,999 posts
  • Name:R - O - B Dammit!
  • Location:Way out west of Melbourne Awstraylya
  • Joined: 10-December 05

Posted 08 February 2011 - 09:20 PM

I'm an exporter and work with a mate in Lilydale

:welcome: to the forum!
Is that your mate on Beresford Rd? :dontknow:

#14 dattoman

dattoman

    Do I feel lucky? Well, do ya, punk?

  • Administrators
  • PipPipPipPipPipPipPip
  • 16,471 posts
  • Name:Neil
  • Location:Perth Western Australia
  • Car:LX SS , 76 Cadillac , 3 x dattos
  • Joined: 04-February 07

Posted 08 February 2011 - 09:22 PM

I was asking more for others benefit
Brakes I can easily adapt :)

#15 _nicko61_

_nicko61_
  • Guests

Posted 08 February 2011 - 10:13 PM

  • cool car and i love the number plates


#16 _LS1 Hatch_

_LS1 Hatch_
  • Guests

Posted 09 February 2011 - 02:21 AM


I'm an exporter and work with a mate in Lilydale

:welcome: to the forum!
Is that your mate on Beresford Rd? :dontknow:


Yep...Nashville Motors..(and Mr. Lugnut which is his son)


What engine mounts and sump have you used

Oh and extractors ??


I thought you'd be more interested in the master cylinder? :dontknow:


Master cylinder? Is that an inside joke? :lol: (Oh, and it's from a 2000 Corvette actually)

Oh, and thanks everyone ! I am real happy with how it's been coming along so far...bit of trial and error of course but the end result is getting there.

#17 _LS1 Hatch_

_LS1 Hatch_
  • Guests

Posted 09 February 2011 - 02:24 AM

Oh, with the number plates...when I had my Charger, I had number plates AUSSIIE on one car and AUUSSIE on the other car...people would see me in one car or the other at different times and asked if I was switching plates back and forth until I pointed out the difference, ha ha.. (I still have the plates off the other car too)

I was thinking about going with TORANA for the hatch, since they are available here...just hadn't made up my mind to switch or not ?

#18 76lxhatch

76lxhatch

    That was easy!

  • Members
  • PipPipPipPipPipPipPip
  • 7,153 posts
  • Location:Unzud
  • Car:SS
  • Joined: 04-August 08
Garage View Garage

Posted 09 February 2011 - 07:01 AM

Out back, I fully boxed the lower arms with new bushes, used Edelbrock adjustable uppers (Chevelle ones)

Did the upper arms bolt straight in? To suit which year Chevelle?

#19 _LS1 Hatch_

_LS1 Hatch_
  • Guests

Posted 09 February 2011 - 07:35 AM

Yep, they went right in. The Chevelle arm was about 1/4" or 3/8" difference in length originally from memory, but since I used adjustable ones, it was piece of cake!

I can't remember off hand if I used early ('64 - 7) or the '68-on arms..there was a length difference in them... Have to look up what I bought and can let you know though!

Posted Image

Posted Image

#20 dattoman

dattoman

    Do I feel lucky? Well, do ya, punk?

  • Administrators
  • PipPipPipPipPipPipPip
  • 16,471 posts
  • Name:Neil
  • Location:Perth Western Australia
  • Car:LX SS , 76 Cadillac , 3 x dattos
  • Joined: 04-February 07

Posted 09 February 2011 - 09:36 AM

Same ones Welby and a few others here have used previously

#21 _LS1 Hatch_

_LS1 Hatch_
  • Guests

Posted 09 February 2011 - 10:49 AM

I didn't know about anyone using them before when I did. I just compared lengths to the few different GM's over here with control arm rear suspension and just went with what happened to be a real close match :)

#22 ls2lxhatch

ls2lxhatch

  • Members
  • PipPipPipPipPipPipPip
  • 5,332 posts
  • Location:Perth
  • Car:LX Hatch
  • Joined: 29-May 06

Posted 09 February 2011 - 10:59 AM

Welby (a9x) did have a set for sale if anyone is interested send him a pm. I suspect they will not fit if you have the Torana upper diff mounts on the BW78 or 9". Similar problem with the McDonald Bros arms.

Posted Image

Posted Image

Edited by ls2lxhatch, 09 February 2011 - 11:06 AM.


#23 _LS1 Hatch_

_LS1 Hatch_
  • Guests

Posted 09 February 2011 - 11:08 AM

Mine fit on the 9" fine though ?

Oh, I see now where they would have a clearance issue. The upper mounts on my diff housing went straight down in the front more so, so did not have that issue like you have shown..


Oh, and for those interested, here is my brake setup in the front.

Posted Image

And the caliper brackets I made..

Posted Image

Posted Image


Took a day to work out just the angle and spacing, but once I did it was pretty simple making the brackets.

Posted Image

Edited by LS1 Hatch, 09 February 2011 - 11:12 AM.


#24 _LS1 Hatch_

_LS1 Hatch_
  • Guests

Posted 09 February 2011 - 11:33 AM

Oh, and here is what I did with the center console.. Made my own trim piece and shift boot setup, and also you can see where I mounted the power window switched (they are billet aluminum done in black) and the door lock switch as well...

Just a few other little things I thought up to make it a little more unique I suppose. The T56 has a pretty short throw shift box on it, so don't need the large opening like it had with the original 4 speed, so that is why I made the little filler piece just ahead of the boot. Probably will put something onto it.. maybe get some cool little emblem made up with the 6 speed shift pattern ? (Going to run a different shift knob..think I will use a factory Hurst SS Camaro late model leather one, I really like the feel of them after having my SS Camaro)

Posted Image

Posted Image

#25 Litre8

Litre8

    Thrillseeker

  • Administrators
  • PipPipPipPipPip
  • 2,399 posts
  • Name:Howard
  • Location:Melbourne, Victoria
  • Car:1976 LX SLR8000
  • Joined: 05-February 07

Posted 09 February 2011 - 12:22 PM

That's a great project. Very well thought out and executed modifications.


0 user(s) are reading this topic

0 members, 0 guests, 0 anonymous users