
See if Craig W wants a set for his hatch build? He will be buying some anyway and may save him some feight?
Will be pulling my engine out tomorrow so may not have the time now. Will let you know if I do...

Tyre Biter's Hatchback - ETA unknown...
Started by
Tyre biter
, Jul 05 2011 11:43 PM
505 replies to this topic
#51

Redslur
-
- Members
-

- 3,536 posts
Has been Torana owner
- Name:Gerry
- Location:Canberra
- Car:HQ GTS Replica 350.
- Joined: 08-November 05
Posted 15 July 2011 - 12:29 PM
#52
Tyre biter
-
- Members
-
- 982 posts
Forum Fixture
- Name:Craig
- Location:Canberra
- Car:Should have gone with Palais...
- Joined: 08-December 10
Posted 15 July 2011 - 02:32 PM
I think the second set are spoken for mate - made to order for another fella is my understanding but by all means give Steve a bell.
Engine out time - finally...
You'd better get your wheels spinning mate, you only have two months until Toranafest!
Cheers, TB
Yeah, the $$$ goes very fast doesn't it!
No problems, happy to post some pics of the trims just as soon as I can.
Cheers, TB
Engine out time - finally...
You'd better get your wheels spinning mate, you only have two months until Toranafest!
Cheers, TB
Thanks TB im putting my order in, o boy i love spending money more o/t for this little black ducky next week, put a photo up for us so we can drool

Yeah, the $$$ goes very fast doesn't it!
No problems, happy to post some pics of the trims just as soon as I can.
Cheers, TB
#53
Tyre biter
-
- Members
-
- 982 posts
Forum Fixture
- Name:Craig
- Location:Canberra
- Car:Should have gone with Palais...
- Joined: 08-December 10
Posted 15 July 2011 - 08:26 PM
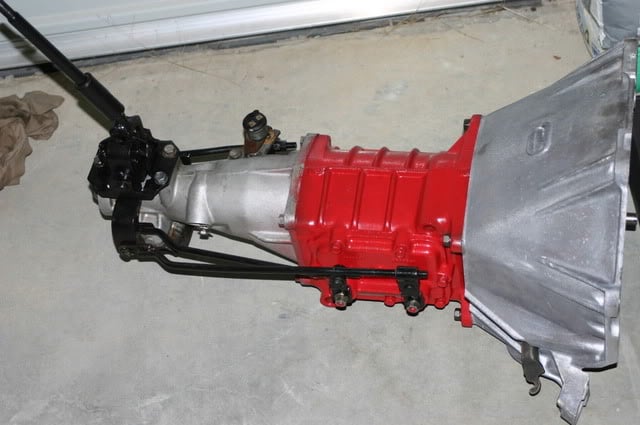
So here is what the fuss was about; One M21 gearbox with upgraded internals reportedly good for 200rwkw/270 odd rwhp;
Internals include (from Australian 4 Speed Specialists);
"...we use a 21 mm lay shaft instead of the standard 16 mm lay shaft we use the same lay shaft and roller pack from the Ford top loader gear box. First we bore the cluster, then we bore the case, we also use a specially developed spiral main shaft which acts like a pump inside first gear and it continuously lubricates first gear which is a major ware factor in these boxes we also increase the thickness of the cir-clip that holds the hub and sleeve which is a common problem in these boxes as the clip is too thin and flexes when you chirp second gear or drive it a little harder than normal, it eventually snaps in the middle of the clip releasing the hub free and the box blows up...we also use a special hi capacity double sealed bearings as used in the L300 4wd vehicles - it has a rev range of 9400 revs a much more heavy duty and reliable bearing."
Also' for you sting - a pic of a front seat (back) trim from Cools in Code 18V: Slate Black;
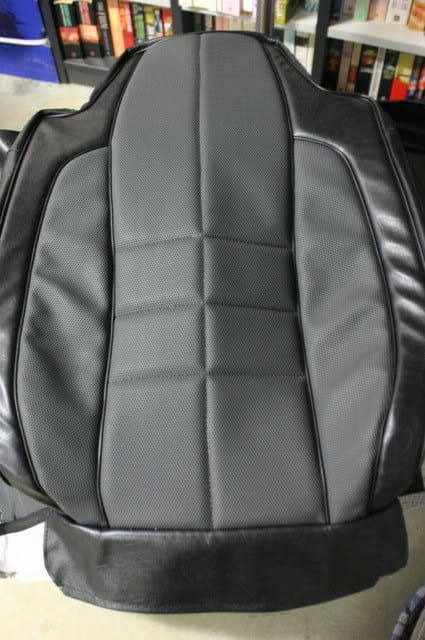
I've not opened the door trims from their packaging but I have seen other one's at Cools - just beautiful. The chrome piping is 'frequency welded' just like the genuine stuff was, and the backing board is specially ordered 2.6mm thick masonite type particleboard as opposed the ubiquitous 3mm board, thereby ensuring its originality and the OEM clips properly retain it to the doors.
Cheers, TB
Internals include (from Australian 4 Speed Specialists);
"...we use a 21 mm lay shaft instead of the standard 16 mm lay shaft we use the same lay shaft and roller pack from the Ford top loader gear box. First we bore the cluster, then we bore the case, we also use a specially developed spiral main shaft which acts like a pump inside first gear and it continuously lubricates first gear which is a major ware factor in these boxes we also increase the thickness of the cir-clip that holds the hub and sleeve which is a common problem in these boxes as the clip is too thin and flexes when you chirp second gear or drive it a little harder than normal, it eventually snaps in the middle of the clip releasing the hub free and the box blows up...we also use a special hi capacity double sealed bearings as used in the L300 4wd vehicles - it has a rev range of 9400 revs a much more heavy duty and reliable bearing."
Also' for you sting - a pic of a front seat (back) trim from Cools in Code 18V: Slate Black;
I've not opened the door trims from their packaging but I have seen other one's at Cools - just beautiful. The chrome piping is 'frequency welded' just like the genuine stuff was, and the backing board is specially ordered 2.6mm thick masonite type particleboard as opposed the ubiquitous 3mm board, thereby ensuring its originality and the OEM clips properly retain it to the doors.
Cheers, TB
#54
bluea9x
-
- Members
-
- 437 posts
Forum Fan
- Name:King Loz
- Location:Queanbeyan NSW
- Car:1976 L31 SS
- Joined: 08-November 05
Posted 15 July 2011 - 09:56 PM
Slow down Max or you well have it for toranafest this year 
#55
Tyre biter
-
- Members
-
- 982 posts
Forum Fixture
- Name:Craig
- Location:Canberra
- Car:Should have gone with Palais...
- Joined: 08-December 10
Posted 18 July 2011 - 11:11 PM
Update: Back into it today.
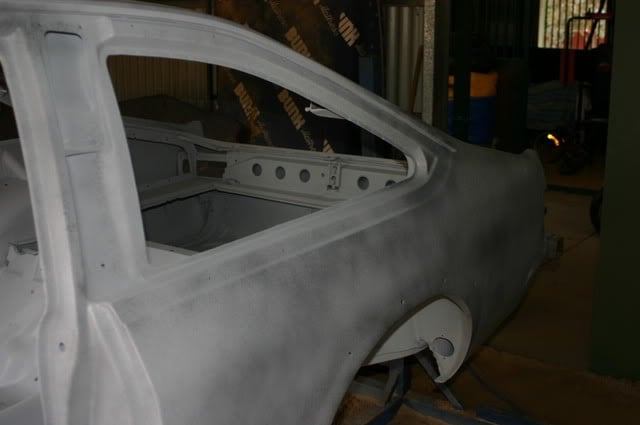
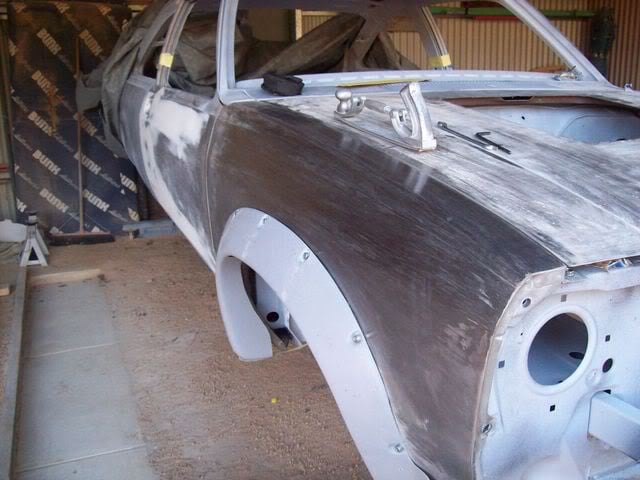
Right rear quarter and beaver in primer and guide coat ready for speed filing. The panel gaps for both doors and the hatch are (now) fantastic and both doors sit just right it terms of the creases lining up;
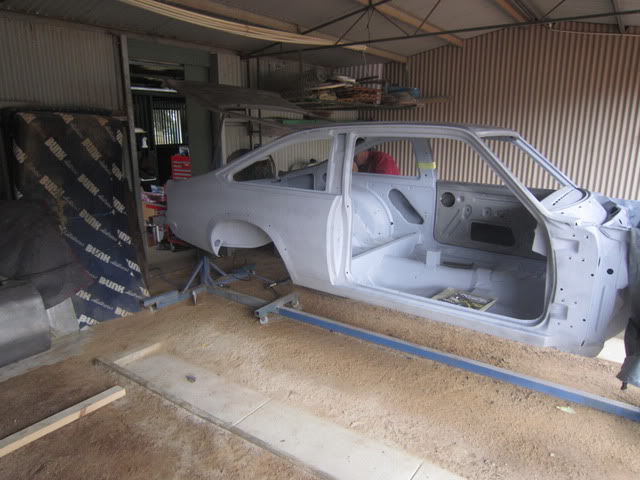
Very happy with the fit on the tail light - still need to work on the lower part of the beaver but that will have to wait until it is off the rotisserie;

Prep on left side has started including the tail light - hope to have the entire apron/beaver and left rear quarter into primer by downing of tools tomorrow (Tuesday) - see how we go...
Also fitted new pins and bushes to the door hinges - a job made so much easier when profiting from others experience with the replacement hinge kits regarding enlarging holes and thinning the lip of the brass replacement bushes a tad.
Cheers, TB
Right rear quarter and beaver in primer and guide coat ready for speed filing. The panel gaps for both doors and the hatch are (now) fantastic and both doors sit just right it terms of the creases lining up;
Very happy with the fit on the tail light - still need to work on the lower part of the beaver but that will have to wait until it is off the rotisserie;
Prep on left side has started including the tail light - hope to have the entire apron/beaver and left rear quarter into primer by downing of tools tomorrow (Tuesday) - see how we go...
Also fitted new pins and bushes to the door hinges - a job made so much easier when profiting from others experience with the replacement hinge kits regarding enlarging holes and thinning the lip of the brass replacement bushes a tad.
Cheers, TB
#56
_nial8r_
_nial8r_
-

- Guests
Posted 19 July 2011 - 07:59 AM
well done Craig its comeing along in leaps and bounds now 
#57
Tyre biter
-
- Members
-
- 982 posts
Forum Fixture
- Name:Craig
- Location:Canberra
- Car:Should have gone with Palais...
- Joined: 08-December 10
Posted 20 July 2011 - 12:29 PM
Thanks Lee.
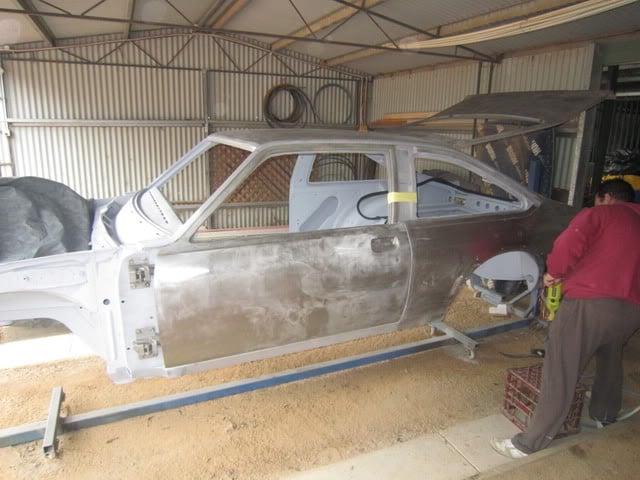
Didn't get the left rear quarter into primer yesterday - will be today (Wednesday).
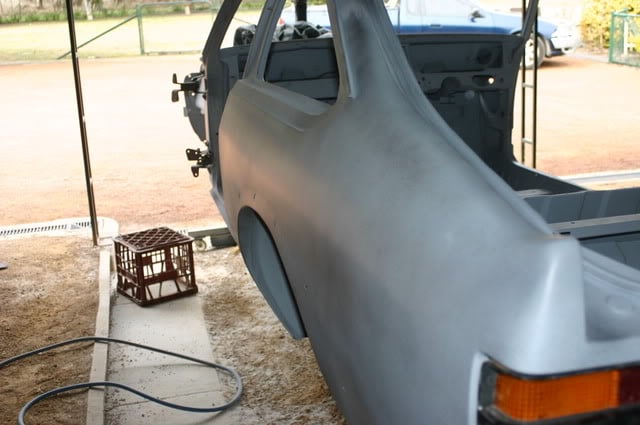
But we did get the tail-lights finished and quarter beaten a little more in places and then filled where required - it lines up fantastic with the tail-light, door and hatch now, and the gaps are terrific!
Also did a lot of work filling the joins in the door apertures to make it smooth as we did with the driver's door aperture.
Here is where I left it yesterday afternoon;
Cheers, TB
Didn't get the left rear quarter into primer yesterday - will be today (Wednesday).
But we did get the tail-lights finished and quarter beaten a little more in places and then filled where required - it lines up fantastic with the tail-light, door and hatch now, and the gaps are terrific!
Also did a lot of work filling the joins in the door apertures to make it smooth as we did with the driver's door aperture.
Here is where I left it yesterday afternoon;
Cheers, TB
Edited by Tyre biter, 20 July 2011 - 12:33 PM.
#58
_berro59_
_berro59_
-
- Guests
Posted 20 July 2011 - 11:30 PM
lights came out great!
Good work. Its these little things that make a car impressive.
Good work. Its these little things that make a car impressive.
#59
Tyre biter
-
- Members
-
- 982 posts
Forum Fixture
- Name:Craig
- Location:Canberra
- Car:Should have gone with Palais...
- Joined: 08-December 10
Posted 24 July 2011 - 06:33 PM
Thanks Berro,
Well the left side is now in primer as is the roof!
The inside of the hatch is also in primer.
Had a wee problem with the inside of the doors - the primer reacted badly after the metal was dressed in deoxidine (sp?) and now need to take it all off to remedy.
Onwards we go...
Cheers, TB
Well the left side is now in primer as is the roof!
The inside of the hatch is also in primer.
Had a wee problem with the inside of the doors - the primer reacted badly after the metal was dressed in deoxidine (sp?) and now need to take it all off to remedy.
Onwards we go...
Cheers, TB
#61
_sting_
_sting_
-
- Guests
Posted 27 July 2011 - 11:00 PM
Dam man you are kicking ass it looks good ,thanks for the photo off the trim ,i bet your head is spinning and you would be like a kid in a lolley shop at the moment.keep it up at this pace you will have it ready soon.
cheers sting
cheers sting
#62
Tyre biter
-
- Members
-
- 982 posts
Forum Fixture
- Name:Craig
- Location:Canberra
- Car:Should have gone with Palais...
- Joined: 08-December 10
Posted 31 July 2011 - 08:57 PM
Thanks guys,
Update time:
Roof is in primer and guide coat, as is the pass door.
Pass fender is on and filed - looking bloody great - all of it - starting to look like a Torana
Mock fitted the flairs to see how it looked - I love it!
But having trouble with the front flair and how it mates to the spoiler. Simply the two don't match up in length from the wheel arch to the first kink and therefore fit it out.
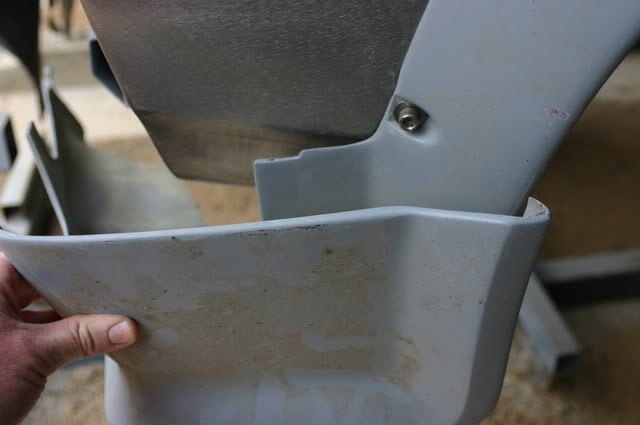
See, the spoiler seems to want to fit around the flair but the length to the first kink is too short to do so!
Thinking I will need to trim the spoiler off at this kink before fitting it behind the flair's forward extension?
A) Is this normal,
 Has anyone suffered this before and if so,
C) What have you done to fix it (am I going about it the right way or should I be going about remedying it differently)?
Cheers, TB
Update time:
Roof is in primer and guide coat, as is the pass door.
Pass fender is on and filed - looking bloody great - all of it - starting to look like a Torana
Mock fitted the flairs to see how it looked - I love it!
But having trouble with the front flair and how it mates to the spoiler. Simply the two don't match up in length from the wheel arch to the first kink and therefore fit it out.
See, the spoiler seems to want to fit around the flair but the length to the first kink is too short to do so!
Thinking I will need to trim the spoiler off at this kink before fitting it behind the flair's forward extension?
A) Is this normal,
Has anyone suffered this before and if so,C) What have you done to fix it (am I going about it the right way or should I be going about remedying it differently)?
Cheers, TB
#63
_Yella SLuR_
_Yella SLuR_
-
- Guests
Posted 31 July 2011 - 09:27 PM
That bit off the front spoiler to the right (near the flare) needs to be cut off. A bolt top and bottom then go through the flare and front spoiler. I have a cut one here if you need a look, or alternatively I can meet somewhere and you can look at Yella.
The bit to the right only stays on if you are going flareless.
The bit to the right only stays on if you are going flareless.
Edited by Yella SLuR, 31 July 2011 - 09:28 PM.
#64
Tyre biter
-
- Members
-
- 982 posts
Forum Fixture
- Name:Craig
- Location:Canberra
- Car:Should have gone with Palais...
- Joined: 08-December 10
Posted 31 July 2011 - 09:50 PM
Ah, that makes sense now - thank you.
Tell me, which part overlaps the other - ie: does the flair's extension sit on top of the cut down spoiler, or alternatively (as I suspect) does the cut-down spoiler part sit over the flair's extension?
Thanks again for the advice.
Cheers, TB
Tell me, which part overlaps the other - ie: does the flair's extension sit on top of the cut down spoiler, or alternatively (as I suspect) does the cut-down spoiler part sit over the flair's extension?
Thanks again for the advice.
Cheers, TB
#65
Mort
 View Garage
-

- Members
-
- 2,760 posts
Lotsa Posts!
- Name:Mort
- Location:Moranbah, QLD.
- Car:74 LH SL/R 4.2, 75 LH 4 door 186
- Joined: 16-December 07
View Garage
Posted 31 July 2011 - 10:05 PM
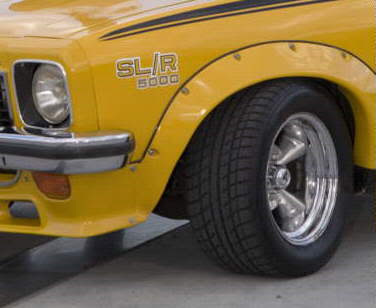
Craig, from looking at and reading others posts and pics you have to cut the ends off so the spoiler overlaps the front of the flare and attach with screws/allan bolts.
The spoiler you have is, i think for the SL/R without flares and is suppose to follow the flare on the guard.
spoiler with flares

without flares

The spoiler you have is, i think for the SL/R without flares and is suppose to follow the flare on the guard.
spoiler with flares
without flares
#66
Tyre biter
-
- Members
-
- 982 posts
Forum Fixture
- Name:Craig
- Location:Canberra
- Car:Should have gone with Palais...
- Joined: 08-December 10
Posted 01 August 2011 - 02:41 PM
Mort - that is very kind of you - thank you.
Cheers, TB
Cheers, TB
Edited by Tyre biter, 01 August 2011 - 02:41 PM.
#67
Tyre biter
-
- Members
-
- 982 posts
Forum Fixture
- Name:Craig
- Location:Canberra
- Car:Should have gone with Palais...
- Joined: 08-December 10
Posted 01 August 2011 - 10:23 PM
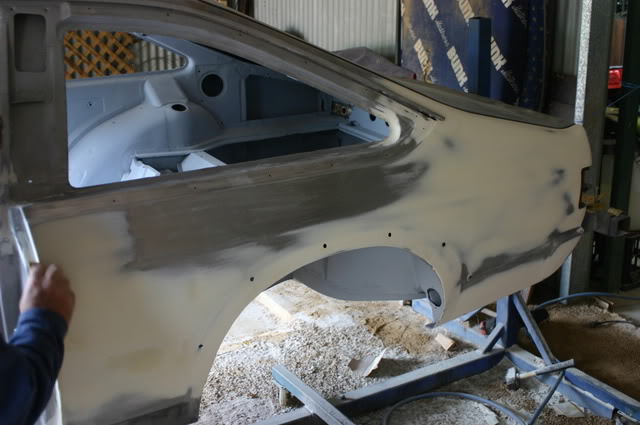
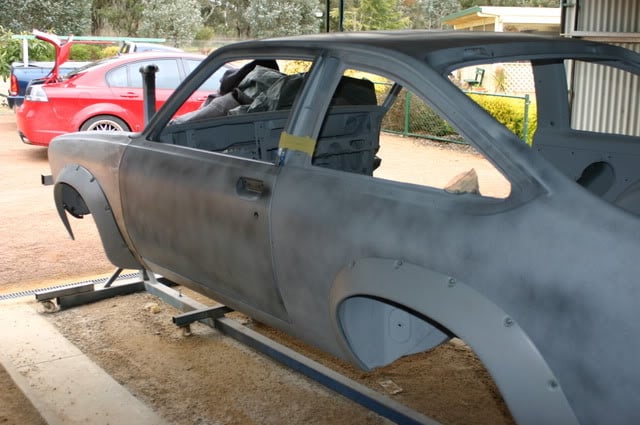
Update: It is looking bloody fantastic!
Left side in primer and ready for speed filing;
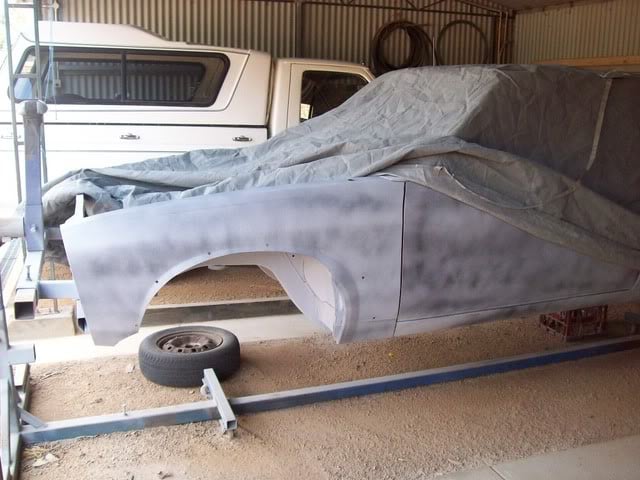
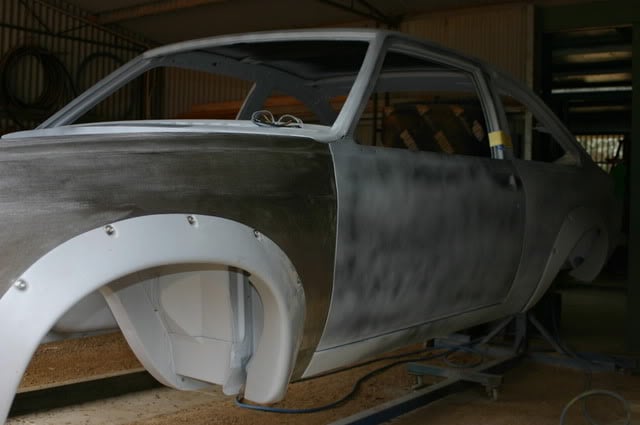
Right side - door and front guard on, filed and filled. Bonnet also in place ready prep for primer has started.
Cheers, TB
Left side in primer and ready for speed filing;
Right side - door and front guard on, filed and filled. Bonnet also in place ready prep for primer has started.
Cheers, TB
Edited by Tyre biter, 01 August 2011 - 10:26 PM.
#68
Redslur
-
- Members
-
- 3,536 posts
Has been Torana owner
- Name:Gerry
- Location:Canberra
- Car:HQ GTS Replica 350.
- Joined: 08-November 05
Posted 02 August 2011 - 12:13 PM
Gees mate you'll have it out on club cruises soon....Will make a nice edition to the family when it is all done!
#69
_LX6LTR_
_LX6LTR_
-
- Guests
Posted 02 August 2011 - 06:19 PM
About time you did something,it's been over a week.
#70
Tyre biter
-
- Members
-
- 982 posts
Forum Fixture
- Name:Craig
- Location:Canberra
- Car:Should have gone with Palais...
- Joined: 08-December 10
Posted 02 August 2011 - 07:24 PM
With friends like you two cultural philistines...
Glad you dropped in and hope you approve.
Cheers, TB
Glad you dropped in and hope you approve.
Cheers, TB
#71
_Liam_
_Liam_
-
- Guests
Posted 02 August 2011 - 08:46 PM
This may be a dumb question but the speed file you are using is the sandpaper type?
Looks good mate.
Looks good mate.
#72
myss427
View Garage
-

- Members
-
- 1,636 posts
Forum Fixture
- Location:Canberra
- Car:427 hatch, CV8 Monaro, Ve SSV ute. Was part owner A9X sedan until he sold it without telling me!
- Joined: 17-November 05
View Garage
Posted 02 August 2011 - 08:52 PM
If you look close, the file on the top of the guard is a steel bladed one. Too narrow and no where to attach paper too.
#73
_Liam_
_Liam_
-
- Guests
Posted 02 August 2011 - 09:03 PM
Cheers mate, so that would remove metal as well then. What is it used for?
Sorry Tyre Biter...

Sorry Tyre Biter...
#74
_Yella SLuR_
_Yella SLuR_
-
- Guests
Posted 02 August 2011 - 09:54 PM
Nice file work.
There is just the one type of front spoiler. For plain guards you leave the ends on, for flares the ends come (get cut) off. Good pic up there, I've never checked if they are over or under!!! See what works best, but I do believe that the spoilers ends go over the flare as pictured, seems more aerodynamic that way, unless of course you drive backwards fast.
I'd be cutting the front spoiler so it fills that relief bit in the top of the flare, about 1" overlap.
Edited by Yella SLuR, 02 August 2011 - 09:55 PM.
#75
_Yella SLuR_
_Yella SLuR_
-
- Guests
Posted 02 August 2011 - 10:16 PM
That pic got me curious as to what my rubber piping bits do. Here's Yella's non-gammy side.
Looks like there is no science as to where you put your fixings when comparing to the photo above!!
Looks like there is no science as to where you put your fixings when comparing to the photo above!!
Edited by Yella SLuR, 02 August 2011 - 10:18 PM.


1 user(s) are reading this topic
0 members, 1 guests, 0 anonymous users

