
I've only got a black bonnet & it's a pain in the arse. Gotto polish it every time you wash the car, look at it wrong & it gets a scratch. I wanted a black car also, pretty happy that I got talked out of it now.


Swarbs LX 5000
Started by
Swarbs
, Nov 15 2011 06:01 PM
70 replies to this topic
#26

lx308
-

- Members
-

- 2,843 posts
Lotsa Posts!
- Name:Tony
- Location:Australind
- Car:Nuffin. Goin touring.
- Joined: 25-March 07
Posted 19 November 2011 - 07:49 PM
#27
Mort
 View Garage
-

- Members
-
- 2,760 posts
Lotsa Posts!
- Name:Mort
- Location:Moranbah, QLD.
- Car:74 LH SL/R 4.2, 75 LH 4 door 186
- Joined: 16-December 07
View Garage
Posted 19 November 2011 - 11:27 PM
I've had my black car (a 05 Toyota Prado) got it out of my system now i'm over it, as said it needs constant washing and polishing, and every time you look at it another scratch appears.
Don't get me wrong i would have another black car in a heartbeat if i had the opportunity only it would not be a daily driver and would be sheded whenever it wasn't used.
PM sent Dave, hope the pic helps as i was the only one i could find .
Don't get me wrong i would have another black car in a heartbeat if i had the opportunity only it would not be a daily driver and would be sheded whenever it wasn't used.
PM sent Dave, hope the pic helps as i was the only one i could find .
Edited by Mort, 19 November 2011 - 11:27 PM.
#28
Swarbs
-
- Members
-
- 1,671 posts
Forum Fixture
- Name:Dave
- Location:North West WA
- Car:LX 5000
- Joined: 18-April 07
Posted 20 November 2011 - 12:46 AM
Yep got it Mort - thanks for that
Dr Fegg welcolme back -- hope all is going well over there for you and the family
a9x868 - cheers
Black it is guys and it is going to be a right bast**d i know
Dr Fegg welcolme back -- hope all is going well over there for you and the family
a9x868 - cheers
Black it is guys and it is going to be a right bast**d i know
#29
_DrFegg_
_DrFegg_
-

- Guests
Posted 20 November 2011 - 01:33 PM
Thanks for the kind words swarbs. We are all well here, but I miss OZ, my mates, my car and james squires golden ale!!!!!!!!!
#30
Swarbs
-
- Members
-
- 1,671 posts
Forum Fixture
- Name:Dave
- Location:North West WA
- Car:LX 5000
- Joined: 18-April 07
Posted 01 December 2011 - 12:17 AM
Aaallrightee
Another week at it and made some progress
Forgot the bloody camera for the first part of it in the shed but had the gear and steel organised for the rotisserie all in roughly the lengths and sizes i needed
The car had to be moved back into town for blasting so the biggest problem was loading it onto a trailer while it was on the rotisserie
Also struck another problem i hadnt thought of that the thing would be too long for the trailer once i got it built
A sit down after a few measurements and a brain jarring cold beer i came up with the solution
Anyway pics start back in town and had already started blasting
Bought some plastic bead media and had it brought up from Perth
First pic is of the end of day 3 after 2 days of getting the rotisserie right and yes there was a few beers involved
You can see how i got round the problem of the trailer length by undercutting the rear support stand
The main cross brace sat just on the edge of the rear of the trailer and left about a metre overhang

The front support is pretty standard but built closer to the car than i would have liked but being restriced for room basically had no choice
You can see i got round the problem of getting it onto the trailer by putting a "drawbar" between the front and rear stands
Simply welded a shackle onto the base and once the pins are put into both swivel joints -- it makes it all rigid as the car becomes part of it and pull it on with the winch

Thanks to the fella's with their input on ballance lines
I made it and after 1 small adjustment to the height it was spot on - turns with one hand
After 1 afternoon (Sat) in 38 or 39 dgrees inside a blast helmet i got this far with sill just a couple of bits left to do on the underside
You can see a better layout of the wizzy thing in this photo
BTW the underside was done with garnet and before i hear eyebrows raised in horror the unit is not a big one and we had it backed off so it was just taking things off nicely - the guy that set it up for me knew exactly what i wanted

Anyway wrapped up for the night in some shade cloth to try and keep the moisture off and with no chance of rain for the next 20 years i had no drama there

Sunday dawned to be a doozy and i think we hit the 41 odd degree's - it was not fun
Finished off the underside and started on the body work / boot inside / interior with the Beads of course

Pushed through till about 5 ish and pretty well ended up with just the engine bay left to do the following morning

Final day at the yard and done the engine bay and spent an hour or so just going round the car giving it a final whip
Another hour and a bit with the compressor blowing all the crap out of everywhere
Got out of the yard round two and back the the shed of pain whith its icey cold beer
Left the roof and quarters for the sander
Upenattem next morning for the grand final of the paint removal and ended up with this sometime after lunch


Good cleanout of the shed with the garden blower to remove as much of the dust as possible
Hit the car with it as well and then the shed again
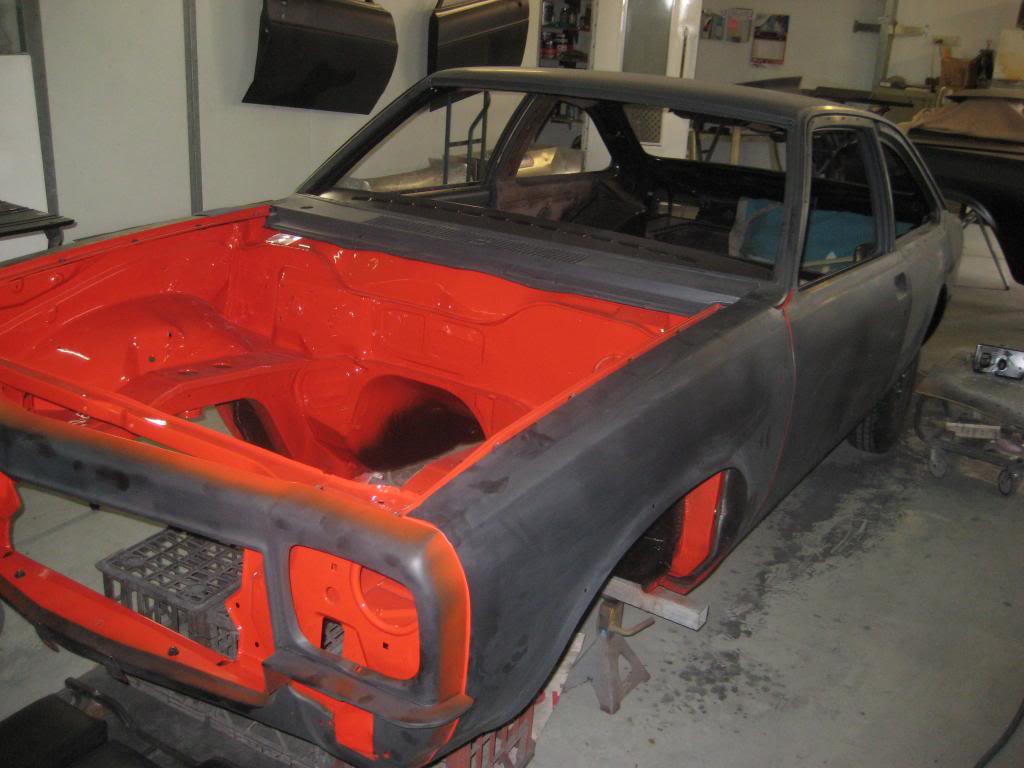
Prepped the steelwork and hit it with a 2 pack etch primer
Give that time to dry
Then hit the underside with POR15
Ended the day looking like this


didnt get a shot of the underside (thought i did)
At the end of it all the car is in not as good a shape as i hoped
Repairs had been done a long time ago very substandard by a bloke with a tin of bog under 1 arm - just bash that bit of rust in and throw bog in it
The hit it has had in the front end will need looking at and it has been driven over something which probably was done at the same time. so the floorpan needs a bit of tlc
The primer and POR15 is just for protection till i take stock of exactly what needs to be done
Took some shots and will update later
Cheers
Another week at it and made some progress
Forgot the bloody camera for the first part of it in the shed but had the gear and steel organised for the rotisserie all in roughly the lengths and sizes i needed
The car had to be moved back into town for blasting so the biggest problem was loading it onto a trailer while it was on the rotisserie
Also struck another problem i hadnt thought of that the thing would be too long for the trailer once i got it built
A sit down after a few measurements and a brain jarring cold beer i came up with the solution
Anyway pics start back in town and had already started blasting
Bought some plastic bead media and had it brought up from Perth
First pic is of the end of day 3 after 2 days of getting the rotisserie right and yes there was a few beers involved
You can see how i got round the problem of the trailer length by undercutting the rear support stand
The main cross brace sat just on the edge of the rear of the trailer and left about a metre overhang
The front support is pretty standard but built closer to the car than i would have liked but being restriced for room basically had no choice
You can see i got round the problem of getting it onto the trailer by putting a "drawbar" between the front and rear stands
Simply welded a shackle onto the base and once the pins are put into both swivel joints -- it makes it all rigid as the car becomes part of it and pull it on with the winch
Thanks to the fella's with their input on ballance lines
I made it and after 1 small adjustment to the height it was spot on - turns with one hand
After 1 afternoon (Sat) in 38 or 39 dgrees inside a blast helmet i got this far with sill just a couple of bits left to do on the underside
You can see a better layout of the wizzy thing in this photo
BTW the underside was done with garnet and before i hear eyebrows raised in horror the unit is not a big one and we had it backed off so it was just taking things off nicely - the guy that set it up for me knew exactly what i wanted
Anyway wrapped up for the night in some shade cloth to try and keep the moisture off and with no chance of rain for the next 20 years i had no drama there
Sunday dawned to be a doozy and i think we hit the 41 odd degree's - it was not fun
Finished off the underside and started on the body work / boot inside / interior with the Beads of course
Pushed through till about 5 ish and pretty well ended up with just the engine bay left to do the following morning
Final day at the yard and done the engine bay and spent an hour or so just going round the car giving it a final whip
Another hour and a bit with the compressor blowing all the crap out of everywhere
Got out of the yard round two and back the the shed of pain whith its icey cold beer
Left the roof and quarters for the sander
Upenattem next morning for the grand final of the paint removal and ended up with this sometime after lunch
Good cleanout of the shed with the garden blower to remove as much of the dust as possible
Hit the car with it as well and then the shed again
Prepped the steelwork and hit it with a 2 pack etch primer
Give that time to dry
Then hit the underside with POR15
Ended the day looking like this
didnt get a shot of the underside (thought i did)
At the end of it all the car is in not as good a shape as i hoped
Repairs had been done a long time ago very substandard by a bloke with a tin of bog under 1 arm - just bash that bit of rust in and throw bog in it
The hit it has had in the front end will need looking at and it has been driven over something which probably was done at the same time. so the floorpan needs a bit of tlc
The primer and POR15 is just for protection till i take stock of exactly what needs to be done
Took some shots and will update later
Cheers
#31
fatslr
View Garage
-
- Members
-
- 1,247 posts
Forum Fixture
- Name:Garth
- Location:Dunsborough W.A.
- Joined: 17-July 07
View Garage
Posted 01 December 2011 - 10:00 PM
Good work Swarbs your making me thirsty just reading your thread - like i need an excuse
No secrets left with the old girl now good to see you went hard on the weekend.
Any luck with finding a painter?
Garth
No secrets left with the old girl now good to see you went hard on the weekend.
Any luck with finding a painter?
Garth
#32
Swarbs
-
- Members
-
- 1,671 posts
Forum Fixture
- Name:Dave
- Location:North West WA
- Car:LX 5000
- Joined: 18-April 07
Posted 02 December 2011 - 09:37 AM
Nah no joy up here - looks like she is in for the big haul down south
Also this is the last night of the nightshift coming up so my week of bits and pieces has gone out the door - job came in early
Need to get prepped up for the break at home in case we get a blow while away as well
So will head back out the shed and have a good tidy up and take stock of what is needed so i can get it organised while i'm down there
What cuts off the other car etc etc
#33
_tuxedo slr_
_tuxedo slr_
-
- Guests
Posted 02 December 2011 - 12:10 PM
looking good swarbs !! How much bead/garnet did u use ?
#34
Swarbs
-
- Members
-
- 1,671 posts
Forum Fixture
- Name:Dave
- Location:North West WA
- Car:LX 5000
- Joined: 18-April 07
Posted 02 December 2011 - 05:20 PM
G'day Phill
Worked out to be 14 bags of garnet and 7 bags of beads - all 25 kg
When i spoke to the rep that i bought the beads of he said i would need round half a tonne
Me in my disbelieving ways thought "yeah right" .... so i stand chastened
If you could save and reuse the stuff big savings could be made
Garnet was free though
#35
_tuxedo slr_
_tuxedo slr_
-
- Guests
Posted 06 December 2011 - 04:12 PM
WOW thats alot more than I thought ! I will try and save it when I do mine.
#36
Swarbs
-
- Members
-
- 1,671 posts
Forum Fixture
- Name:Dave
- Location:North West WA
- Car:LX 5000
- Joined: 18-April 07
Posted 07 December 2011 - 11:33 AM
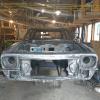
Doing the rounds of the car so i can come up with a game plan have found these are the area's needing attention
As i said the bloody bog merchant had done a good job of consealing the rusted areas
Starting from rear will need a new beaver panel and both lower side rear quarters - bumper mounting points had been banged in and bogged
Most of this i can get off the donor car i bought last year - but will be getting a few replacement pieces
Tail lights


Boot floor which i thought wasn't too bad turns out needs work


The scarey part -- rear window


"B" Pillar bases


Floor pan - bit of rust and also has been banged in a bit at some stage due to some off road use i presume


Plenum after the fibreglass has been removed

As i said the bloody bog merchant had done a good job of consealing the rusted areas
Starting from rear will need a new beaver panel and both lower side rear quarters - bumper mounting points had been banged in and bogged
Most of this i can get off the donor car i bought last year - but will be getting a few replacement pieces
Tail lights
Boot floor which i thought wasn't too bad turns out needs work
The scarey part -- rear window
"B" Pillar bases
Floor pan - bit of rust and also has been banged in a bit at some stage due to some off road use i presume
Plenum after the fibreglass has been removed
#37
Swarbs
-
- Members
-
- 1,671 posts
Forum Fixture
- Name:Dave
- Location:North West WA
- Car:LX 5000
- Joined: 18-April 07
Posted 07 December 2011 - 11:44 AM
LHS bonnet hinge mount - RHS is fine

Front window

Couple of bits RHS firewall top

RHS "A" pillar bottom

And of course the boxed section on the radiator support panel
So all in all i suppose not toooo bad and all fixable
Have a bit of work to do on the chassis underneath due to the off road work but just a tidy up
Front window
Couple of bits RHS firewall top
RHS "A" pillar bottom
And of course the boxed section on the radiator support panel
So all in all i suppose not toooo bad and all fixable
Have a bit of work to do on the chassis underneath due to the off road work but just a tidy up
#38
Swarbs
-
- Members
-
- 1,671 posts
Forum Fixture
- Name:Dave
- Location:North West WA
- Car:LX 5000
- Joined: 18-April 07
Posted 07 December 2011 - 03:58 PM
So i have picked up a full beaver panel
The two lower quarters
And the repair panel for the lower radiator support box section
Should have them pretty soon after Xmas
Then the fun can start along with the above
The two lower quarters
And the repair panel for the lower radiator support box section
Should have them pretty soon after Xmas
Then the fun can start along with the above
#39
_Liam_
_Liam_
-
- Guests
Posted 09 December 2011 - 06:22 PM
I may sound like an idiot but, if you are going to change where the bonnet hinge mounts to on one side, you may as well change the other one because it may not have broken through yet, but there is almost a 95% chance it has started in between the backing plate and the bay...
How was the plenum chamber up under the firewall lip in the centre? Mine was all rusted out there.
Pretty good base to start from however, at least most of those are repair sections.
You are ripping into it though good work mate.
Who did you end up going for you repair sections mate?
How was the plenum chamber up under the firewall lip in the centre? Mine was all rusted out there.
Pretty good base to start from however, at least most of those are repair sections.
You are ripping into it though good work mate.
Who did you end up going for you repair sections mate?
#40
Redslur
-
- Members
-
- 3,536 posts
Has been Torana owner
- Name:Gerry
- Location:Canberra
- Car:HQ GTS Replica 350.
- Joined: 08-November 05
Posted 09 December 2011 - 06:58 PM
Wow, you certainly have your work cut out for you. At least now you know what you are faced with. Good luck!
#41
Swarbs
-
- Members
-
- 1,671 posts
Forum Fixture
- Name:Dave
- Location:North West WA
- Car:LX 5000
- Joined: 18-April 07
Posted 11 December 2011 - 12:49 PM
Gday Liam
It would be no trouble to cut a rectangular piece out from the other side and if all is good just weld it back in again or replace if need be so yes good thinking and i will check
Whole plenum chamber was good apart from the section where the right angle plastic box goes in - floor and wherever i can get to will be getting a good dose of POR15 after the repair
Repair panels are coming from Retro Rods in Queensland - they are trying to get the bits away before x-mas for me
Bit of discussion here if you are interested http://www.gmh-toran...-repair-panels/
Hi Gerry
That is why i wasn't too worried about using garnet - i actually wanted to expose the problem area's
Am also looking forward to the repairs
Cheers
#42
Swarbs
-
- Members
-
- 1,671 posts
Forum Fixture
- Name:Dave
- Location:North West WA
- Car:LX 5000
- Joined: 18-April 07
Posted 24 January 2012 - 05:17 PM
Looong haul down south - one of those trips where the wind seems to be blowing against you all the way
Left Karratha at 12pm and didn't get in to Geraldton until nearly 3am but a mate had some revival rum waiting for me
Again i forgot the camera as i was going to take a shot of the big nothing on the way
Got to Cols (owns fatslr) and set up camp
He happened to have some old patio framing kicking round so after a few beers we came up with this

As it was i think it only rained once but at least it didn't get wet
Sad part
Had 3 proper panel beaters look at it while i was there due to the chassis damage and windows being a bit beyond me
There was much tut tutting and head shaking but the general consensus between all 3 was bigger than ben hur
This sort of stopped me in my tracks as i didn't think it all that bad but after talking to them they made me realiise what ii was up against - jigs and rail replacement etc plus stop and look at the rear windows alone
Kind of repairs i realy dont have the time or place or expertise to do (properly)
Negotiated some prices and consulted she who controls matters in finance and internal house colours
Some kind words on my behalf were spoken by col (she is his sister in law) and it was agreed i could have the funds to do the repairs
We did look at scrapping it at one stage and would have had it been not what it is
A sea container was bought and the car put into storage until the repairer is available to make a start

Luckily in Cols toybox down the back is a 20 tonne Franna which we used in the hootchie assembly and also loaded the car and rotiss into the container with
Meanwhile
Have recieved the Super T10 and associated parts from Joe (Unclefesta) - Great bloke to work with and went out of his way to make sure i got what i wanted and needed
Thanks Joe
Datto has come through with the front end bits and pieces and picked them up from him while down there
Cheers Neil
So plan is to do the front end up with all the gear i collected while down there
Recon the engine
Fit the T10 up
And basicly get all that prepped up to fit to the car - complete with exhaust
Do the same to the diff
Continue with the gathering and prep of all else required
Left Karratha at 12pm and didn't get in to Geraldton until nearly 3am but a mate had some revival rum waiting for me
Again i forgot the camera as i was going to take a shot of the big nothing on the way
Got to Cols (owns fatslr) and set up camp
He happened to have some old patio framing kicking round so after a few beers we came up with this
As it was i think it only rained once but at least it didn't get wet
Sad part
Had 3 proper panel beaters look at it while i was there due to the chassis damage and windows being a bit beyond me
There was much tut tutting and head shaking but the general consensus between all 3 was bigger than ben hur
This sort of stopped me in my tracks as i didn't think it all that bad but after talking to them they made me realiise what ii was up against - jigs and rail replacement etc plus stop and look at the rear windows alone
Kind of repairs i realy dont have the time or place or expertise to do (properly)
Negotiated some prices and consulted she who controls matters in finance and internal house colours
Some kind words on my behalf were spoken by col (she is his sister in law) and it was agreed i could have the funds to do the repairs
We did look at scrapping it at one stage and would have had it been not what it is
A sea container was bought and the car put into storage until the repairer is available to make a start
Luckily in Cols toybox down the back is a 20 tonne Franna which we used in the hootchie assembly and also loaded the car and rotiss into the container with
Meanwhile
Have recieved the Super T10 and associated parts from Joe (Unclefesta) - Great bloke to work with and went out of his way to make sure i got what i wanted and needed
Thanks Joe
Datto has come through with the front end bits and pieces and picked them up from him while down there
Cheers Neil
So plan is to do the front end up with all the gear i collected while down there
Recon the engine
Fit the T10 up
And basicly get all that prepped up to fit to the car - complete with exhaust
Do the same to the diff
Continue with the gathering and prep of all else required
#43
kudu
-
- Members
-
- 1,466 posts
Forum Fixture
- Location:Wanganui - New Zealand
- Car:LH SL/R 5000
- Joined: 08-November 05
Posted 24 January 2012 - 07:45 PM
What a great thread so far. I may have missed it but are you going back to original colours?
#44
Swarbs
-
- Members
-
- 1,671 posts
Forum Fixture
- Name:Dave
- Location:North West WA
- Car:LX 5000
- Joined: 18-April 07
Posted 24 January 2012 - 10:28 PM
Hii kudu
Black old son -- bit of discussion about it prior
Bit of an extra bonus over x-mas
There has been an owners manual in the glove box since i bought it and it had a name on the inside cover K Smi----s
Took a punt before the new year and googled up the name -- luckily enough there was only a couple in the book so to speak
Got hold of a lady in Newman who blew out when i told her i was looking for the original owner of the car
Said her husband still wonders what had happened to it and that he had had it when she first met
DO NOT sell it to him was her last words no matter how much he wants it
She gave me his mobile and i rang Ken who blew out more than his wife
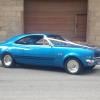
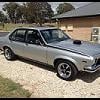
He bought it from the showroom floor from Goldie Holden in Perth in "76 and drove it to Geraldton and 4 days later heading back to Perth to have a roo bar fitted he hit one
Funnily enough Ken was from Wickham where 30 odd years later the same car was stripped by me not 10 k's away from where it started out
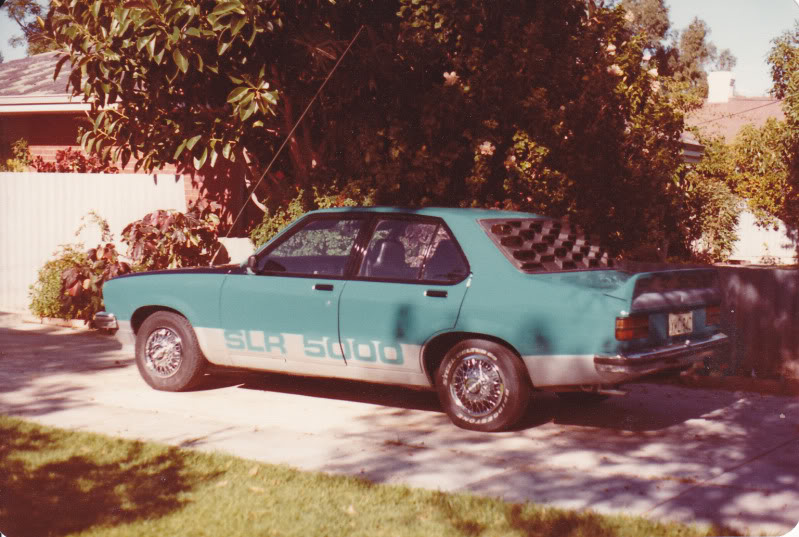
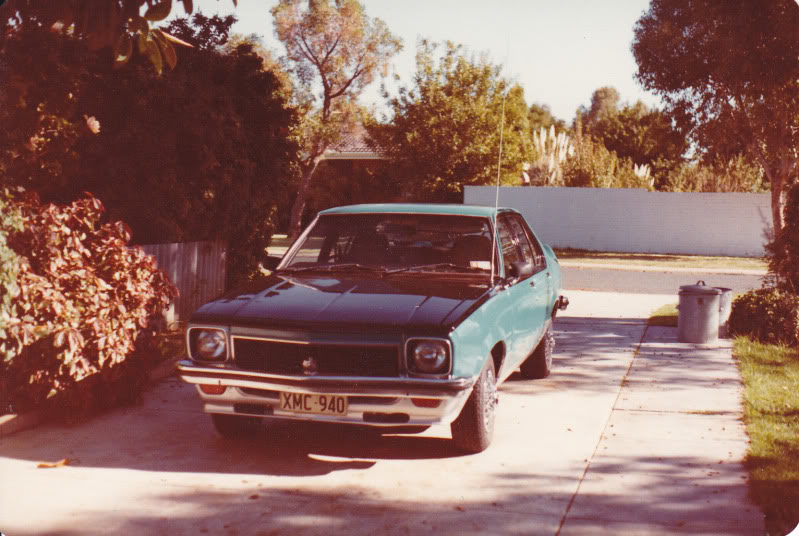
The repair was done and a roo bar fitted along with a snazzy honecomb rear louvre
The first hit with the roo - nuff to make you cry
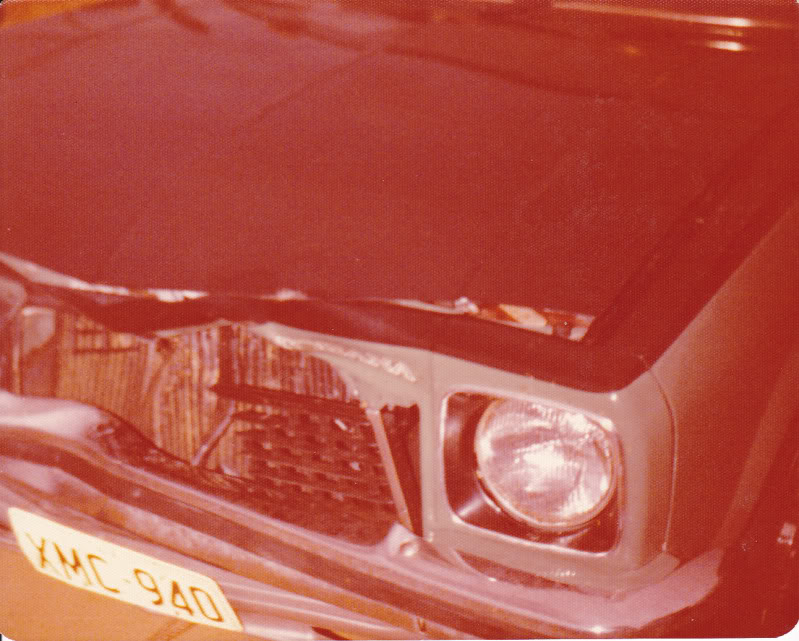
Check out the arial -- pick up the cricket from 2500k's away
Sorry Ken but the rims -- Fail
Nice bloke and was stoked to hear from me - thanks Ken for the sharing of pictures and info
He sold the car to Independant motors Vic Park in "84 and the car ended up in Rockingham where i would say the damage happened
Gav, the bloke i bought it off bought it from there in "88 and did not change a thing so the red paint came from there
Gav took it back to Dampier - 50 odd k's from Wickham
I bought it in "02 but it had not been on the road since about "94
And like i say it done a full circle 30m odd years later - i actualy pulled into the carpark at woolies in Wickham on the way out to Samson
It prob done skids in the very same carpark
Just have the 4 years in Rockingham unaccounted for -- probably best not to know
Would not have been a nice place for a country SLR
Black old son -- bit of discussion about it prior
Bit of an extra bonus over x-mas
There has been an owners manual in the glove box since i bought it and it had a name on the inside cover K Smi----s
Took a punt before the new year and googled up the name -- luckily enough there was only a couple in the book so to speak
Got hold of a lady in Newman who blew out when i told her i was looking for the original owner of the car
Said her husband still wonders what had happened to it and that he had had it when she first met
DO NOT sell it to him was her last words no matter how much he wants it
She gave me his mobile and i rang Ken who blew out more than his wife
He bought it from the showroom floor from Goldie Holden in Perth in "76 and drove it to Geraldton and 4 days later heading back to Perth to have a roo bar fitted he hit one
Funnily enough Ken was from Wickham where 30 odd years later the same car was stripped by me not 10 k's away from where it started out
The repair was done and a roo bar fitted along with a snazzy honecomb rear louvre
The first hit with the roo - nuff to make you cry
Check out the arial -- pick up the cricket from 2500k's away
Sorry Ken but the rims -- Fail
Nice bloke and was stoked to hear from me - thanks Ken for the sharing of pictures and info
He sold the car to Independant motors Vic Park in "84 and the car ended up in Rockingham where i would say the damage happened
Gav, the bloke i bought it off bought it from there in "88 and did not change a thing so the red paint came from there
Gav took it back to Dampier - 50 odd k's from Wickham
I bought it in "02 but it had not been on the road since about "94
And like i say it done a full circle 30m odd years later - i actualy pulled into the carpark at woolies in Wickham on the way out to Samson
It prob done skids in the very same carpark
Just have the 4 years in Rockingham unaccounted for -- probably best not to know
Would not have been a nice place for a country SLR
#45
_AD_75_
_AD_75_
-
- Guests
Posted 24 January 2012 - 10:47 PM
Nice to see another one being saved swarbs! sure looks like the old girls had a hard life.
#46
Rob2408
-

- Members
-
- 309 posts
Forum Fan
- Name:Rob
- Location:Brisbane
- Car:1974 L32 SLR
- Joined: 29-October 11
Posted 29 December 2012 - 10:01 PM
Bump.
An update Dave?
An update Dave?
#47
Swarbs
-
- Members
-
- 1,671 posts
Forum Fixture
- Name:Dave
- Location:North West WA
- Car:LX 5000
- Joined: 18-April 07
Posted 30 December 2012 - 12:30 AM
Shit -- looking at the last date it has been a while
Had to read back a couple of posts to see where it left off
Car went in in March to the restoration boys after a visit there to see what they do and how they do it
The guys are GT fanatics and do a lot of work for a select few - when i was there last they had a back to bare metal XY GT on the go and a Phase 3 they were tidying up panel wise for a bloke to sell -- There was also a white XW "faker" some bloke had rear ended into a pole at a powercruise somewhere
Anyway first trip there was shown around
Hatch on the go - guys name is Darryl and is a forum member but i dont think he get on here much
Spoke to him on the phone a few weeks ago and he is very happy with his finished product
"K" code XY ute on the go
This car had over 700 hours spent on it and is owned by the same bloke who owns the phase 3 mentioned above
A lot of stuff had to be made by hand as it was in pretty bad shape but being brought back to concourse in Vermillion Fire
Sorry about the quality of the photo but for some reason photobucket is dicking me round something cruel and could only upload the thumbnail

Nice charge in the booth - had been bought in for a paint tidy up
Edit .... missing Charge - it was there but gone now
Will be back with the charge later
Had to read back a couple of posts to see where it left off
Car went in in March to the restoration boys after a visit there to see what they do and how they do it
The guys are GT fanatics and do a lot of work for a select few - when i was there last they had a back to bare metal XY GT on the go and a Phase 3 they were tidying up panel wise for a bloke to sell -- There was also a white XW "faker" some bloke had rear ended into a pole at a powercruise somewhere
Anyway first trip there was shown around
Hatch on the go - guys name is Darryl and is a forum member but i dont think he get on here much
Spoke to him on the phone a few weeks ago and he is very happy with his finished product
"K" code XY ute on the go
This car had over 700 hours spent on it and is owned by the same bloke who owns the phase 3 mentioned above
A lot of stuff had to be made by hand as it was in pretty bad shape but being brought back to concourse in Vermillion Fire
Sorry about the quality of the photo but for some reason photobucket is dicking me round something cruel and could only upload the thumbnail
Nice charge in the booth - had been bought in for a paint tidy up
Edit .... missing Charge - it was there but gone now
Will be back with the charge later
Edited by Swarbs, 30 December 2012 - 12:32 AM.
#49
Rob2408
-
- Members
-
- 309 posts
Forum Fan
- Name:Rob
- Location:Brisbane
- Car:1974 L32 SLR
- Joined: 29-October 11
Posted 30 December 2012 - 01:22 PM
So what about your car??
yeah what he said
#50
fatslr
View Garage
-
- Members
-
- 1,247 posts
Forum Fixture
- Name:Garth
- Location:Dunsborough W.A.
- Joined: 17-July 07
View Garage
Posted 30 December 2012 - 02:42 PM
It has risen from the dead and turned into a beautiful hatchback 


0 user(s) are reading this topic
0 members, 0 guests, 0 anonymous users

