

Thanks guys yeah Gene is right it's:
GMH Monza blue metallic 1969
Paint Code: 10976
It's been done in Glasurit and looks even better in the flesh.
Hey Macka I had a sample of Mediterranean sprayed out too that is a nice color and your car looks amazing. My little boy picked Monza, so Monza it is.
201 replies to this topic
#76

ljv8
-
- Members
-

- 299 posts
Forum Fan
- Name:Steve
- Location:Vic
- Car:LC GTR
- Joined: 17-May 09
Posted 31 October 2013 - 07:51 PM
#77
_LONA-CK_
_LONA-CK_
-

- Guests
Posted 31 October 2013 - 08:09 PM
looks great steve top effert mate.
cheers gong
#79
_Macka_
_Macka_
-
- Guests
Posted 02 November 2013 - 07:25 AM
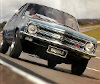
Thanks guys yeah Gene is right it's:
GMH Monza blue metallic 1969
Paint Code: 10976
It's been done in Glasurit and looks even better in the flesh.
Hey Macka I had a sample of Mediterranean sprayed out too that is a nice color and your car looks amazing. My little boy picked Monza, so Monza it is.
Mine is Glasurit also. It was also flow coated. Don't know to much about flow coat but apparently it makes it even better. I think it maybe something to do with the clear being applied a few times but could be wrong.
When it's all done we should get some photos of the cars together? I reckon those two colors side by side will look great.
#80
Potta
-

- Members
-
- 6,026 posts
Oh My, Don't you post alot
- Name:Craig
- Location:Gozzy, WA
- Car:LC GTR, LC 4 door
- Joined: 01-May 09
Posted 02 November 2013 - 11:08 AM

They are both awesome colours
#81
ljv8
-
- Members
-
- 299 posts
Forum Fan
- Name:Steve
- Location:Vic
- Car:LC GTR
- Joined: 17-May 09
Posted 02 November 2013 - 02:13 PM
Cheers guys appreciate the feedback.
Flow coated hey have to ask my painter about that one.
Macka that's a definite yes mate when she is all done a good cruise and photo shoot of both cars together is a must.
Painter laid on the blackouts yesterday. Only sent me a few pics he wants me to wait till it's all done. Should be home next weekend, this weekend it's time to clear the garage out.
#83
gtrboyy
-
- Members
-
- 3,142 posts
Lotsa Posts!
- Location:SYDNEY,NSW
- Joined: 07-November 05
Posted 02 November 2013 - 11:27 PM
Car looks ace in that colour.Well done.
Mine was that colour originally now seeing yours & Macka's make it more tempting to one day return it back to blue.
#84
ljv8
-
- Members
-
- 299 posts
Forum Fan
- Name:Steve
- Location:Vic
- Car:LC GTR
- Joined: 17-May 09
Posted 07 November 2013 - 12:37 PM
Update #21
Keen to finish off the motor now so finished filing down the 161 badge.
Lesson learnt don't cast the thing so bloody thick next time and save an hour filing!
Was a fine line between getting it thin enough and the thing folding in my hands. Went as thin as possible. Doesn't look factory exact but close enough. It's only meant to get a bit of a laugh when I tell people it was the only 161 blue block that was cast, and I'm not trying to pass it off as a 2600S.

Glued to block with JB Weld.

Only the first coat to see how it looks. Need to just clean up the glue on the edges then another coat of orange.

Next tasks scotchbrite the black ASR sump so I can paint it orange and paint the oil pump as it was fitted after I painted the block. Have a few touch ups to do on the block so will give it another all over coat of orange.
Once it's all done will fit the manifold carbs and extractors and make the heat shield. After all that might not even see the 161 badge :(
Should have the shell home in the next couple of days. Blackouts are done just the side stripe and a few touch ups.
Keen to finish off the motor now so finished filing down the 161 badge.
Lesson learnt don't cast the thing so bloody thick next time and save an hour filing!
Was a fine line between getting it thin enough and the thing folding in my hands. Went as thin as possible. Doesn't look factory exact but close enough. It's only meant to get a bit of a laugh when I tell people it was the only 161 blue block that was cast, and I'm not trying to pass it off as a 2600S.
Glued to block with JB Weld.
Only the first coat to see how it looks. Need to just clean up the glue on the edges then another coat of orange.
Next tasks scotchbrite the black ASR sump so I can paint it orange and paint the oil pump as it was fitted after I painted the block. Have a few touch ups to do on the block so will give it another all over coat of orange.
Once it's all done will fit the manifold carbs and extractors and make the heat shield. After all that might not even see the 161 badge :(
Should have the shell home in the next couple of days. Blackouts are done just the side stripe and a few touch ups.
#85
_GTR 82911_
_GTR 82911_
-
- Guests
Posted 07 November 2013 - 03:50 PM
Awesome work mate
Very inspiring to see your build unfold and to such a high standard, champion.
I too had my first in the 90's and it never left my blood ,same as your addiction, not a good feeling all those years being single/toranaless ay.
Keep up the good work it won't be long, and even though some of us have never met ya, including me, we will know you when we see you cause you will be that guy walking down the road with your chin up and that huge (I have a mad Torana) smile from ear to ear.
P.s go the blue tories
#86
gad05
-
- Members
-
- 420 posts
Forum Fan
- Name:Graham
- Location:Brisbane
- Car:73 lj 2 door , 74 lj sedan.
- Joined: 11-January 09
Posted 11 November 2013 - 10:29 PM
Great work with the badge Steve ,looks factory.
Cheers Graham.
Cheers Graham.
#87
ljv8
-
- Members
-
- 299 posts
Forum Fan
- Name:Steve
- Location:Vic
- Car:LC GTR
- Joined: 17-May 09
Posted 12 November 2013 - 04:29 AM
Thanks for the very kind words Alex. Yeah it's been so long since I have driven one can't wait to get it on the road. I drifted for a while there with other interests and cars but the Torana passion never left.
Cheers Graham yeah I'm pretty happy how it turned out.
Update #22
She is home yehaaaa!!!!!!!
I'm wrapped with the finish its mirror shiny and am happy I went the GMH black for the blackouts. Gloss level looks pretty period correct for the blackouts although body is way too shiny to be period correct. Oh well can't complain too much about that. It was hard to take a photo of the color as everything in the vicinity reflects off it, including my guts I'm one of the pics. I'm happy the way the GTR side stripes came out, took a bit of time to get the masking right but it flows well and looks close enough to original.
A big thanks to Alf for the photos and help with the blackouts and to Col for the side stripe measurements.


Got cranking on rubbing back the sump and giving it all a good degrease before hitting it and the oil pump with the first coat of orange. Really happy I did the sump orange I think it looks heaps better than black.
I picked up some heat spacers for the SU's from Wilson's Carburetors a while ago. Was lead to believe these were no longer available new but John stocks them. It however meant I had to buy longer manifold studs as the original lynx ones were too short. Got some reasonably long ones and cut them down for the top studs. Left them long for the bottom studs as I plan to make a heat shield and bolt it to the bottom carb studs. Had to drill out the carb spacers as the holes were pretty small and would have buggered them if I forced them on. Looks like they are compressed wood or some sort of composite, definitely not baker lite.
Threw the carbs and linkages back on, only finger tight. I'm pretty keen on the sonic injection manifold for SU's. Brett at sonic is working on linkages to suit so will wait and see how the set comes out, but will most likely go this route.
Test fitted heat shield and it's going to hide the lovely bendy pipes unfortunately, guess its a trade off as SU's don't like heat near the fuel bowl. Won't cut up the ACL heat shield just yet till I finalize my manifold setup. I could always do a short shield to just cover the carbies and a little of the manifold.
Also sourced these sexy 5" ram tubes from Sorbent as seen in the pics. They generate huge amounts of torque and are completely recyclable and environmentally friendly. I reackon they will be the next big thing


Next task will be a second coat of orange on the sump then a final all over coat on the entire motor.
After that will focus on finishing the front end. Need to strip the control arms and paint them and do a final satin coat on the cross member. Once that's done can press in the bush set and assemble it. Have a set of pedders lowered springs for the front in ugly red so have to black them and get a set of shocks. Might go Koni to match the pair I have for the back. Will paint them dark green to look factory. Plan then is to put in the wiring, setup the dash, steering column, and assemble to doors, then it's off to the trim shop. That's the plan anyway. Hopefully I can source new glass and all the interior reasonably quickly.
Cheers Graham yeah I'm pretty happy how it turned out.
Update #22
She is home yehaaaa!!!!!!!
I'm wrapped with the finish its mirror shiny and am happy I went the GMH black for the blackouts. Gloss level looks pretty period correct for the blackouts although body is way too shiny to be period correct. Oh well can't complain too much about that. It was hard to take a photo of the color as everything in the vicinity reflects off it, including my guts I'm one of the pics. I'm happy the way the GTR side stripes came out, took a bit of time to get the masking right but it flows well and looks close enough to original.
A big thanks to Alf for the photos and help with the blackouts and to Col for the side stripe measurements.
Got cranking on rubbing back the sump and giving it all a good degrease before hitting it and the oil pump with the first coat of orange. Really happy I did the sump orange I think it looks heaps better than black.
I picked up some heat spacers for the SU's from Wilson's Carburetors a while ago. Was lead to believe these were no longer available new but John stocks them. It however meant I had to buy longer manifold studs as the original lynx ones were too short. Got some reasonably long ones and cut them down for the top studs. Left them long for the bottom studs as I plan to make a heat shield and bolt it to the bottom carb studs. Had to drill out the carb spacers as the holes were pretty small and would have buggered them if I forced them on. Looks like they are compressed wood or some sort of composite, definitely not baker lite.
Threw the carbs and linkages back on, only finger tight. I'm pretty keen on the sonic injection manifold for SU's. Brett at sonic is working on linkages to suit so will wait and see how the set comes out, but will most likely go this route.
Test fitted heat shield and it's going to hide the lovely bendy pipes unfortunately, guess its a trade off as SU's don't like heat near the fuel bowl. Won't cut up the ACL heat shield just yet till I finalize my manifold setup. I could always do a short shield to just cover the carbies and a little of the manifold.
Also sourced these sexy 5" ram tubes from Sorbent as seen in the pics. They generate huge amounts of torque and are completely recyclable and environmentally friendly. I reackon they will be the next big thing
Next task will be a second coat of orange on the sump then a final all over coat on the entire motor.
After that will focus on finishing the front end. Need to strip the control arms and paint them and do a final satin coat on the cross member. Once that's done can press in the bush set and assemble it. Have a set of pedders lowered springs for the front in ugly red so have to black them and get a set of shocks. Might go Koni to match the pair I have for the back. Will paint them dark green to look factory. Plan then is to put in the wiring, setup the dash, steering column, and assemble to doors, then it's off to the trim shop. That's the plan anyway. Hopefully I can source new glass and all the interior reasonably quickly.
#88
gad05
-
- Members
-
- 420 posts
Forum Fan
- Name:Graham
- Location:Brisbane
- Car:73 lj 2 door , 74 lj sedan.
- Joined: 11-January 09
Posted 12 November 2013 - 09:37 AM
Engine coming along nicely Steve ,did you sort out the fan issue.
Cheers Graham .
Cheers Graham .
#89
_judgelj_
_judgelj_
-
- Guests
Posted 12 November 2013 - 10:13 AM
I was so close to asking you for some sorbet contact details, then I realised... Do any of the stud nuts foul on the intake runners?
#90
_gorto_
_gorto_
-
- Guests
Posted 12 November 2013 - 04:39 PM
Paint looks awesome! Cant wait to see it finished!
#91
_Macka_
_Macka_
-
- Guests
Posted 12 November 2013 - 07:59 PM
Steve and Ryan what about a triple LC GTR photo shoot!! Ryan you might have a bit a drive though!!
#92
_gorto_
_gorto_
-
- Guests
Posted 12 November 2013 - 09:04 PM
I'm sure the 202 would love a 15 hour drive!
Sent from my GT-I9100 using Tapatalk
Sent from my GT-I9100 using Tapatalk
#93
ljv8
-
- Members
-
- 299 posts
Forum Fan
- Name:Steve
- Location:Vic
- Car:LC GTR
- Joined: 17-May 09
Posted 12 November 2013 - 09:58 PM
Thanks guys
Yeah Graham I found the fan belt pulley and it brings the fan out a fair bit. Will still need to trim a little as it just fowls on the nut. I was a bit worried about trimming the fan and throwing off the balance but Ian said it will be fine if I carefully measure and cut off the same amount. Will give it a crack, what's the worst that can happen, throw a blade through my shiny bonnet
Hey Jacob nah manifold studs replicate the original ones so have a short entry on the manifold, then a smooth section then the long thread that the carb bolts to. No issue at all.
Thanks Ryan have to say your Torana is looking amazing, and it's great to see so many of the old girls getting resurrected.
I think we are going to have to organise all the forum GTRs to get together one day. Might have to do it by state the photoshop them together
#94
gad05
-
- Members
-
- 420 posts
Forum Fan
- Name:Graham
- Location:Brisbane
- Car:73 lj 2 door , 74 lj sedan.
- Joined: 11-January 09
Posted 13 November 2013 - 09:35 AM
Is that pulley from a later model Holden ?
Cheers Graham .
Cheers Graham .
#95
_judgelj_
_judgelj_
-
- Guests
Posted 13 November 2013 - 11:32 AM
That's interesting as the nuts fowl on my manifold in the middle section and I had to use cap head bolts to get around it.
#96
warrenm
 View Garage
-

- Members
-
- 2,107 posts
Forum Fixture
- Location:Central West NSW
- Car:1972 LJ Torana
- Joined: 08-November 05
View Garage
Posted 14 November 2013 - 05:54 AM
That's interesting as the nuts fowl on my manifold in the middle section and I had to use cap head bolts to get around it.
This is a Lynx manifold which isn't as wide as the Armours that you are using.
#97
ljv8
-
- Members
-
- 299 posts
Forum Fan
- Name:Steve
- Location:Vic
- Car:LC GTR
- Joined: 17-May 09
Posted 14 November 2013 - 01:52 PM
Hi Graham
No it's a fan belt pulley from my old 161 but is fairly thick so don't have to trim too much. Also check your messages sent you a pm the other day.
Thanks Warren was going to say the same thing the Lynx is quite different, has threaded holes and no nuts on the runner side.

One of the old short studs, Jacob as you can see only a short thread goes into the manifold and stops at the non threaded bit

No it's a fan belt pulley from my old 161 but is fairly thick so don't have to trim too much. Also check your messages sent you a pm the other day.
Thanks Warren was going to say the same thing the Lynx is quite different, has threaded holes and no nuts on the runner side.
One of the old short studs, Jacob as you can see only a short thread goes into the manifold and stops at the non threaded bit
#98
_judgelj_
_judgelj_
-
- Guests
Posted 14 November 2013 - 08:55 PM
Yeah pretty much what i have. Except my two middle studs sit so close to the middle runner that i cant get a nut on, let alone the factory spacer, so i have to use socket heads and make up some spacers.
Apart from that looks really nice. I like the factory look of the high volume sump, pretty cool. Did you tap your own crank?
#99
ljv8
-
- Members
-
- 299 posts
Forum Fan
- Name:Steve
- Location:Vic
- Car:LC GTR
- Joined: 17-May 09
Posted 14 November 2013 - 09:54 PM
Ah ok I get ya Jacob re the manifold.
Tap my own crank??
Tap my own crank??
#100
_judgelj_
_judgelj_
-
- Guests
Posted 14 November 2013 - 10:45 PM
Yeah re phrase that. Did you tap the crank yourself. I noticed it has a bolt and washer, presumably to retain the balancer.
Edited by judgelj, 14 November 2013 - 10:46 PM.


Also tagged with one or more of these keywords: Stevo, LC GTR, Phantom Grey, Tate, GTR
Holden Tech →
Electrical →
LC rear indicator screwsStarted by dacastle , 06 Apr 2024 |
|

|
||
Holden Tech →
General Questions and Help →
TaillightsStarted by dacastle , 01 Apr 2024 |
|
|
||
Holden Tech →
Engine →
accelerator holesStarted by dacastle , 07 Dec 2022 |
|

|
||
Holden Tech →
Engine →
2600N engineStarted by stealthxu1 , 28 Jul 2021 |
|

|
||
Members Area →
Members Projects & Plans →
The Sally ReportStarted by _The Handbrake_ , 23 Jun 2019 |
|
|
0 user(s) are reading this topic
0 members, 0 guests, 0 anonymous users

