
Just had a read of all this thread. Im really digging the dash gauges - has the perfect look of original meets functional IMHO. Good work!!!

LJ Sedan
Started by
stevemc32
, Jan 13 2013 09:07 PM
388 replies to this topic
#151

shanegtr
 View Garage
-

- Members
-

- 533 posts
Forum Fixture
- Name:Shane
- Location:Tom Price, Pilbara WA
- Car:LJ 2 door
- Joined: 10-November 05
View Garage
Posted 22 May 2014 - 02:23 PM
#152
gad05
-
- Members
-
- 421 posts
Forum Fan
- Name:Graham
- Location:Brisbane
- Car:73 lj 2 door , 74 lj sedan.
- Joined: 11-January 09
Posted 22 May 2014 - 11:22 PM
No Steve I haven't started a build thread yet .Just have to get myself organised.
My lj I'm building at the moment is 173 trimatic,all original drive line low mileage car.
Thinking of using the toyota box in my other lj.I am still not sure about drive line specs .
Defiantly holden six maybe triple su's or efi like you have used.I have collected parts for both.
Decisions decisions.I need to stop getting sidetracked and finish my coupe first .
Cheers Graham . image.jpg 213.68K
10 downloads
image.jpg 213.68K
10 downloads
My lj I'm building at the moment is 173 trimatic,all original drive line low mileage car.
Thinking of using the toyota box in my other lj.I am still not sure about drive line specs .
Defiantly holden six maybe triple su's or efi like you have used.I have collected parts for both.
Decisions decisions.I need to stop getting sidetracked and finish my coupe first .
Cheers Graham .
image.jpg 213.68K
10 downloads
#153
stevemc32
-
- Members
-
- 324 posts
Forum Fan
- Name:Steve
- Location:Sydney
- Car:LJ 4 Door
- Joined: 14-September 12
Posted 27 May 2014 - 06:23 PM
Cheers Shane, pretty happy with how with the dash turned out.
Graham thanks for giving us a look at the 2 door, is it another in Covert Green? Looks like a fair bit of progress on that one so far, further along than mine at the moment...
#154
gad05
-
- Members
-
- 421 posts
Forum Fan
- Name:Graham
- Location:Brisbane
- Car:73 lj 2 door , 74 lj sedan.
- Joined: 11-January 09
Posted 27 May 2014 - 10:41 PM
It's actually Dublin green Steve . A metalic colour, that's the original shade.
Looks nice in full sun.
Will you be keeping the same green on you're machine?
Cheers Graham .
Looks nice in full sun.
Will you be keeping the same green on you're machine?
Cheers Graham .
#155
stevemc32
-
- Members
-
- 324 posts
Forum Fan
- Name:Steve
- Location:Sydney
- Car:LJ 4 Door
- Joined: 14-September 12
Posted 03 June 2014 - 09:49 AM
I really like Dublin Green, that's the current choice for my one to replace the Covert, though it's still a long way off so there's a good chance things will change.
#156
stevemc32
-
- Members
-
- 324 posts
Forum Fan
- Name:Steve
- Location:Sydney
- Car:LJ 4 Door
- Joined: 14-September 12
Posted 02 March 2015 - 08:17 PM
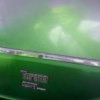
Being very disappointed with the lack of progress I decided to go through some old pics and found some of my first Torana that I'd scanned about 10 years ago when scanners were a thing. I know it doesn't really relate to the current build but I'll put up some pics cos they put a smile on my face and got me back into Torana mode.
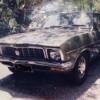
Here's how the old LC looked when I first picked it up in 1989.
File0004.jpg 176.11K
7 downloads
I did some rust/bog work on the left rear quarter and the following resulted from a long and boring uni holiday and some left over spray cans from other projects. I thought it looked awesome but I don't think many agreed with me at the time. This was around '91 or '92 I think so if anyone around Sydney area recalls seeing it feel free to give me some shit about it.
File0014.jpg 162.69K
9 downloads
File0016.jpg 186.97K
8 downloads
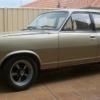
I think I drove it like that for about a year before it got a respray in Arctic White.
File0024.jpg 157.13K
10 downloads
It looked great for about 6 months and was going pretty hard at that stage with a rebuilt 186, YT head, triple SUs and an M20 box.
File0018.jpg 142.85K
8 downloads
File0019.jpg 169.44K
10 downloads
The paint didn't last long unfortunately over the top of my newspaper and flyscreen bog job. The cancer took hold a couple of years later and the passion was gone, the poor thing ended up being towed for scrap after donating any useful vital organs.
#157
ribz0
-
- Members
-
- 512 posts
Forum Fixture
- Name:Eric
- Location:Perth WA
- Car:LC Torana & 1975 South African Mini
- Joined: 01-April 09
Posted 04 March 2015 - 08:33 PM
Hi ya Steve... things are moving along nicely... any updates mate?
Great job so far!! Im about to start "phase 2" of my build so always good inspiration... keep up the great work!!!
#158
stevemc32
-
- Members
-
- 324 posts
Forum Fan
- Name:Steve
- Location:Sydney
- Car:LJ 4 Door
- Joined: 14-September 12
Posted 07 March 2015 - 08:00 PM
Cheers Eric, no updates unfortunately, just a short drive up and down the street every now and then to keep things turning.
I think the next little bit to work on will be some machining on the throttle body to lower the TPS so it fits under the bonnet. Apart from that still waiting to get underway on the carport construction.
I look forward to seeing phase two on the LC.
#159
stevemc32
-
- Members
-
- 324 posts
Forum Fan
- Name:Steve
- Location:Sydney
- Car:LJ 4 Door
- Joined: 14-September 12
Posted 20 April 2015 - 08:56 PM
Not much progress to report but I have been working on getting the throttle body to fit under the bonnet with the TPS at the top. I've passed the VN throttle body to a mate for some machining work to lower the TPS but in the meantime I've gotten hold of a VY throttle body that looks to be a little more useful.
DSCN2406.JPG 238.44K
4 downloads
This one sits just 25mm above the manifold where the VN version is almost 35mm above. It could still present an issue as the highest point of the VY version is situated further outboard and further forward of the other one so the bonnet slope in those directions might reduce the clearance gained.
I'm also working on a variable ratio cable pulley for the throttle body to try to lighten the load on the accelerator pedal at the start of it's travel. Haven't been able to find any reading on the subject so I've done some simple calculations and will mock up a few to see if they make any significant difference to the pedal feel.
#160
gad05
-
- Members
-
- 421 posts
Forum Fan
- Name:Graham
- Location:Brisbane
- Car:73 lj 2 door , 74 lj sedan.
- Joined: 11-January 09
Posted 20 April 2015 - 10:10 PM
Hi Steve,
Good to see some progress happening, even if only small.
All the little jobs add up to make the big picture come together .
Great to see pics of you're LC.
Cheers Graham .
Good to see some progress happening, even if only small.
All the little jobs add up to make the big picture come together .
Great to see pics of you're LC.
Cheers Graham .
#161
stevemc32
-
- Members
-
- 324 posts
Forum Fan
- Name:Steve
- Location:Sydney
- Car:LJ 4 Door
- Joined: 14-September 12
Posted 07 May 2015 - 06:04 PM
Didn't get much chance to fit the VY throttle body with all the rain lately but finally got it on today.
Made some serious improvements on the clearance at the body of the TPS, almost double the clearance at this point up to about 12mm.
1dscn2409.jpg 89.26K
12 downloads
Unfortunately with the TPS twisted around and moved outboard the connection plug is further forward and again busts on through the plasticine to meet up with the bonnet.
1dscn2410.jpg 115.53K
11 downloads
Back to the drawing board on this one but I do have some other options being explored at the moment including a clockwise twist on the TPS to bring it under the raised bonnet section.
Edited by stevemc32, 07 May 2015 - 06:04 PM.
#162
stevemc32
-
- Members
-
- 324 posts
Forum Fan
- Name:Steve
- Location:Sydney
- Car:LJ 4 Door
- Joined: 14-September 12
Posted 10 May 2015 - 06:47 PM
Managed to sneak off to the shed for an hour on Mother's Day and got some work done.
The battle of throttle position sensor vs bonnet has been ongoing but I think I might have solved it. Will have to wait till tomorrow to fit it up and check.
The TPS on the VY throttle body has been twisted around to bring the highest point, the cable connector, more rearward and inboard. Hopefully this gets it under the raised centre section on the bonnet.
Here's the original position in the first photo and twisted in the second.
2015-05-06 17.05.35.jpg 86.91K
9 downloads
20150510_172228.jpg 87.17K
9 downloads
Wasn't too difficult to achieve, just needed to turn down a little delrin adaptor replacement for the original butterfly shaft cover to compensate for the adjusted mounting position of the sensor.
20150510_172507.jpg 157.74K
11 downloads
Plasticine test up tomorrow.
#163
stevemc32
-
- Members
-
- 324 posts
Forum Fan
- Name:Steve
- Location:Sydney
- Car:LJ 4 Door
- Joined: 14-September 12
Posted 11 May 2015 - 08:02 PM
Ok, last of the boring TPS updates. Finally it fits under the bonnet and the world is once again a happy place. Got 7mm clearance from the highest part of the TPS to the bonnet and calling it done. A small bracket from the second mount hole over the top of the TPS just for some extra support will finish it off.
DSCN2413.jpg 160.75K
10 downloads
Moved onto the throttle cable modifications needed. The butterfly on the VY throttle body turns in the opposite direction to the VN version so I'll have to remake the cable mount and might need to move the intake air temp sensor as well to clear the cable pull. I found the initial travel on my last setup was very heavy so have been researching some variable pivot cable pull designs and have mocked up something that should do the job and seems to provide the feel I'm after on the bench. Just need to turn it into metal.
DSCN2415.jpg 195.94K
10 downloads
DSCN2417.jpg 198.1K
10 downloads
#164
Dave6179
-
- Members
-
- 577 posts
Forum Fixture
- Name:David
- Location:NZ
- Car:HJ, VN, VX SS
- Joined: 23-August 12
Posted 12 May 2015 - 07:40 AM
It's the little things that take the time isn't it! But well worth getting it done right the first time.
Did you get in trouble for 'not being there' on mothers day??
#165
stevemc32
-
- Members
-
- 324 posts
Forum Fan
- Name:Steve
- Location:Sydney
- Car:LJ 4 Door
- Joined: 14-September 12
Posted 12 May 2015 - 08:16 PM
Cheers Dave, did pretty much a full day of visiting families on Mother's day so the hour I scored in the shed didn't cause too much drama!
All these little jobs are really just busy work at the moment as I don't have anywhere to get stuck into the body. It is good to be able to spend the time and get them right. The carport has been in planning for a couple of years and still haven't made any significant progress as the house renovations that were "required" to get the go ahead for the carport are proving problematic. Slowly, slowly...
I've enjoyed the small fabrication projects that have come up as a bit of a challenge since most of my tools are for woodworking. Got a start on the cable pull and I reckon it's starting to look ok. Will definitely need to remake the cable mount but thats ok since I forgot to paint the one I made earlier and it's turned into a rusty mess.
20150512_164706.jpg 157.13K
9 downloads
20150512_164723.jpg 129.61K
9 downloads
20150512_164918.jpg 101.68K
9 downloads
Waiting on an assorted pack of throttle balls to set the correct height on the cable pull, then I can get onto the mount.
#166
stevemc32
-
- Members
-
- 324 posts
Forum Fan
- Name:Steve
- Location:Sydney
- Car:LJ 4 Door
- Joined: 14-September 12
Posted 17 May 2015 - 06:28 PM
Cable pull is done, cable mount is half way there.
2015-05-17 18.04.59.jpg 170.5K
10 downloads
Definitely seems to lighten the cable load in the first third of the movement but will have to wait till the mount is done to see how it feels on the right foot.
#167
orangeLJ
-

- Members
-
- 10,261 posts
Yes, yes I do post alot!
- Joined: 02-May 06
Posted 22 May 2015 - 10:59 AM
Nice work. Live the ingenuity
#168
stevemc32
-
- Members
-
- 324 posts
Forum Fan
- Name:Steve
- Location:Sydney
- Car:LJ 4 Door
- Joined: 14-September 12
Posted 24 May 2015 - 02:31 PM
Thanks orangeLJ.
Got the cable mount finished up and the pedal feel is now much better in the initial stages. Pretty happy with the result.
20150524_133400.jpg 174.54K
11 downloads
#169
_Agent 34_
_Agent 34_
-

- Guests
Posted 24 May 2015 - 04:57 PM
small things too complete take a lot of work.
good to see the fix and how it's done with photos.
G
#170
stevemc32
-
- Members
-
- 324 posts
Forum Fan
- Name:Steve
- Location:Sydney
- Car:LJ 4 Door
- Joined: 14-September 12
Posted 06 June 2015 - 08:19 PM
Thanks Grant, I like to keep the photos up so I can easily see what I've done. Over 2 years on it already and it still looks exactly the same...
Trawled the threads on steering columns over the last few days and thought I'd have a go at converting my spare one from column auto to floor shift. I'd already bought one of the reproduction covers a while ago when collecting parts.
Wasn't too difficult to disassemble with the exception of the column shifter pin which I had to drill out to get the shifter off to remove the barrel.
20150606_142106.jpg 471.4K
9 downloads
I got rid of the shift tube altogether as both of the bottom bushes were flogged out. The top bearing is surprisingly quite good so I'm hoping to reuse it.
20150606_161808.jpg 251.05K
9 downloads
I thought rares did the bottom bush but couldn't find it so I'll probably go for the 6205 bearing and 1" to 3/4" sleeve over the shaft.
#171
stevemc32
-
- Members
-
- 324 posts
Forum Fan
- Name:Steve
- Location:Sydney
- Car:LJ 4 Door
- Joined: 14-September 12
Posted 07 June 2015 - 07:48 PM
Changed my mind and ordered a big chunk of delrin rod from ebay to try turn up a new lower bush on the wood lathe. Shouldn't be too difficult.
#172
Heath
View Garage
-

- Administrators
-
- 18,402 posts
I like cars.
- Name:Heath
- Location:Eastern Suburbs, Melbourne
- Car:Heavily Modified UC Sunbird Hatchback
- Joined: 07-November 05
View Garage
Posted 07 June 2015 - 09:23 PM
This is great stuff. Love your work Steve!
#173
stevemc32
-
- Members
-
- 324 posts
Forum Fan
- Name:Steve
- Location:Sydney
- Car:LJ 4 Door
- Joined: 14-September 12
Posted 08 June 2015 - 10:40 PM
Cheers Heath. I feel a little guilty each time I add another half a kilo of superfluous metal to the LJ whenever I've been reading your hatch build thread.
#174
red6
-
- Members
-
- 591 posts
Forum Fixture
- Location:Melbourne
- Car:1971 Lc Torana S 2 Door
- Joined: 11-November 05
Posted 09 June 2015 - 09:29 AM
This is a really good build thread. Although your progress has been slow there is some really nice work being done. Shows the benefit of having a clear plan for a build before you start and sticking to it.
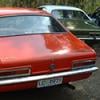
Thought you might like the pic below. Its of one of my mates old cars. Dublin Greens is a really classy colour and actually goes quite well with the brown interior. White roof is a good look to I think. If you want some more pics drop me your e-mail by pm and I can shoot some across.
DSCF0005.JPG 752.74K
8 downloads
#175
stevemc32
-
- Members
-
- 324 posts
Forum Fan
- Name:Steve
- Location:Sydney
- Car:LJ 4 Door
- Joined: 14-September 12
Posted 09 June 2015 - 04:05 PM
Cheers red6, that's a sweet looking Torana, message coming your way.
Started work on the coffee pot today stripping off the old paint. Got a few questions for this part.
rsz_20150609_145413.jpg 108.98K
7 downloads
Firstly can I use a phosphoric rust converter on this cast Aluminium part to get rid of the corrosion spots? Is there another product or do I just need to keep sanding it deeper till it's all removed?
Second question is I need to fill the holes from the old auto indicator and light. Should I use some sort of liquid metal product or better to just bog em up with a polyester filler.


1 user(s) are reading this topic
0 members, 1 guests, 0 anonymous users

