Jump to content


Photo
- - - - -

LJ Sedan


  • Please log in to reply
339 replies to this topic

#126 stevemc32

stevemc32

    Forum Fan

  • Members
  • PipPipPipPip
  • 297 posts
  • Name:Steve
  • Location:Sydney
  • Car:LJ 4 Door
  • Joined: 14-September 12

Posted 14 January 2014 - 09:07 PM

Thanks Graham, the ideas are plentiful but the skills to bring them to life could certainly use a lot more practice.


Got the brackets made up to hang the engine computer under the plenum chamber and managed to just barely tack weld them in.  The welder really didn't want to come to the party today and I think it might have had something to do with the earth connection and possibly the turkey holding onto the welder.  Anyhow, they're in and secure for now so I'll make sure to weld them up properly when the heater has been removed so I don't cause anything to catch fire.


Attached File  1dscn2146.jpg   144.02K   10 downloads


Attached File  1dscn2150.jpg   140.51K   6 downloads


If anyone is interested here is a photo showing how much space is available behind the GTR dash for instrument refits.


Attached File  1dscn2151.jpg   148.65K   9 downloads


#127 orangeLJ

orangeLJ

    Yes, yes I do post alot!

  • Members
  • PipPipPipPipPipPipPip
  • 10,259 posts
  • Joined: 02-May 06

Posted 15 January 2014 - 08:28 AM

Of you don't run a heater box and naughtily no demister, there's more room to be had (no plastic duct in the way)

#128 stevemc32

stevemc32

    Forum Fan

  • Members
  • PipPipPipPip
  • 297 posts
  • Name:Steve
  • Location:Sydney
  • Car:LJ 4 Door
  • Joined: 14-September 12

Posted 15 January 2014 - 08:59 PM

I'm not hard enough to run with no heater anymore... My old LC had the ram air driven heater/demister and it was dead set useless.


This was today's effort and it was no fun at all.


Attached File  1dscn2160.jpg   147.04K   6 downloads


Attached File  1dscn2161.jpg   145K   5 downloads


The TPS and IAC wiring will need to be extended and possibly the MAP sensor wiring as well.  I'm using a VN engine harness and will add a plug on the injector feeds so I can use the standard torana firewall hole.  I really didn't want to drill a new 2.5 inch hole in the firewall for the VN loom plug.


I'm considering mounting the MAP sensor inside the cabin to avoid extending the wires.  Any MAP based fuel injection guys know of any problems with this?


#129 warrenm

warrenm

    Forum Fixture

  • Members
  • PipPipPipPipPip
  • 2,107 posts
  • Location:Central West NSW
  • Car:1972 LJ Torana
  • Joined: 08-November 05
Garage View Garage

Posted 16 January 2014 - 06:17 AM

Should give any problems extending the wiring.


#130 _Inj gtr202_

_Inj gtr202_
  • Guests

Posted 16 January 2014 - 06:38 AM

I'm not hard enough to run with no heater anymore... My old LC had the ram air driven heater/demister and it was dead set useless.


This was today's effort and it was no fun at all.


attachicon.gif1dscn2160.jpg


attachicon.gif1dscn2161.jpg


The TPS and IAC wiring will need to be extended and possibly the MAP sensor wiring as well.  I'm using a VN engine harness and will add a plug on the injector feeds so I can use the standard torana firewall hole.  I really didn't want to drill a new 2.5 inch hole in the firewall for the VN loom plug.


I'm considering mounting the MAP sensor inside the cabin to avoid extending the wires.  Any MAP based fuel injection guys know of any problems with this?


It's considered best practice to put the MAP sensor as close to the manifold as possible to get the best vacuum response. 

I don't really think there would be too much of an issue with it mounted in the cabin, mine is mounted on the LHS above the wheel arch and have no issues.


BTW, you may want to re-think the way the ecu is mounted, at some stage you will want to get to the memcal to make tune adjustmentst.


Edited by Inj gtr202, 16 January 2014 - 06:41 AM.


#131 _Inj gtr202_

_Inj gtr202_
  • Guests

Posted 16 January 2014 - 08:20 AM

Looking at it some more, as long as you can get to the screws at the back and you have enough cable length, where the computer is mounted is fine.

I have mine in a very similar spot but hangs a little lower and is rotated 90 degrees. 


Also, I just ran a separate fuse block for the ecu and fuel pumps and kept all the original stuff how it was, to me is seemed a lot simpler.


Edited by Inj gtr202, 16 January 2014 - 08:24 AM.


#132 stevemc32

stevemc32

    Forum Fan

  • Members
  • PipPipPipPip
  • 297 posts
  • Name:Steve
  • Location:Sydney
  • Car:LJ 4 Door
  • Joined: 14-September 12

Posted 16 January 2014 - 10:46 AM

Thanks Warren and Adam, this was the info that I was after.  Extending of the wires is the way to go.


It's considered best practice to put the MAP sensor as close to the manifold as possible to get the best vacuum response.


The computer will drop out fairly easily when I need to open it up.  For now I've fitted an NVRam and USB comms for real time tuning so when the tune is completed I'll burn it to a read only chip and replace the NVRam.


I did consider running a second fuse block for the new gear but thought it might be a little neater if I replace the original.  Definitely a lot more work.


#133 stevemc32

stevemc32

    Forum Fan

  • Members
  • PipPipPipPip
  • 297 posts
  • Name:Steve
  • Location:Sydney
  • Car:LJ 4 Door
  • Joined: 14-September 12

Posted 01 February 2014 - 07:39 AM

Still working on the wiring and it looks exactly the same as it did a couple of weeks ago...  Just need to hook up the injectors and fuel pump wiring then the electricals should be ready to go.


In my quest to keep things looking clean I decided to stick the manifold air temp sensor into the underside of the throttle body mount.  I didn't have the tools or skills to drill or tap it in that location so a good mate helped out and it's come up spot on.  Will finish off plugging some of the unnecessary holes and call it done.


Attached File  1dscn2164.jpg   147.6K   7 downloads


Any ideas on how I can give the inside of the manifold a good clean out without having access to an acid bath?


#134 warrenm

warrenm

    Forum Fixture

  • Members
  • PipPipPipPipPip
  • 2,107 posts
  • Location:Central West NSW
  • Car:1972 LJ Torana
  • Joined: 08-November 05
Garage View Garage

Posted 02 February 2014 - 06:22 AM

Oven cleaner.


#135 stevemc32

stevemc32

    Forum Fan

  • Members
  • PipPipPipPip
  • 297 posts
  • Name:Steve
  • Location:Sydney
  • Car:LJ 4 Door
  • Joined: 14-September 12

Posted 03 February 2014 - 08:34 PM

Oven cleaner eh?  I ended up with a can of intake cleaner from Supercrap and it didn't really do a great job.  I've got the MAT sensor installed now so too late to try the oven cleaner but I'll remember that one for next time.


I finally worked up the courage to get a move on with the engine so off came the original head for a swap with the 12 port.  The rocker cradle bolts may have been torqued up a little beyond specification as I broke a cradle trying to loosen them off.  Also bent the two associated push rods in the process but they were all being replaced by the 202 items anyway.


Attached File  1dscn2188.jpg   145.97K   8 downloads


Can't see any oversize markings on the pistons, even after scraping 2mm of crud off the top of them...  Not sure how to tell if they're the original pistons but there sure seems to be a good 40 years of oil scum on the rocker gear and inside the cover.


Attached File  1dscn2196.jpg   147.81K   6 downloads


Four new holes for the 12 port water jacket was the next task after spending over an hour scraping off the old head gasket.  That bit sucked.


Attached File  1dscn2198.jpg   144.67K   5 downloads


And to finish it off today, on went the new gasket and head.  I swapped over the Torana water neck and thermostat cover to keep the heater hoses on the correct side and that meant the original rocker cover will need to be used also to clear the water neck.


Attached File  1dscn2203.jpg   149.58K   8 downloads


Tomorrow we'll see how far off fitting the extractors are and whether or not the bonnet will close with the VN throttle body TPS pointed upwards.


Quick plug for a joint called Rapid Cables on the internet.  First place I found where you can buy small quantities (by the metre) of auto wire in a full selection of colours and striping at very reasonable prices.  No affiliation, just a happy customer though I would love to see more of their catalogue products on the website.  Check em out if you're re-wiring.


#136 warrenm

warrenm

    Forum Fixture

  • Members
  • PipPipPipPipPip
  • 2,107 posts
  • Location:Central West NSW
  • Car:1972 LJ Torana
  • Joined: 08-November 05
Garage View Garage

Posted 04 February 2014 - 06:10 AM

That looks like it it's a genuine factory Holden head gasket, so with no over size on the pistons, it may std 173 bore.


Edited by warrenm, 04 February 2014 - 06:11 AM.


#137 stevemc32

stevemc32

    Forum Fan

  • Members
  • PipPipPipPip
  • 297 posts
  • Name:Steve
  • Location:Sydney
  • Car:LJ 4 Door
  • Joined: 14-September 12

Posted 04 February 2014 - 09:10 PM

The little 173 possibly going for all those years without a rebuild and still running.  I reckon that's a pretty solid effort.


Manifold went on today for a test fit.


Needs some work here on the battery tray.


Attached File  1dscn2206.jpg   140.81K   5 downloads


This bit is good at the front of the manifold.


Attached File  1dscn2208.jpg   133.07K   9 downloads


Body of the TPS no real drama.


Attached File  1dscn2214.jpg   142.96K   6 downloads


This part not so good with the TPS plug installed.


Attached File  1dscn2215.jpg   147.49K   8 downloads


Attached File  1dscn2218.jpg   143.19K   5 downloads


I think I could shave off the top of the clip and plug without any dramas to get it clear of the bonnet but I do have another idea also that might get me sufficient clearance for engine movement.


It is starting to look interesting though.  I tried the original VK extractors and another set that I'd gotten off ebay and neither went any were near fitting.  An arvo on the phone today should have a new set here in a few days that are supposed to be a quick bolt in.  We'll see...


Attached File  1dscn2219.jpg   144.53K   9 downloads


#138 sibhs

sibhs

    Lotsa Posts!

  • Members
  • PipPipPipPipPipPip
  • 2,703 posts
  • Name:Martin
  • Location:Perth
  • Car:LJ Coupe S
  • Joined: 27-July 12

Posted 04 February 2014 - 10:45 PM

Nice work Steve, mods look great.


Marty


#139 warrenm

warrenm

    Forum Fixture

  • Members
  • PipPipPipPipPip
  • 2,107 posts
  • Location:Central West NSW
  • Car:1972 LJ Torana
  • Joined: 08-November 05
Garage View Garage

Posted 05 February 2014 - 06:43 AM

I fitted a set up like this in my UC & picked up some clearance by rolling the throttle body around 90° so the throttle shaft is parallel with the engine.


#140 stevemc32

stevemc32

    Forum Fan

  • Members
  • PipPipPipPip
  • 297 posts
  • Name:Steve
  • Location:Sydney
  • Car:LJ 4 Door
  • Joined: 14-September 12

Posted 07 February 2014 - 07:45 PM

Cheers Marty. 


Spinning the throttle body around is my fall back position Warren if I can't get it to fit.  I really want the throttle linkage on the bottom though so I'll be trying whatever I can to keep it that way.


New set of headers turned up today and with some very minor modifications I was able to get them into the bay and bolted up.  First up some hacking of the battery tray to clear the intake.  I'm planning on moving the battery to the boot so not real worried about the tray.  It's pretty rooted rust wise anyway.


Attached File  1dscn2223.jpg   147.85K   10 downloads


The only part that so far needed modification to fit the extractors was the rubber engine mount.  I had to jack up the left side of the engine to get the extractors onto the manifold studs but once in position it's ok.  The pipes do sit very close to the area where the engine mount is welded to the front crossmember but I think a fresh engine mount rubber would give it a bit more clearance compared to the sagged old originals. 


Attached File  1dscn2225.jpg   143.95K   6 downloads


This next bit will definitely be a problem.  I'd like to get a flange welded onto the end of the extractors so I'll just get the outlet curved up a bit to make sure I can get the exhaust over the gearbox crossmember.


Attached File  1dscn2227.jpg   143.54K   7 downloads


Attached File  1dscn2231.jpg   147.6K   8 downloads


These extractors have a 2.5 inch outlet which I think is probably a bit big for my planned fairly stock 202 so wondering if it's worth having it stepped down to 2.25 or 2 inches at the flange?


#141 gad05

gad05

    Forum Fan

  • Members
  • PipPipPipPip
  • 420 posts
  • Name:Graham
  • Location:Brisbane
  • Car:73 lj 2 door , 74 lj sedan.
  • Joined: 11-January 09

Posted 09 February 2014 - 10:51 AM

Build coming along nicely Steve,what brand of pipes are you using ?
Cheers Graham .

#142 madtoranajzedded

madtoranajzedded

    Sir ask alot

  • Members
  • PipPipPipPipPipPip
  • 2,891 posts
  • Name:Maz
  • Location:Southern Tasmania
  • Car:72 LJ SL SEDAN.
  • Joined: 30-September 13

Posted 09 February 2014 - 11:39 AM

hi steve youre getting there mate,with the exhaust,after the collector mine had a 90 degree bend that went towards driver side seat from there the muffler was put on then another bend then ran it straight out the side under quarter panel,but you can continue straight through,you will find that this way will work and wont have to bend anything and gets the exhaust up high,might have to trim collector back a bit,


Maz


Edited by madtoranajzedded, 09 February 2014 - 11:42 AM.


#143 stevemc32

stevemc32

    Forum Fan

  • Members
  • PipPipPipPip
  • 297 posts
  • Name:Steve
  • Location:Sydney
  • Car:LJ 4 Door
  • Joined: 14-September 12

Posted 10 February 2014 - 07:10 PM

The headers are Genie 099E and they definitely look the goods.


Sounds like a good plan for the exhaust Maz, I'll have to get under there and see if there's room above the crossmember or whether I'll have to run below it.  A 2.5 inch pipe under the crossmember would be pretty low to the ground.


Been chipping away at the little jobs to hopefully make an attempt at starting it up before the end of the week.


Finished off the fuel lines using a hose as the fuel feed and the original steel pipe as the return.  I'd like to bend up a new steel pipe for the feed and get rid of the hose running under the car but I'll sort that out once it's all stripped down.  For now the hose will do.


Attached File  1dscn2232.jpg   140.07K   12 downloads


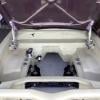
I just bolted this bracket for the filter and dampener to the boot floor.  I'm planning on putting the battery into the boot in the space above so the bolts shouldn't be any issue.


Got the locked and modified distributor in and found a mounting for the new coil.  I'd wired it all up using Camira parts to run the Delco computer so needed to use the molded coil to fit the plugs.  Don't really like the look of it though so I might go back to the old can coil later on.


Attached File  1dscn2238.jpg   147.69K   9 downloads


Had a serious win on the throttle cable setup.  All those calculations way back on about page 1 were pretty much spot on and it just fell into place on the first fitting.  The Holden Astra cable is the perfect length and even the rubber bung where the throttle cable mounts to the firewall went straight into the original firewall hole without issue.  I did need a minor adjustment to my cable mounting bracket on the fuel rail as I'd spaced it about a millimetre too far out to get a bit of cable freeplay at closed throttle.  A full throttle stop is needed at the pedal end and for that I'll just use a bolt through the old kick-down switch bracket.


Attached File  1dscn2239.jpg   143.7K   12 downloads


Attached File  1dscn2240.jpg   145.13K   16 downloads


Just need to wire up the fuel pump now and bridge the two ignition contacts on the starter switch to stop the computer being shut down during cranking.  Getting a little excited now.


#144 warrenm

warrenm

    Forum Fixture

  • Members
  • PipPipPipPipPip
  • 2,107 posts
  • Location:Central West NSW
  • Car:1972 LJ Torana
  • Joined: 08-November 05
Garage View Garage

Posted 11 February 2014 - 06:39 AM

It's all looking good. Are you using the VK injectors? From memory, I don't think they work with the 808 Delco. I used the std VP injectors on a 202, blue head,Trimatic & a very mild cam, made 130hp at the treads.


#145 stevemc32

stevemc32

    Forum Fan

  • Members
  • PipPipPipPip
  • 297 posts
  • Name:Steve
  • Location:Sydney
  • Car:LJ 4 Door
  • Joined: 14-September 12

Posted 11 February 2014 - 09:58 PM

Woohoo!  It actually ran.


As far as I'm aware the injectors are stock VK items, that's were they came from.  Not much chance of 130 horses from the low compression 173 but it's bloody good to hear it running.


I almost nailed the wiring on the first attempt but for some reason the park / neutral switch decided to no longer co-operate so my first turn of the key to start was very disappointing.  I'd previously been leaving the column shift lever in the park position as I haven't removed it yet but that didn't seem to do anything so I just bridged the switch wires and it fired into life.


Looks like I've got a fairly serious fuel leak at the injectors though as all six were pooled in fuel after a short idle run.  I did put seal kits through each one before refitting them but I guess there's an issue at the fuel rail.  Couldn't imagine fuel coming back up from the manifold side of the injectors.


#146 madtoranajzedded

madtoranajzedded

    Sir ask alot

  • Members
  • PipPipPipPipPipPip
  • 2,891 posts
  • Name:Maz
  • Location:Southern Tasmania
  • Car:72 LJ SL SEDAN.
  • Joined: 30-September 13

Posted 14 February 2014 - 10:24 PM

kool great to see you have her cranking over steve  :spoton: did you iron out your prob with feul leakage today


Maz


#147 stevemc32

stevemc32

    Forum Fan

  • Members
  • PipPipPipPip
  • 297 posts
  • Name:Steve
  • Location:Sydney
  • Car:LJ 4 Door
  • Joined: 14-September 12

Posted 22 February 2014 - 07:02 PM

Cheers Maz, the fuel leak issue seems to be sorting itself out over time, maybe the injector o-rings just needed a bit of time to bed into the rail.


Haven't had much chance to play with it as there was no exhaust past the headers and I didn't want to piss the neighbours off too much.  I measured up a pipe to join the headers to the old pea-shooter exhaust and got a local mob to make it up for me.  Gotta say they did a great job on it but my measurements weren't exactly fantastic so I needed to do some mods when I got it home and it doesn't look as good as it did...  I'll also take responsibility for the welding around the oxygen sensor bung, looks like it will do the job but that's about all.


Attached File  1dscn2250.jpg   144.07K   17 downloads


So now that it's quietened down a little it's time to see if I can get it running.  Haven't had a lot of luck so far.  It does idle but that's about if for now and tomorrow's job will be to check the timing mark on the balancer hasn't shifted and remark and reset the timing if it has.


#148 stevemc32

stevemc32

    Forum Fan

  • Members
  • PipPipPipPip
  • 297 posts
  • Name:Steve
  • Location:Sydney
  • Car:LJ 4 Door
  • Joined: 14-September 12

Posted 06 March 2014 - 02:27 PM

Not a great deal of progress lately as I've pretty much finished up all the mechanical modifications I was planning to get done before the bodywork started.  Unfortunately the carport plans have only just been finalised and are now with the local council awaiting approval so covered areas to do bodywork are non-existant and still a long way off.


In the meantime I've been harassing the guys over at pcmhacking.net (formerly delco hacking) for advice on getting the 173 running and it's slowly inching closer.  It is driveable at this stage but difficult to do any real tuning when not registered so mainly just working on idle areas and learning to interpret the logs.  It's good fun.


Attached File  1tpshot.jpg   144.75K   16 downloads


If anything exciting happens I'll update the thread but it'll probably be pretty quiet for a while as the construction takes over.  Thanks for the help so far.  :spoton:


#149 gad05

gad05

    Forum Fan

  • Members
  • PipPipPipPip
  • 420 posts
  • Name:Graham
  • Location:Brisbane
  • Car:73 lj 2 door , 74 lj sedan.
  • Joined: 11-January 09

Posted 20 May 2014 - 10:29 PM

Hi Steve,

Any updates at the moment?
How is you're carport going?

Cheers Graham .

#150 stevemc32

stevemc32

    Forum Fan

  • Members
  • PipPipPipPip
  • 297 posts
  • Name:Steve
  • Location:Sydney
  • Car:LJ 4 Door
  • Joined: 14-September 12

Posted 21 May 2014 - 10:11 PM

G'day Graham,


Nothing really to update at this stage, I've been continuing on with the 173 tuning and it's running quite well now.  I've definitely learnt a lot about the efi recently.  Started it up the other day from about 6 weeks cold and it fired up straight away without the 5 - 10 minutes of throttle pumping and choke working that the old strommy used to demand.  I was pretty happy with that.


The carport is stalled at the council stage unfortunately, 4 months they've been considering it for now along with a couple of other house renos...


How is your build coming along, I still don't recall seeing a thread?  Did you go with the Toyota box conversion?


0 user(s) are reading this topic

0 members, 0 guests, 0 anonymous users