
I hope you get rid of those nolathane K-Frame bushes before your final assembly.

Rusty Lx 4 door rebuild.
Started by
slar
, Jul 15 2013 10:19 PM
293 replies to this topic
#26

hanra
-

- Members
-

- 11,033 posts
Oh My, Don't you post alot
- Name:Brad
- Location:Farrrrrr North Qld
- Car:1975 LH SL/R 5000, 1967 Morris Cooper S, E36 BMW, Toyota Corolla, Isuzu DMax
- Joined: 24-March 11
Posted 09 September 2013 - 01:15 PM
#27
slar
 View Garage
-
- Members
-
- 498 posts
Forum Fan
- Name:AL
- Location:Newcastle
- Car:Rusty the Torana......Nearly complete
- Joined: 14-September 09
View Garage
Posted 09 September 2013 - 05:18 PM
Oh yeah there going alright especially after all the bad things people have been experiencing with crumbling.I hope you get rid of those nolathane K-Frame bushes before your final assembly.
Back to rubber for me....all the suspension bushes are rubber and that's the way their gonna stay lol.
#28
slar
View Garage
-
- Members
-
- 498 posts
Forum Fan
- Name:AL
- Location:Newcastle
- Car:Rusty the Torana......Nearly complete
- Joined: 14-September 09
View Garage
Posted 31 March 2014 - 07:22 PM
Well its been months since my last update but the work on the Torry hasnt stopped.........been doing the body work, skim coating panels and spraying polyester filler to refine the profiles even further.
So far so good......spent a lot of time blocking and making dust......certainly messes up your shed thats for sure 
Heres a heap of pics of the progress so far.
This is where I was up to in my last posts


Gave the bonnet a strip and a coat of epoxy 408


Then the doors and front guards


Had a little trial fit of the body kit

Started skimming the panels flat.....its amaising just how ripply the body was so it took a lot of work and guide coat to get her flat.

Smoothed out the apertures and sills and re epoxied.

Seam sealed the floor pan and gave it a coat of Sika Guard rubberized under body coating......nice stuff

Time for the Reface polyester spray filler.....I like this stuff... sands like chalk...gave the body 3 coats and allow to set up for a week.

Blocking the reface using guide coat and tape to keep the lines nice and straight.


Scuffed the apertures and tapped her up ready for high build primer.


Gave her a 4 shot of primer


Nice and straight again


Skimmed the boot lid....thanks to lousy sand blasting that caused ripples in the skin

Refaced and ready to block flat

Skim coated the doors....blocked flat and refaced


The spray filled doors are looking very good.....ready to block for Hi build primer

So thats where im up to with the body work.
As of tonight I have bolted all the doors back on and set the gaps and swedges so I can start on the alignment of the front guards and nosecone....Its all coming together really well especially since this shell was a rusted hulk when I bought it and has had that many welded repairs done that I thought it would be a lot more work straightening her up.
So far so good and I hope this helps someone on there build.
More to come.
cheers
Al
#29
_Bomber Watson_
_Bomber Watson_
-

- Guests
Posted 31 March 2014 - 07:49 PM
Awesome build.
Wish i had a quarter of your metal skills.
How nice is Epotec 408 to work with? I recommend it all the time and think its fantastic.
And i see you apply bog the same way i do hehehehe.
And which High build primer are you using, out of curiosity?
Cheers.
Edited by Bomber Watson, 31 March 2014 - 07:50 PM.
#30
SmacT
-

- Members
-
- 1,007 posts
Forum Fixture
- Name:Sam
- Location:Sydney
- Car:LX 4dr 355, TKX, BW
- Joined: 24-December 08
Posted 31 March 2014 - 08:20 PM
Great build. That is one straight looking Torrie
#31
slar
View Garage
-
- Members
-
- 498 posts
Forum Fan
- Name:AL
- Location:Newcastle
- Car:Rusty the Torana......Nearly complete
- Joined: 14-September 09
View Garage
Posted 31 March 2014 - 08:48 PM
Yep Epotech is unreal and protects well.....Im using PPG HS Primer Filler No 467-49413
Ive used it for years and other painters I know also use it as well......goes on nice lays very flat and has a nice build depending on mix ratio.
Your painter arnt you Bomber, what type of high fill do you use or prefer
#32
_Bomber Watson_
_Bomber Watson_
-
- Guests
Posted 31 March 2014 - 08:53 PM
I use Protec CP-6120, mainly because the supplier is close to me and also the supplier for work = trade price for me haha.
PPG owns Protec, would be interesting to compare to two products side by side....
Cheers.
#33
slar
View Garage
-
- Members
-
- 498 posts
Forum Fan
- Name:AL
- Location:Newcastle
- Car:Rusty the Torana......Nearly complete
- Joined: 14-September 09
View Garage
Posted 31 March 2014 - 09:01 PM
Yeh would be interesting, I don't think you could go wrong with any PPG product, they are good all round quality.
I get my paint at trade price also hehe still know guys in the industry......never burn bridges 
#35
LOOKING4HATCH
-
- Members
-
- 71 posts
Forum Member
- Name:Scott
- Location:Perth
- Car:LX hatch
- Joined: 19-May 10
Posted 31 March 2014 - 10:08 PM
looking good, what skim coat are you using ?
#36
slar
View Garage
-
- Members
-
- 498 posts
Forum Fan
- Name:AL
- Location:Newcastle
- Car:Rusty the Torana......Nearly complete
- Joined: 14-September 09
View Garage
Posted 01 April 2014 - 06:46 AM
Gday Scott.....i use Rage Black Gold by evercoat same as rage gold but the aussie version.
For skimming i add a dash of diggers fiber glass resin to help it flow out over large areas and it helps extend the working time of the filler.
You could use evercoats plastic honey filler thinner but its hard to get.
The diggers resin does the same anyway and is cheaper...has a similar styrene content so it works excellent.
After this coat i refine the level with Upol dolphin glaze.....sands really well
#37
BIG KEV
-

- Members
-
- 1,218 posts
Forum Fixture
- Name:Kevin
- Location:SYDNEY
- Car:LHSLR5000 and The 6LT Project
- Joined: 02-January 12
Posted 01 April 2014 - 07:20 AM
Hi Al .....its coming alone nicely ....you have to be proud of your self....Top job
You have skills above most of us ....
You have skills above most of us ....
#38
slar
View Garage
-
- Members
-
- 498 posts
Forum Fan
- Name:AL
- Location:Newcastle
- Car:Rusty the Torana......Nearly complete
- Joined: 14-September 09
View Garage
Posted 01 April 2014 - 09:10 AM
Thanks kev...a few years in the panel trade helps.....have you got your car on the spit yet
#39
Redslur
-

- Members
-
- 3,536 posts
Has been Torana owner
- Name:Gerry
- Location:Canberra
- Car:HQ GTS Replica 350.
- Joined: 08-November 05
Posted 01 April 2014 - 11:20 AM
Awesome job. Actually went and had a look at a club members car at the weekend and he is is giving his hatch as much attention too. Wish I had the skills of some off you guys.
#40
_mick74lh_
_mick74lh_
-
- Guests
Posted 01 April 2014 - 11:42 AM
Wow! The quality of work you're doing on this is second to none.
Cool Sigma too. I usually hate the things but the one you built is so nice.
#41
eyepeeler
-
- Members
-
- 1,959 posts
Forum Fixture
- Location:Perth
- Car:77 SL Hatchback, Chrome Yellow L34, LX IPRA Race Car the White Ghost
- Joined: 16-August 08
Posted 01 April 2014 - 12:12 PM
Nice work. I like the method of covering the entire panel with filler, you would get a much better result than the way I did it with my race car which was spots here and there. I will do it that way next time.
Good stuff mate,
#42
slar
View Garage
-
- Members
-
- 498 posts
Forum Fan
- Name:AL
- Location:Newcastle
- Car:Rusty the Torana......Nearly complete
- Joined: 14-September 09
View Garage
Posted 01 April 2014 - 12:27 PM
Hi Eyepeeler....you get a much flatter surface but its a bit more effort bocking it out.
It looks like a lot of filler however you can basically see through it so theres not much left on the panels.
Some say its the cheats way to do it and for real quality it should be file finished metal but unless you have the know how to file it this is the best wsy by far.
Good luck with your car
It looks like a lot of filler however you can basically see through it so theres not much left on the panels.
Some say its the cheats way to do it and for real quality it should be file finished metal but unless you have the know how to file it this is the best wsy by far.
Good luck with your car
#43
_j.e.d._
_j.e.d._
-
- Guests
Posted 01 April 2014 - 06:56 PM
Wow, that's some amazing work there Al - I'm inspired! 
#44
slar
View Garage
-
- Members
-
- 498 posts
Forum Fan
- Name:AL
- Location:Newcastle
- Car:Rusty the Torana......Nearly complete
- Joined: 14-September 09
View Garage
Posted 01 April 2014 - 08:55 PM
Well finished putting the front panels on tonight..............aligning them ready for a skim coat of filler except the bonnet which is near perfect.
Found a couple of small imperfections with the bonnet gap to nosecone.
Left side looking from front is ok but the right side tapers into a bigger gap......just enough to be noticeable
Left

Right is not as good

But looking not too bad from a distance.......cant wait to finish this off so i can get it painted.

Left the front doors just coated with polyester until I skim the guards......I will profile the front guards to the door profile so I can get a good shape and alignment.

Ok thats it for a few days......should be finished this weekend....cheers
#45
Ice
-

- Members
-
- 15,221 posts
Cool
- Name:Gene
- Location:Galaxy's away from Ipswich
- Car:77 HZ Sandman Van
- Joined: 03-January 07
Posted 01 April 2014 - 09:10 PM
Love the way some of you guys make it look easy great work another one to keep an eye on
What colour is it going to be Al
What colour is it going to be Al
#46
slar
View Garage
-
- Members
-
- 498 posts
Forum Fan
- Name:AL
- Location:Newcastle
- Car:Rusty the Torana......Nearly complete
- Joined: 14-September 09
View Garage
Posted 01 April 2014 - 09:21 PM
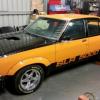
Hey Gene...its going to be Flamenco Red with blackouts....I think lol.... I know..... another red one but I just like the look of them
Similar to this.......im not real sure if this is flamenco red or salamanca but I like this red anyway......if some one knows this car could you tell me what actual colour it is.
Oh yeh Im having round headlights though

#47
eyepeeler
-
- Members
-
- 1,959 posts
Forum Fixture
- Location:Perth
- Car:77 SL Hatchback, Chrome Yellow L34, LX IPRA Race Car the White Ghost
- Joined: 16-August 08
Posted 01 April 2014 - 09:23 PM
I am interested in how you lined the doors up. Can you tell me how you did that?
I am going to be doing it when all the door hardware is back on and the rubbers in place.
I have done it before by loosening off the bolts and using the play in that to adjust. Do you do that or do you use another method?
I am going to be doing it when all the door hardware is back on and the rubbers in place.
I have done it before by loosening off the bolts and using the play in that to adjust. Do you do that or do you use another method?
#48
Ice
-
- Members
-
- 15,221 posts
Cool
- Name:Gene
- Location:Galaxy's away from Ipswich
- Car:77 HZ Sandman Van
- Joined: 03-January 07
Posted 01 April 2014 - 09:29 PM
Yep red does look good on toranas no to ways about itHey Gene...its going to be Flamenco Red with blackouts....I think lol.... I know..... another red one but I just like the look of them
Similar to this.......im not real sure if this is flamenco red or salamanca but I like this red anyway......if some one knows this car could you tell me what actual colour it is.
Oh yeh Im having round headlights though
#49
slar
View Garage
-
- Members
-
- 498 posts
Forum Fan
- Name:AL
- Location:Newcastle
- Car:Rusty the Torana......Nearly complete
- Joined: 14-September 09
View Garage
Posted 01 April 2014 - 10:34 PM
I am interested in how you lined the doors up. Can you tell me how you did that?
I am going to be doing it when all the door hardware is back on and the rubbers in place.
I have done it before by loosening off the bolts and using the play in that to adjust. Do you do that or do you use another method?
Hey Eyepeeler...its pretty easy ......you will have to remove the front guards again before you start though this will make it heaps easier.
Always start on the rear doors first.
I never have the rubbers in first....I think that makes it harder to move the door but your choice.
Its also good to have the internals in the door as this will allow you to adjust the door with the correct weight applied.
This is what I do
Bolt the hinges to the rear doors (just nip up the bolts) try and centralise them in there sliding holes as you have about 5mm up and down and in and out adjustment on the door and 5mm up and down and front to rear on the B pillar
Position the door on the B pillar with someone helping you and nip up the B pillar hinge bolts.
Adjust hinges to get the door central to aperture without hitting anywhere.
Once its in a rough position check out the alignment with the rear quater and check the gap at the bottom of the door to the sill panel and the door to rear quater panel.....I aim for a 5 to 6 mm even gap...adjust as necessary on the b pillar
Then check the top of the door just under the rain gutter and ensure there is a nice even curved gap in that area.
Next check the B pillar to window frame gap this should be even and about 5 to 6mm also.
Once youve got the door central in the aperture and all gaps pretty even you need to adjust the door in and out cause it will probably be protruding up around the window frame or at the sill panel area.
Loosen the bottom hinge bolts on the door first and move the door in or out to so the bottom swedge on the door is flush with the sill panel....then nip up the bottom bolt only so the door can pivot in the next stage..
Loosen the top hinge bolts on the door and adjust the in/out so the window frame is flush with the B pillar.
Check the rear door alignment and flushness to the rear quater....this should be pretty right if the sill and window frames are flush and in there correct position. Nip everything up
If you have the locking hardware already in your door you may need to remove the striker bolt to make these adjustments as this wont allow you to move the door up or down.
Replace your striker bolt once your happy and adjust it so the door closes flush with the rear quater panel.
its a long explination....sorry
Do exactly the same with your front doors.....its the same principal...aim for even gaps all round the doors and use the alignment of the swedge lines (folds in your door) to accurately line them up.
To do the front doors you need the front guards off the car as this will allow easy access to the hinge bolts on the A pillar.
Once the front doors are done replace the guards and aim for an even gap between the guard and the front door and the bonnet and the guard.....you may need to shim the front guard on the A pillar to make it flush with the front door. They did come originally with shims for this very reason.
Then move onto the nosecone......same again even gaps....flushness with mating panels.
Always work from the rear to the front of the vehicle if you want a good fit.
All in all you just have to take your time be carefull and tweak and persevere until you get it right.
Just remember the old torana always had dodgy door gaps and panel fitment some of these gaps my have to be larger or smaller depending on your panels.....they had very large tolerances which makes this a bit of a pain in the bum.
There thats how I do it....works for me
Good luck
Cheers
Al
#50
eyepeeler
-
- Members
-
- 1,959 posts
Forum Fixture
- Location:Perth
- Car:77 SL Hatchback, Chrome Yellow L34, LX IPRA Race Car the White Ghost
- Joined: 16-August 08
Posted 01 April 2014 - 10:46 PM
Cheers Al, appreciate you taking the time to explain that.


1 user(s) are reading this topic
0 members, 1 guests, 0 anonymous users

