
Hi Al ...I haven't fitted my car to the spit yet ...
been busy trying to make room in my shed ....room to move
my shed is 10m x 12m two LH cars and a floor full of crap ...boy I have some crap here
I am in the middle of building some storage area in the roof area of my shed about 21sqm hopefully I should be finished this in a week or two ....

Rusty Lx 4 door rebuild.
Started by
slar
, Jul 15 2013 10:19 PM
293 replies to this topic
#51

BIG KEV
-

- Members
-

- 1,218 posts
Forum Fixture
- Name:Kevin
- Location:SYDNEY
- Car:LHSLR5000 and The 6LT Project
- Joined: 02-January 12
Posted 02 April 2014 - 06:33 AM
#52
slar
 View Garage
-
- Members
-
- 498 posts
Forum Fan
- Name:AL
- Location:Newcastle
- Car:Rusty the Torana......Nearly complete
- Joined: 14-September 09
View Garage
Posted 10 June 2014 - 08:56 PM
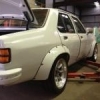
Well its been a while but I've kept going on the Torry so I thought Id throw up a few more pics of where I'm up to.
Finally got her all hi fill primed and started to fit the body kit.


Chucked on the rear flares with the usual result....crap alignment.....the fronts are excellent...you can plainly see the door part of the flare is thicker towards the top and doesnt match the quater flare very well......also in the door gap area it dips in nearly 15mm.
These are Willsons flares and I have to say if these are the better ones Id hate to see the crappy ones.

So time to attack the problem....fiberglass and filler

Set the door gap and all is good

Next its time for my favorite bit, Reface spray filler.....love this stuff....as you may know when you sand fiberglass and sand through the gel coat it is usually full of pin holes...no worries with Reface.....fills pinholes like nothing else

I let the Reface set up overnight then bolted the flares back on the car so the Spray filler can conform to the correct shape as it sets over the next week.....coating only one side of a flexible part can tend to warp it out of shape as most coatings will shrink a little.


Alignment is now very close....I'm happy now lol.....just needs a final sand while bolted on to level it up perfectly then a few coats of hi build primer to finish it off.


This was the right side.... so same procedure for the left side


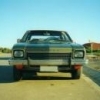
Now its time to hit the rear spoiler....... I may need some help off you guys for this one as I'm not sure of the correct fit towards the bottom edge of the boot lid.....looking from behind the car you can still see the boot lid gap under the spoiler.....looks crap and I dont like it....im thinking of extending the bottom edge of the spoiler a little to help hide the boot lid gap and even things up somewhat.
This is what I mean....very big gap

Also the rear duck tail is very warped along the botom edge where it bolts to the boot lid...this gonna take some work to fix.


The whole spoiler is rather ripply and is going to require a skim coat of filler over the entire surface to smooth it off.
Do these cutouts look correct or do they need extending to the edge of the boo lid.


Ok last thing.... the bonnet scoop...this was a real pain as the top of the scoop was concave and took a stack of filler to bring back to level.
Im not real impressed with this kit as there are a lot of faults with the moulds and it realy does create a lot of extra work. I've had this kit a while now and it never fitted correctly from day one......only hope the new Ernicks Wilsons guys have improved over the old moulds.


Ok thats it for now....info about the rear spoiler would be greatly appreciated.
Cheers
Al
#53
SmacT
-

- Members
-
- 1,007 posts
Forum Fixture
- Name:Sam
- Location:Sydney
- Car:LX 4dr 355, TKX, BW
- Joined: 24-December 08
Posted 10 June 2014 - 10:13 PM
I've always thought the measure of a top flared torrie as opposed to an average one is how well the rear flares sit. I think I know where this one is going! Top work.
#54
_Red One_
_Red One_
-

- Guests
Posted 10 June 2014 - 10:39 PM
Not sure about those spacers for the bottom of the boot spoiler slar.
Is that an after market thing?
#55
slar
View Garage
-
- Members
-
- 498 posts
Forum Fan
- Name:AL
- Location:Newcastle
- Car:Rusty the Torana......Nearly complete
- Joined: 14-September 09
View Garage
Posted 11 June 2014 - 07:37 AM
Not sure about those spacers for the bottom of the boot spoiler slar.
Is that an after market thing?
Yeh they came with the kit and fit neatly over the attaching bolts.
I tried leaving them off but it pulls the bottom of the spoiler in to far and upsets the position of the boot lock hole...
So not real sure what the go is
#56
BIG KEV
-
- Members
-
- 1,218 posts
Forum Fixture
- Name:Kevin
- Location:SYDNEY
- Car:LHSLR5000 and The 6LT Project
- Joined: 02-January 12
Posted 11 June 2014 - 08:26 AM
Looking Great Al
I have 3 rear bob tails and I have the same Wilson kit fitted to my car .....none of them are that bad for ripples ....don't get me wrong there is some ripples but not that bad ....Looks like I will be up for some filler too ...I am thinking that you may need to move the 2 top bolts more forward to the front of the car to relieve the stress of the bob tail if you follow what I am saying ...if I had my time over again I would NEVER fit these flairs everyone I speak to has to reshape them ...so your not the only one
I have 3 rear bob tails and I have the same Wilson kit fitted to my car .....none of them are that bad for ripples ....don't get me wrong there is some ripples but not that bad ....Looks like I will be up for some filler too ...I am thinking that you may need to move the 2 top bolts more forward to the front of the car to relieve the stress of the bob tail if you follow what I am saying ...if I had my time over again I would NEVER fit these flairs everyone I speak to has to reshape them ...so your not the only one
#57
myss427
View Garage
-

- Members
-
- 1,636 posts
Forum Fixture
- Location:Canberra
- Car:427 hatch, CV8 Monaro, Ve SSV ute. Was part owner A9X sedan until he sold it without telling me!
- Joined: 17-November 05
View Garage
Posted 11 June 2014 - 09:17 AM
Recently did this to an orange valencia 4 door, and on the rear spoiler we glassed a 5mm strip of aluminium to the base edge and extended it about 7mm. It helped to hide the gap and stop the back face from bending in and out where it bolts up to the boot lid. Genuine spoilers just hide the gap. Also, never seen a flair kit that did not need work!
Edited by myss427, 11 June 2014 - 09:19 AM.
#58
slar
View Garage
-
- Members
-
- 498 posts
Forum Fan
- Name:AL
- Location:Newcastle
- Car:Rusty the Torana......Nearly complete
- Joined: 14-September 09
View Garage
Posted 11 June 2014 - 09:24 AM
Looking Great AlI have 3 rear bob tails and I have the same Wilson kit fitted to my car .....none of them are that bad for ripples ....don't get me wrong there is some ripples but not that bad ....Looks like I will be up for some filler too ...I am thinking that you may need to move the 2 top bolts more forward to the front of the car to relieve the stress of the bob tail if you follow what I am saying ...if I had my time over again I would NEVER fit these flairs everyone I speak to has to reshape them ...so your not the only one
Yeh i know what you mean Kev.....even though it looks like its pulling in under stress its actually not...the bolts are finger tight and if you remove the spoiler the shape doesnt change.....its definantly moulded that way unfortunately.
Ill just have to rework it to suit.
#59
Ruts
-

- Moderators
-
- 1,118 posts
How Fast!?
- Location:Bargo, NSW
- Car:Blown A9X replica, Black SS hatchback, LH SLR5000
- Joined: 23-December 06
Posted 11 June 2014 - 10:21 AM
Great job.
#60
BIG KEV
-
- Members
-
- 1,218 posts
Forum Fixture
- Name:Kevin
- Location:SYDNEY
- Car:LHSLR5000 and The 6LT Project
- Joined: 02-January 12
Posted 11 June 2014 - 04:49 PM
Al where has all there quality control gone these days .....we are paying good dollars only to repair new items that don't fit correctly
#61
slar
View Garage
-
- Members
-
- 498 posts
Forum Fan
- Name:AL
- Location:Newcastle
- Car:Rusty the Torana......Nearly complete
- Joined: 14-September 09
View Garage
Posted 11 June 2014 - 09:10 PM
Recently did this to an orange valencia 4 door, and on the rear spoiler we glassed a 5mm strip of aluminium to the base edge and extended it about 7mm. It helped to hide the gap and stop the back face from bending in and out where it bolts up to the boot lid. Genuine spoilers just hide the gap. Also, never seen a flair kit that did not need work!
Thanks mate thats not a bad idea with the aluminium strip.....can see that working a treat.....definantly give that a go.
#62
slar
View Garage
-
- Members
-
- 498 posts
Forum Fan
- Name:AL
- Location:Newcastle
- Car:Rusty the Torana......Nearly complete
- Joined: 14-September 09
View Garage
Posted 11 June 2014 - 09:23 PM
Al where has all there quality control gone these days .....we are paying good dollars only to repair new items that don't fit correctly
Hi Kev...I asked myself the same question.....but somehow it seems ok to sell dodgyness to the public.....when that boot spoiler was made it would of been really obvious that it wasnt smooth and level.... the mold must have been made off a really bad example of a boot spoiler.....its a shame..... they could of been so much better.
#63
N/A-PWR
-

- Members
-
- 9,644 posts
CABIN ENGINE CONTROLS GALORE
- Name:Dave I
- Location:Wooroloo, 65km's East of Perth
- Car:'1969' LC RAT TORANA
- Joined: 08-December 12
Posted 11 June 2014 - 09:33 PM
Yep, no QC's anymore,
those were the days when our work was checked when going out the door. 
#64
UCANG
-

- Members
-
- 448 posts
Forum Fan
- Name:Ang
- Location:Adelaide, South Australia
- Car:UC Hatch, UC Sedan, VL Turbo, ForFour Brabus, 2010 Fatboy
- Joined: 28-January 06
Posted 12 June 2014 - 09:40 PM
How have I missed this thread? Your body work is amazing, so thorough, you definitely know what you're doing! 
Just from the pictures I have learned alot.
Can't wait to see it progress!
#65
slar
View Garage
-
- Members
-
- 498 posts
Forum Fan
- Name:AL
- Location:Newcastle
- Car:Rusty the Torana......Nearly complete
- Joined: 14-September 09
View Garage
Posted 12 June 2014 - 10:25 PM
Thanks Ang.... plenty more to come if could only get some time to do it lol
#66
eyepeeler
-
- Members
-
- 1,959 posts
Forum Fixture
- Location:Perth
- Car:77 SL Hatchback, Chrome Yellow L34, LX IPRA Race Car the White Ghost
- Joined: 16-August 08
Posted 12 June 2014 - 10:50 PM
Nice work Al, you will have a ripper of a car when it's done.
#67
slar
View Garage
-
- Members
-
- 498 posts
Forum Fan
- Name:AL
- Location:Newcastle
- Car:Rusty the Torana......Nearly complete
- Joined: 14-September 09
View Garage
Posted 22 June 2014 - 09:59 PM
Howdy....this weekend was time to attack my very ripply rear spoiler......and it took from Friday night to this evening to get it sorted out.
Since I know you all like pics of things heres a few more to keep you pondering 
Ok...I decided to start on the bottom edge that was 7mm short of hiding the boot gap.....I took a suggestion from an earlier post of how to do this and modified the suggestion to suit my needs.
Instead of adding and aluminium strip as suggested i thought that just plain fiber glass should do but i needed some way to mold it to the spoiler....so after thinking about it for a few days I conclude that fiber glass doesnt stick to plastics so I headed to the local hardware and bought a length of pvc 30mm x 30mm angle.
I removed the gel coat on the outside of the edge and scuffed up the inner side with a 36 grit roloc wheel to ensure adhesion
The pvc angle is flexible and and after taping it in position on the bottom edge of the spoiler it conformed to the slight curve perfectly.
Now I had my mold for the bottom edge.....the angle had a nice sharp internal right angle and was perfect for the edge.

This was just positioning it but once aligned I ran tap over along the entire angle to hold it firmly dowm

Next I glassed it up with several layers of woven glass and resin and let it set.
The next day I removed the tape and popped the angle off and this was the result.


After a quick trim to remove the dags I test fitted to the car to check alignment and it looked pretty good.


This is the edge before I started
This is the edge after glassing it up.....huge difference

Next was the sanding and filling stage to level off the rear and to get nice sharp lines back.
You can see just how wavy all of the spoiler is by the fill patches left after sanding to shape.

I decided to skim coat the entire top surface because it was way to wavy for me.....creates a lot of sanding but worth it in the end.

All sanded flat and ready to polyester spray fill.....again you can see how wavy the top surface was.

All spray filled.

Happy now I have the definition of the lines back

Let the spray filler set up for a few hours and then bolted the spoiler back on the car in position to cure for the next week....spray filler can shrink slightly and this will pull the spoiler out of shape if you don't secure it in position.
Perfect.... no boot gap and nice and straight.


Well that was one weekends worth of work and personally I reckon if you purchase something for your car it should fit without hundreds of hours of work modifying it. Its a challenge thats for sure.
Next cab off the rank....since I own a taxi lol....is the front spoiler and flares... looks like a few more weekends worth of work before shes ready for paint.
Cheers Al
#68
_AD_75_
_AD_75_
-
- Guests
Posted 23 June 2014 - 05:46 AM
Great work Al, I agree with you..that's a horrible amount of effort required to make that kit look acceptable..i think you've nailed it though. 
#69
slar
View Garage
-
- Members
-
- 498 posts
Forum Fan
- Name:AL
- Location:Newcastle
- Car:Rusty the Torana......Nearly complete
- Joined: 14-September 09
View Garage
Posted 23 June 2014 - 11:05 AM
Great work Al, I agree with you..that's a horrible amount of effort required to make that kit look acceptable..i think you've nailed it though.
The whole car has been a horrible amount of work lol
#70
HIBERN8
-
- Members
-
- 131 posts
Forum Member
- Name:Mark
- Location:SA
- Car:1974 LH S
- Joined: 05-July 12
Posted 05 August 2014 - 01:07 AM
Hey Al, I'm very keen to see another update! Got anything to show us?
Cheers,
Mark
Cheers,
Mark
#71
slar
View Garage
-
- Members
-
- 498 posts
Forum Fan
- Name:AL
- Location:Newcastle
- Car:Rusty the Torana......Nearly complete
- Joined: 14-September 09
View Garage
Posted 07 August 2014 - 07:32 PM
Hey Al, I'm very keen to see another update! Got anything to show us?
Cheers,
Mark
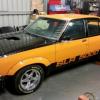
Hi Mark....havent got a great deal just a few shots of the flares and spoilers in final fit before paint....nearly ready to shoot it.
Have been getting all the plating done to the bonnet hinges, locks and scuff plates but dont get them back til 15/08/2014 so not much to show.
Also been reconditioning the wiper motor and wiper linkages and fan blower motor.
Anyway heres a few shots for ya.


Pretty boring but thats about it for a week or two.
Cheers AL
#72
SmacT
-
- Members
-
- 1,007 posts
Forum Fixture
- Name:Sam
- Location:Sydney
- Car:LX 4dr 355, TKX, BW
- Joined: 24-December 08
Posted 08 August 2014 - 02:52 PM
Doesn't look boring to me! :-)
Will you paint it panels on or off?
Will you paint it panels on or off?
#73
slar
View Garage
-
- Members
-
- 498 posts
Forum Fan
- Name:AL
- Location:Newcastle
- Car:Rusty the Torana......Nearly complete
- Joined: 14-September 09
View Garage
Posted 08 August 2014 - 05:59 PM
Panels will be done off the car, doing it at home and I want to take my time... so slow and steady as she goes.
cheers
Al
#74
HIBERN8
-
- Members
-
- 131 posts
Forum Member
- Name:Mark
- Location:SA
- Car:1974 LH S
- Joined: 05-July 12
Posted 08 August 2014 - 11:00 PM
Damnnn!! Looks immaculate mate! Really great shots, you've done a great job on that kit. Thanks for the update, a very impressive build.
#75
N/A-PWR
-
- Members
-
- 9,644 posts
CABIN ENGINE CONTROLS GALORE
- Name:Dave I
- Location:Wooroloo, 65km's East of Perth
- Car:'1969' LC RAT TORANA
- Joined: 08-December 12
Posted 09 August 2014 - 02:16 AM
Very Dressed Up Too Al
You have now got yourself a Show Piece


2 user(s) are reading this topic
0 members, 2 guests, 0 anonymous users

