Jump to content


Photo

Supra 5 Spd behind 253/308 - WHICH CLUTCH SETUP?


  • Please log in to reply
103 replies to this topic

#76 StephenSLR

StephenSLR

    Oh My, Don't you post alot

  • Members
  • PipPipPipPipPipPipPip
  • 6,707 posts
  • Name:Stephen
  • Location:Sydney
  • Car:1976 LX SL/R
  • Joined: 12-November 05

Posted 07 June 2010 - 07:36 PM

Yeah the master is the HR style one, you can also alter the effort by moving the pushrod up the pedal a bit if you have the stroke to spare.


I had someone else install mine, it was welded from what I remember, I'm not sure if it's in the best spot but I'd have to cut it and re-weld to do that right?

s

#77 76lxhatch

76lxhatch

    That was easy!

  • Members
  • PipPipPipPipPipPipPip
  • 7,156 posts
  • Location:Unzud
  • Car:SS
  • Joined: 04-August 08
Garage View Garage

Posted 07 June 2010 - 09:13 PM

Most are just bolted through a hole in the pedal. Hard to say without seeing it but anything is possible, re-welding a pedal isn't really a major drama anyway. What is the pedal to fork/slave ratio like though?

#78 _Toranamuk_

_Toranamuk_
  • Guests

Posted 08 June 2010 - 11:46 PM

Couple more photos.... I'm trying to work out where I need to drill the new hole for the cable:

This is my original factory setup:

Posted Image

Posted Image


The reason I'm slightly confused, is from the other thread.... this pic below shows where toryman76 mounted his cable - 25mm above the factory captive nut:

Posted Image


As you can see in my photos, I don't have a captive nut, just a locating hole, which is clearly in a different position. Should I just be drilling a hole 25mm up from the centre of the big hole where my original cable ran through? Next time I'm looking at the car, I'll try to dummy it all up and work it all out, but if someone has an answer for me already, it'd save me any drama's!!


In the last picture, the hole just below the clutch cable is a "captive nut" it has 5/16 UNC thread in it. The hole is supposed to be drilled 25mm above it, from the centre of that "captive nut" to the centre of the new clutch cable hole which should be drilled at 14mm (9/16) diameter.

Craig

Edited by Toranamuk, 08 June 2010 - 11:48 PM.


#79 LXCHEV

LXCHEV

    Lotsa Posts!

  • Members
  • PipPipPipPipPipPip
  • 3,510 posts
  • Name:Brett
  • Location:Melbourne
  • Car:'76 LX - 383 Chev
  • Joined: 08-November 05

Posted 09 June 2010 - 03:11 PM

Yep I understood that Craig.... but that last pic is toryman's car. The first two pics are my car, which does not have a captive nut, it only has a locating hole, the stud, and the huge hole. I ended up working it out ok though, but it's totally different to toryman's pic.

This weekend I'm hoping to have another crack at the car if I get some shed time. I'll be swapping my V8 thrust bearing with the V6 one.

When you've done this in the past Craig with the BH40 bellhousing, TF9 fork, and V6 thurst bearing, did you have any clearance issues with regards to fork/pressure plate/or bellhousing? Keen to hear what mods might be required before I dummy up the new bearing. With the current V8 bearing my fork is hitting the pressure plate, but I'm hoping the V6 bearing will resolve this issue.

#80 LXCHEV

LXCHEV

    Lotsa Posts!

  • Members
  • PipPipPipPipPipPip
  • 3,510 posts
  • Name:Brett
  • Location:Melbourne
  • Car:'76 LX - 383 Chev
  • Joined: 08-November 05

Posted 13 June 2010 - 11:32 PM

Ok another update. Snuck in a few more hours on the mighty Torry today.

Attempt #2 - partial fail.... more swearing ;) Read on for details...

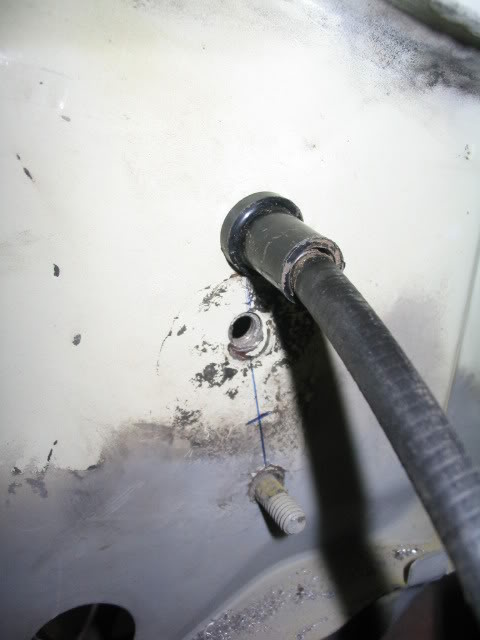
To continue the photos of the conversion though first, here is the new pedal fitted. First photo shows where it hits the body. Second photo shows the cut-out section allowing clearance, and lots of dripping paint to seal it up. I should have dropped the steering column so I could get in there easier!

Posted Image

Posted Image

Here's some shots comparing the old factory pedal with the new cable pedal:

Posted Image

Posted Image

Posted Image

This was the old factory setup:

Posted Image

The new cable system:

Posted Image

Posted Image

Attempt #1 was done using the original V8 thrust bearing pictured below. I hoped it would work, even though the clearance is pretty big. But it slipped straight off as soon as any pressure was applied:

Posted Image

So here's the new V6 thrust bearing on the left:

Posted Image

It locates bloody awesome on the throwout fork, nice and snug:

Posted Image

Posted Image

And finally, here's where I'm up to at present with the new bearing in place;
I've modified the bellhousing some more to allow the fork to sit back further (in the resting position), and I've screwed the pivot ball nearly all the way in.
I wanted to get absolute maximum throw, so having the fork as far back as possible to start with was key. The photo doesn't actually show it very clearly, but there is still clearance (just) between the gearbox bolts and the fork. I don't think I can get it back much further now!

Posted Image

BUT it still doesn't work yet :(
As you press the clutch pedal, the throwout fork contacts the pressure plate. In the photo above, on the left side, it touches the circular section. It's so close to working, but just not quite there yet. I didn't have time today to stuff around with cable adjustment / pivot ball adjustments.... that will come next. I hope something works, because I thought the way I'd set everything up was already allowing maximum travel.... but I'll see what I can do. If it doesn't work.... I'm so tempted to take to the pressure plate with a die-grinder to relieve that damn ridge!!!! I only need a couple of mm!!!

Stupid cars :(

#81 _Toranamuk_

_Toranamuk_
  • Guests

Posted 14 June 2010 - 11:01 AM

In your last pic you can see the bolt head from the front snout/brg cover touching the clutch fork, you can either grind a notch in the fork or trim the bolt head down, or do both.

On some of the Supra front snouts there is a support rib that runs down from the top bearing to the lower bearing, this ridge needs to be trimmed down to allow the clutch fork to have enough back travel.

The BH40 bell housing generally needs the rear of the window "squared up", also to allow enough back travel for the fork.

Once you have done these small mods, you can adjust your pivot ball closer to the pressure plate & should eliminate your problem of the fork hitting the pressure plate.

The CRS fork is a lot chunkier than the original & has caused some of your problems.

Ring me if you still get stuck.

Craig

#82 LXCHEV

LXCHEV

    Lotsa Posts!

  • Members
  • PipPipPipPipPipPip
  • 3,510 posts
  • Name:Brett
  • Location:Melbourne
  • Car:'76 LX - 383 Chev
  • Joined: 08-November 05

Posted 14 June 2010 - 10:19 PM

Thanks Craig. I had started filing some material away from the rear window in the bellhousing but I was too cautious (see first pic below). I'm going to rip the box out again, and go nuts! I will remove some more material from that area, and also make some clearance notches in the fork to clear the bolts. Fingers crossed that will be enough.

This pic shows the fork window, and also shows where the fork is hitting the pressure plate (top right of photo)...

Posted Image

Some more general pics of the fork about to hit...

Posted Image

Posted Image

Lastly, I thought I would also include a photo of the new firewall position for the cable:

Posted Image

It's interesting to hear the new CRS fork is chunkier than an original. It definitely explains why I've had so much trouble, so it's very re-assuring to hear!

I also wonder if different brands of pressure plates have a shorter ridge in the centre circle. If that was just 5mm less, it'd allow stacks of clearance. My backup plan is to remove the pressure plate and machine off 5mm in a lathe. But I'd rather not do this, as it would mean more stuffing around in the future if I ever had to replace the pressure plate.

Stay tuned guys.... I will report back with attempt #3 soon... :)

#83 rexy

rexy

    Lotsa Posts!

  • Members
  • PipPipPipPipPipPip
  • 3,602 posts
  • Name:Rexy
  • Location:Melbourne
  • Car:Kia grand carnival!!!
  • Joined: 03-November 09

Posted 16 June 2010 - 09:45 PM

As per Craig, you will need to get the pivot ball screwed out a lot further to get a good result. Happy grinding!

#84 LXCHEV

LXCHEV

    Lotsa Posts!

  • Members
  • PipPipPipPipPipPip
  • 3,510 posts
  • Name:Brett
  • Location:Melbourne
  • Car:'76 LX - 383 Chev
  • Joined: 08-November 05

Posted 04 July 2010 - 08:50 PM

Ok attempt #3 appears successful! THE BEAST LIVES AGAIN :)

More mods to the bellhousing window to allow the fork to sit back further, and also more mods to the fork itself to thin it out a little, and a few notches for particular bolts etc. I have so much clearance now it's not funny.

With the fork in the rear-most position (clutch dis-engaged), the thrust bearing now actually sits flush against the gearbox, whereas previously it still had approx 5-7mm gap. I need to fine-tune the adjustment a little, but presently the clutch pedal is a tiny bit higher than the brake pedal.... pressing it approx a quarter of the way down disengages the clutch, if I continue to press the pedal all the way to the floor it just opens up the clutch plate clearance even more, and the best news is that the fork still clears the pressure plate by a mile, even at full travel - I have mm's of clearance still. This is with the pivot ball adjusted several turns out (as much as I could go out without pre-loading it).

Anyway, the pedal feels fantastic, it's extremely easy to press - exactly like everyone has said about this conversion. The mighty hatchback survived it's first test-drive this arvo, yay. Nothing better than cruising your car again after it's been off the road for a couple of months.

It will take some getting used to the different clutch pedal though - I'm used to a clutch engaging right off the floor, but now it engages right up near pedal height. This is what I hope to adjust in a little bit more, but even like this, it's still nice to drive. The replacement supra box I bought off Ebay has also proven to be a winner too, heaps nicer than my old one which was getting pretty tired.

Here's the final couple of pics....

Posted Image

Posted Image

Posted Image

And here's our young fella Brocky helping out Dad....

Posted Image

#85 mr5000

mr5000

    chief break-everything

  • Members
  • PipPipPipPipPipPip
  • 3,449 posts
  • Location:melbourne
  • Car:77 lx 4door
  • Joined: 08-January 06

Posted 05 July 2010 - 08:26 AM

im putting the same clutch pedal hook on mine at the moment brett and run into the same prob with that bracket i saw that and being 5 oclock i gave up is there enough room to get a grinder in there or is the metal thin enough to use tin snips

#86 LXCHEV

LXCHEV

    Lotsa Posts!

  • Members
  • PipPipPipPipPipPip
  • 3,510 posts
  • Name:Brett
  • Location:Melbourne
  • Car:'76 LX - 383 Chev
  • Joined: 08-November 05

Posted 05 July 2010 - 10:10 AM

You're talking about the body panel where the new hook hits right?

I think the best bet would be a small die grinder or a dremel. Not enough room to get a normal size grinder in there. You'd be pushing it with tin snips - but worth a shot.

I'm a glutton for punishment, with limited tools here, so manually cut it out using a hacksaw blade!

#87 mr5000

mr5000

    chief break-everything

  • Members
  • PipPipPipPipPipPip
  • 3,449 posts
  • Location:melbourne
  • Car:77 lx 4door
  • Joined: 08-January 06

Posted 06 July 2010 - 08:40 AM

haha ive got a real bad habbit of collecting tools so i think i should have something in the arsenal that sould do the job

#88 _Toranamuk_

_Toranamuk_
  • Guests

Posted 14 July 2010 - 01:23 AM

Glad you got it sorted out & its working well for you.

Its a simple & efficient system that works.

One thing I did notice tonight in your pics is that the spring on your clutch pedal is the wrong way around. This system has a constant run thrust bearing & also requires light load on the clutch cable to stop the adjusting nut loosening itself off during a cruise.

The spring needs to be turned around 180* so that it pulls the pedal towards the floor.

One day I'll get time to post up some step by step pics & measurements & maybe the mods can make it a sticky.

Cheers
Craig

#89 LXCHEV

LXCHEV

    Lotsa Posts!

  • Members
  • PipPipPipPipPipPip
  • 3,510 posts
  • Name:Brett
  • Location:Melbourne
  • Car:'76 LX - 383 Chev
  • Joined: 08-November 05

Posted 14 July 2010 - 04:55 PM

Craig,

I actually had a feeling I put the spring on the wrong way. I just copied how my old pedal had been setup. When I get a chance I'll swap it around 180.

Do you run a return spring on the throwout fork with these conversions? It's another thing I've been pondering. At the moment, I have no return spring on mine. Even with my old setup I never had one either. Yet some people say they are very important to run.

When you say 'constant run thrust bearing' - does this means it's always in contact with the pressure plate or something else??

If you can find the time, I would still love to see all your pics & measurements and stuff.

#90 fuzzypumper

fuzzypumper

    Forum Fixture

  • Members
  • PipPipPipPipPip
  • 929 posts
  • Name:Archie
  • Location:Melbourne Eastern
  • Joined: 30-December 06

Posted 14 July 2010 - 07:28 PM

One thing I did notice tonight in your pics is that the spring on your clutch pedal is the wrong way around. This system has a constant run thrust bearing & also requires light load on the clutch cable to stop the adjusting nut loosening itself off during a cruise.

Cheers
Craig


Seriously? a constant running bearing? would that really last long?

#91 rodomo

rodomo

    To advertise here, call 13TORANA

  • Members
  • PipPipPipPipPipPipPip
  • 17,999 posts
  • Name:R - O - B Dammit!
  • Location:Way out west of Melbourne Awstraylya
  • Joined: 10-December 05

Posted 14 July 2010 - 08:00 PM

Seriously? a constant running bearing? would that really last long?


Not alot of hydraulic clutches around these days with adjustment, some cable ones still do.
UC and VB+ Commodores have constant running thrusts.
The cable adjustment just alters the pedal height.

#92 _RTS Guy_

_RTS Guy_
  • Guests

Posted 14 July 2010 - 09:17 PM

Brett this thread is a real credit to you. Well done with all the pictures, it is a lot of help. Glad it is all up and running.

#93 _Toranamuk_

_Toranamuk_
  • Guests

Posted 17 July 2010 - 01:37 AM

Brett, I don't fit a return spring to the clutch fork with this system, the only thing I do on some of these conversions & to ALL the race cars I have with this type of cable is that I fit a small hose clamp behind the adjuster nut to stop it "unwinding" itself.

Regards
Craig

#94 LXCHEV

LXCHEV

    Lotsa Posts!

  • Members
  • PipPipPipPipPipPip
  • 3,510 posts
  • Name:Brett
  • Location:Melbourne
  • Car:'76 LX - 383 Chev
  • Joined: 08-November 05

Posted 17 July 2010 - 09:54 AM

Awesome, good to know. Thanks again Craig.

#95 StephenSLR

StephenSLR

    Oh My, Don't you post alot

  • Members
  • PipPipPipPipPipPipPip
  • 6,707 posts
  • Name:Stephen
  • Location:Sydney
  • Car:1976 LX SL/R
  • Joined: 12-November 05

Posted 30 June 2014 - 11:50 PM

It looks like I may be up for a new clutch.  I was experiencing clutch judder a while back, jumped back into the car after a month or so and now the pedal is really low to bite, so low I'm sometimes having difficulty selecting gears.


I think either it needs adjusting, the fork is bent or I'm up for a new clutch plate.


What's the best plate to get these days and from whom?


I already have the 5 speed in from previously.


s


Edited by StephenSLR, 30 June 2014 - 11:50 PM.


#96 TerrA LX

TerrA LX

    Fulcrum Fixture

  • Members
  • PipPipPipPipPipPipPip
  • 14,241 posts
  • Location:Sid 'n' knee
  • Joined: 31-May 06

Posted 01 July 2014 - 05:47 AM

Dyna truck clutch plate is a good off the shelf replacement, careful brand selection is needed to fit the Holden 1 tonner pressure plate.

Make sure you have your pressure plate on hand when at the counter.


#97 StephenSLR

StephenSLR

    Oh My, Don't you post alot

  • Members
  • PipPipPipPipPipPipPip
  • 6,707 posts
  • Name:Stephen
  • Location:Sydney
  • Car:1976 LX SL/R
  • Joined: 12-November 05

Posted 01 July 2014 - 04:23 PM

Dyna truck clutch plate is a good off the shelf replacement, careful brand selection is needed to fit the Holden 1 tonner pressure plate.

Make sure you have your pressure plate on hand when at the counter.


I'm not sure what pressure plate I have. So is there enough variation to choose another clutch plate or would I have to get myself another pressure plate?


s


Edited by StephenSLR, 01 July 2014 - 04:24 PM.


#98 TerrA LX

TerrA LX

    Fulcrum Fixture

  • Members
  • PipPipPipPipPipPipPip
  • 14,241 posts
  • Location:Sid 'n' knee
  • Joined: 31-May 06

Posted 02 July 2014 - 10:02 AM

The outer diameter of the clutch spring pack needs to fit inside the inner diameter of the pressure plate face.
Hope that makes sense.

Different brands etc have slightly different diameters which will foul when you try to put the clutch plate onto the pressure plate.

That's why you need your pressure plate on hand, any good reputable clutch shop should be able to help you.PBR fitted mine but may not fit yours...


#99 hainzy

hainzy

    Forum Fixture

  • Members
  • PipPipPipPipPip
  • 502 posts
  • Location:BALLARAT
  • Joined: 16-April 07

Posted 18 October 2016 - 05:26 PM

The standard length V8 tailshaft with the CRS extended slip yoke is the correct set up.

The BH82 bell housing is 5/8ths (16mm) shorter than the V8 Aussie 4sp bell housing, so the slip yoke that CRS supplies is 5/8ths longer & accepts the standard RUJ2030 uni joint.

Fit new premium joints & get it balanced though (or get the balancing co. to supply & fit uni's).

The supra conversion behind a 6cyl requires a 25mm (from memory, although something clicking at 19mm) SHORTER tailshaft, as the length of the supra/celica input shaft is longer than a 6 cyl Aussie 4sp (or 3sp).


Hi guys. Just doing a bit of googling and dug up this old thread.


I have an LX which I just took the aussie 4 speed out of, and replaced it with a supra 5 speed. I understand i can connect the extended supra yoke and itll be the right length to go back in. But can anyone clarify how long its supposed to be? Because for some reason Ive accumulated 2 different slightly longer supra yokes. Im not sure if I need to use the much longer one or the slightly longer one? The much longer one also has bigger cap size too, so the middle size one would be better...


Heres a photo. The green one in the middle is the aussie 4 speed yoke. Cheers for any info....    


57C71960-7B13-4B4A-8FE5-7BC011CEC153_zps


#100 hainzy

hainzy

    Forum Fixture

  • Members
  • PipPipPipPipPip
  • 502 posts
  • Location:BALLARAT
  • Joined: 16-April 07

Posted 22 October 2016 - 10:16 AM

Anyone have any ideas on this? Im thinking Ill just put the slightly longer one in and see how it goes..


0 user(s) are reading this topic

0 members, 0 guests, 0 anonymous users