Ideally you assemble the hinge to your intended door and tack in place once sheet repair is complete.Usually this is easier said than done though.
Sent from my iPad using Tapatalk
Agree.somewhere in mikecatts thread he shows how he has done it.


Sir ask alot

Posted 01 May 2022 - 07:54 PM
Ideally you assemble the hinge to your intended door and tack in place once sheet repair is complete.Usually this is easier said than done though.
Sent from my iPad using Tapatalk
Cool

Posted 01 May 2022 - 08:00 PM
Agree.somewhere in mikecatts thread he shows how he has done it.
That thread is long gone try Maz check out The Marty Report thread im sure Marty did that repair on his LJ
Sir ask alot
Posted 02 May 2022 - 01:00 AM
Forum Fan
Posted 02 May 2022 - 10:15 AM
Definitely a shame Mike's threads were removed, they did provide a pretty good photo reference. It certainly looks like the most effective way of fixing it involves removing the guard. I couldn't find it in the Marty Report but I see that Marty did this repair on the LC and had the guard and full outer pillar skin removed to get it done.
I really don't have any interest in taking the guard off at this stage so it'll require some more thinking and possibly a not so permanent repair to get it over the line for now.
Forum Fixture

Posted 02 May 2022 - 10:25 AM
Sir ask alot
Posted 02 May 2022 - 01:10 PM
Definitely a shame Mike's threads were removed, they did provide a pretty good photo reference. It certainly looks like the most effective way of fixing it involves removing the guard. I couldn't find it in the Marty Report but I see that Marty did this repair on the LC and had the guard and full outer pillar skin removed to get it done.
I really don't have any interest in taking the guard off at this stage so it'll require some more thinking and possibly a not so permanent repair to get it over the line for now.
Forum Fan
Posted 02 May 2022 - 09:48 PM
I actually have two brand new repro guards, rad support, nose cone and lower front valance panel that I do plan to fit but at this point I was just hoping for some rust repairs to get it roadworthy again and do some driving. Unpicking the guard, and probably the drivers side as well, will certainly lead to a full restoration and respray and probably see it off the road for another few years...
I had planned on replacing the lower guards at this stage so maybe, similar to Ian's suggestion, I could possibly cut that off and unpick the inner rear to give me some wiggle room on the guard without touching the top and hopefully get some access to the front of the hinge. If I repair the side of the pillar first I should be able to keep the hinge in position without having to take it out.
Lotsa Posts!

Posted 02 May 2022 - 11:05 PM
Forum Fan
Posted 03 May 2022 - 10:34 AM
Cheers Clay, I reckon that's good advice. Once I've replaced the inner section in the photo above I think I will be able to put the door back on and re-weld the hinge from inside the pillar, or at least tack it in place.
Edited by stevemc32, 03 May 2022 - 10:34 AM.
Forum Fan
Posted 02 December 2023 - 05:06 PM
Not 5 years this time but still a while between progress shots...
Finally worked up the courage to start tackling the A-pillar repairs. The lower hinge is still welded in place into a nice solid piece of metal at the pillar flange where the inner and outer meet so I don't think I'll need to remove it. I should also be able to keep the door on when welding it back onto the replacement parts just to make sure.
I took a section of the guard off so I could look at the front of the A-pillar. I think order of repairs for this section should go first the A-pillar around the lower hinge, then onto the inner sill and passenger floor pan, then the outer sill.
 20231202_151922.jpg 347.6K
4 downloads
20231202_151922.jpg 347.6K
4 downloads
20231202_161321.jpg 331.45K
4 downloads
Forum Member

Posted 03 December 2023 - 08:45 AM
Hey Steve
on page 2 on my thread ( Adam’s LJ restomod) have some shots showing the similar order of repairs. My passenger sill was solid and only had a bit of rust in the inner guard end with a matching 50c size hole into inner floor/ sill. My drivers inner sill was stuffed 1/2 way to the back of the door, outer sill stuffed and previously patched, floor stuffed, A pillar rust on outer skin, lower inner and outer guards stuffed. For the drivers side repair I made up the inner sill from some 1.0mm sheet I had, bent it roughly to shape making sure the bottom edge was right. I predrilled the future spotweld holes off the car. Welded the floor in first. Then attached the inner. As I welded the inner sill in, dollied it into the body to get it tight while it was hot. Then I used the lower sill/A pillar repair patch panel from Rares. That made the outer sill to inner guard and A Pillar really easy to do, it took less time to get that on right than patching the passenger side. In hindsight, I should have bought both sides and just lopped off the nose for the Passenger side, would have been quicker and probably marginally better. The grinding in the step between the lower guard and the sill took a lot of time. I like try to do stuff myself too, but sometimes the right bits just make the repairs much easier, but also much better. You’ll get there! Good luck Adam
Edited by 4dabush, 03 December 2023 - 08:48 AM.
Forum Fan
Posted 05 December 2023 - 08:39 PM
Thanks Adam, checked out your thread and the photos are really helpful.
I have been eyeing off the rares full sill panels just for that front section around the A pillar. Might have to go that way.
Lotsa Posts!
Posted 05 December 2023 - 08:46 PM
Forum Member
Posted 05 December 2023 - 10:07 PM
Thanks Adam, checked out your thread and the photos are really helpful.
I have been eyeing off the rares full sill panels just for that front section around the A pillar. Might have to go that way.
Yes, like I said, if I was doing it again, I’d use that panel just for the nose back to the sill, would have saved hours. My drivers sill was stuffed to the back of the door. That Rares panel was a really good fit. I had (still have) some early Rares sills and the new panels crap all over the old stuff for shape and fit. Lower guards were not the right shape, but were easy enough to get right, but the A Pillar and sill I was quite impressed with. The Patchmaker gear looks awesome too, but I had a bunch of Rares stuff being posted so one more bit was economical.
I’ll get growled at no doubt, but when you said the lower hinge is solid and you have the holes showing, what about cutting out all the cancer, cleaning it all up and welding patches in? Now you have taken the edge of the guard off, you can get to both sides of the repair and should be able to double skin it well, weld the outer patches, and maybe drill holes on the inner patch before fitting so you can spotweld the panels together again. Then rust treat the crap out if it (fishoil/cavity wax/ whatever your preferred method). If the patches weld clean and nice to the surrounding metal, and you can spot them like the factory did, it should be close to as strong as original, Better than it is now, and probably better that many that haven’t been patched, but are rotten internally because it hasn’t rusted through. Now, your door bottoms…i like having a crack, but I’d be inclined to go Patchmaker…will save hours in making and way more hours in grinding!
Forum Fan
Posted 27 December 2023 - 07:21 PM
Cheers Adam, I ended up buying the Rares sill panels for both sides as they will definitely save a heap of time trying to make up the front section. I've had my eye on the Patchmaker door bottoms and they look awesome but for the price I could probably just find better doors and save a heap of work on these ones. I'll have a go at patching it up myself and if it doesn't work I'll probably just look for another pair of doors.
I started on the A-pillar inner repairs around the bottom hinge. Took most of the rotten sill off so I could see what was going on and found the top half of the inner sill was not too bad.
20231227_110658 - Copy.jpg 263.13K
4 downloads
I picked up these inner sill sections a couple of years ago and will cut out the pieces that I need to get the job done.
20231227_135022 - Copy.jpg 597.14K
1 downloads
Cut a big hole out of the inner pillar and started welding in a patch.
20231227_162505 - Copy.jpg 401.72K
2 downloads
20231227_184804 - Copy.jpg 327.99K
5 downloads
This is my first attempt at any significant rust repairs so it's looking pretty shit at the moment but I'll keep going on it and grind it all clean once done. It can all be redone I guess if I stuff it up the first time!
Forum Member
Posted 27 December 2023 - 09:04 PM
So long as you are getting good penetration of your welds, next skin I’d pre drill so you can ‘plug weld’ some spots between the sheets to add some strength and not just rely on the welds on the edges.
For grinding, I can’t recall which thread I saw on here, maybe one of Marty’s, that grinding discs aren’t created equal. Someone recommended these Kronenflax discs. I reckon whoever it was, was on the money. I reckon they were quicker, cooler, and kept their edge better. I could only get them in 4inch up here. I had 2 x 4 inch and 125mm cordless grinders on the go at any one time with different discs on each. Also went through lots of flappy discs too. I also used a die grinder in some awkward places, they are a pain, slow and sketchy, and leave nasty splinters everywhere, although mines electric, an air one might be much better/safer.
I’d be inclined to clean up that number of tacks you have done, and then weld between, it gives you a chance to see if any welds haven’t penetrated, and saves spending hours grinding a heap of welds, especially if you get welds on welds. It’ll help you get to know when your welds are good, you’ll hear them ( the weld arc) when they bite well, and you’ll start to see the good welds need less grinding than the ones that really haven’t got the penetration.
Keep up the good work!
IMG_1195.jpeg 101.28K
4 downloads
Edited by 4dabush, 27 December 2023 - 09:10 PM.
Lotsa Posts!
Posted 27 December 2023 - 11:00 PM
Forum Fan
Posted 28 December 2023 - 12:24 PM
Thanks Gents,
I was thinking the penetration on the tack welds wasn't really cutting it so I'll grind it back and go back to the settings. I had is set as per the chart for 0.6 wire and 1mm material and couldn't really get it looking or sounding nice.
20231227_184846 - Copy.jpg 593.24K
2 downloads
I've also found a place nearby that sells those Kronenflex discs so I'll head out a grab a few. Cheers.
Lotsa Posts!

Posted 28 December 2023 - 02:42 PM
MIGs with switch settings for voltage will always be a compromise.
Never had much luck with them especially on thinner stuff.
Not too bad when you get into thicker metal as it is a bit more forgiving.
Honestly reckon you will find your welds either not hot enough, or you will be constantly chasing holes.
My advice would be to advertise that machine for sale, and get a machine with more adjustment on it like a UNIMIG.
Once I went to a better machine its amazing how much easier it was to weld with.
Cheers
Rob
Forum Fan
Posted 28 December 2023 - 06:46 PM
Cheers Rob,
Funnily enough, I went out to buy some of the Kronenflex grinding discs and came home with a Unimig! Had some Christmas money to spend...
It seemed a bit more successful so far but still a long way to go.
20231228_183749 - Copy.jpg 242.35K
4 downloads
Forum Fan
Posted 29 December 2023 - 06:26 PM
Next bit to repair is the hole in the bottom of the A-pillar inner and then move onto the inner sill.
20231229_163527.jpg 396.2K
4 downloads
I'm planning to take about the lower 2/3rds of the inner sill off for replacement from the front to just before the seat mounting reinforcement brackets under the car. This will detach the A-pillar from the floor but the top of the inner sill will remain in place across the door opening. Just wondering if it would be best to brace the A-pillar and if so would a single brace from the pillar to the tunnel be enough. I can't imagine it moving forwards or backwards with the kick panel and top half of the guard remaining in place but it could possibly swing in or out.
To advertise here, call 13TORANA

Posted 29 December 2023 - 10:40 PM
Next bit to repair is the hole in the bottom of the A-pillar inner and then move onto the inner sill.
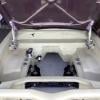
I'm planning to take about the lower 2/3rds of the inner sill off for replacement from the front to just before the seat mounting reinforcement brackets under the car. This will detach the A-pillar from the floor but the top of the inner sill will remain in place across the door opening. Just wondering if it would be best to brace the A-pillar and if so would a single brace from the pillar to the tunnel be enough. I can't imagine it moving forwards or backwards with the kick panel and top half of the guard remaining in place but it could possibly swing in or out.
This is how I braced mine to do the same job.
Brace.JPG 169.02K
10 downloads
Forum Fan
Posted 07 January 2024 - 06:18 PM
Cheers Rob, had another browse through your thread to steal some ideas on how to get it done.
Took a chunk of inner sill out today and started on fitting the replacement piece. The cheap arse bender did a better job on it than I expected with a few extra clamps but it's still not great. It should do the trick though.
20240107_142022.jpg 363.75K
5 downloads
20240107_145746.jpg 309.78K
3 downloads
20240107_165421.jpg 334.72K
4 downloads
Forum Fan
Posted 09 January 2024 - 11:44 AM
The inner sill repair is mostly done and I think it's pretty close to being in the right spot. The welding still sucks but it seems to be getting better slowly.
The next question is whether to do the floor first or finish off the outer sill. I was planning on the floor first but I'm guessing the new floor pan is a part that will take a whole heap more bashing to get it into place, so it might be better to get the sill on first to make sure the inner sill doesn't move?
20240109_113509.jpg 254.27K
5 downloads
20240109_113448.jpg 382.91K
5 downloads
Forum Fixture

Posted 09 January 2024 - 06:09 PM


0 members, 0 guests, 0 anonymous users


