

That's not the same piece then. I know Gavin and he makes what he shows, I'm sure it was either a mixup with order or a error on his end.
847 replies to this topic
#77
 _mikecatts_
_mikecatts_
-

- Guests
Posted 14 June 2012 - 09:31 PM
I have spoken to Gavin...Its all good. We are still mates  ..
..
The ones I got are the ones he sells, I think these are the last batch any way because the mold is knackered.. The pic on his site is an oldy...
Ill have a go at using them..If not, Ill get the complete seal with ends on them...
..The ones I got are the ones he sells, I think these are the last batch any way because the mold is knackered.. The pic on his site is an oldy...
Ill have a go at using them..If not, Ill get the complete seal with ends on them...
#78
_mikecatts_
_mikecatts_
-
- Guests
Posted 14 June 2012 - 09:47 PM
Back to the car...
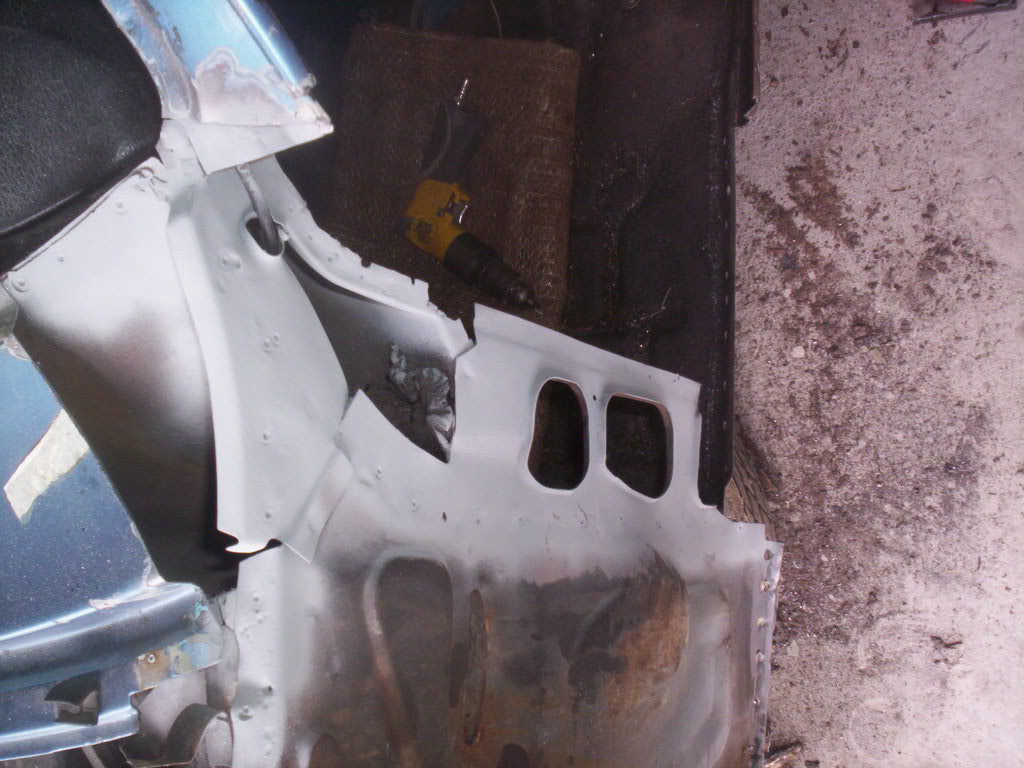
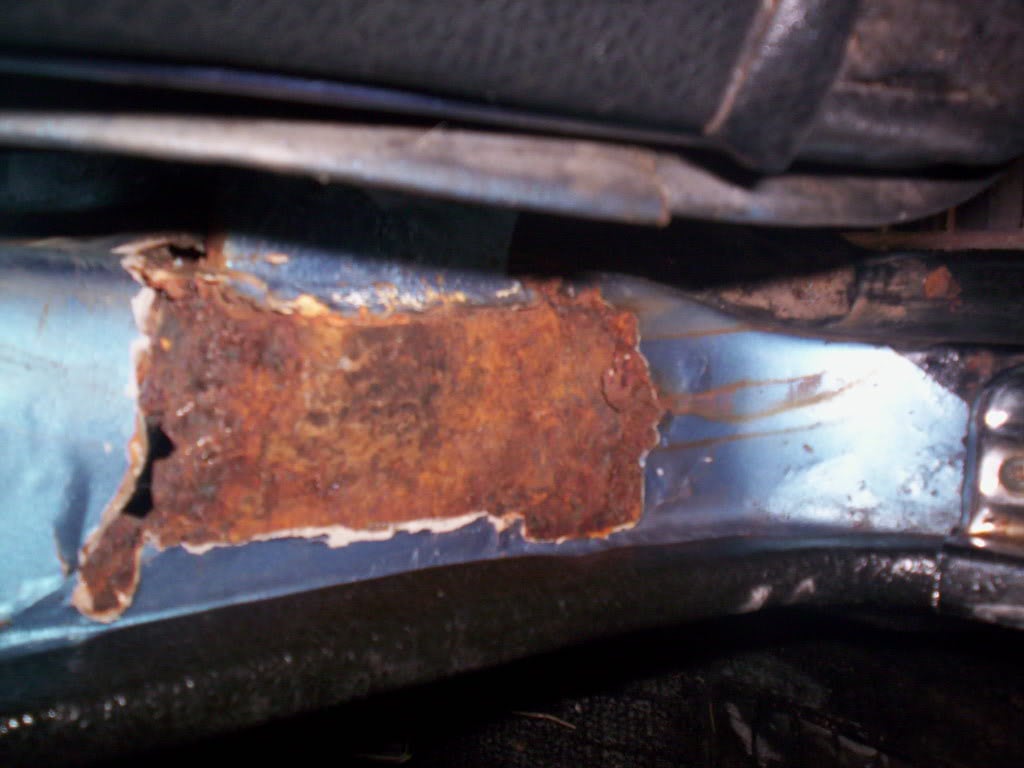
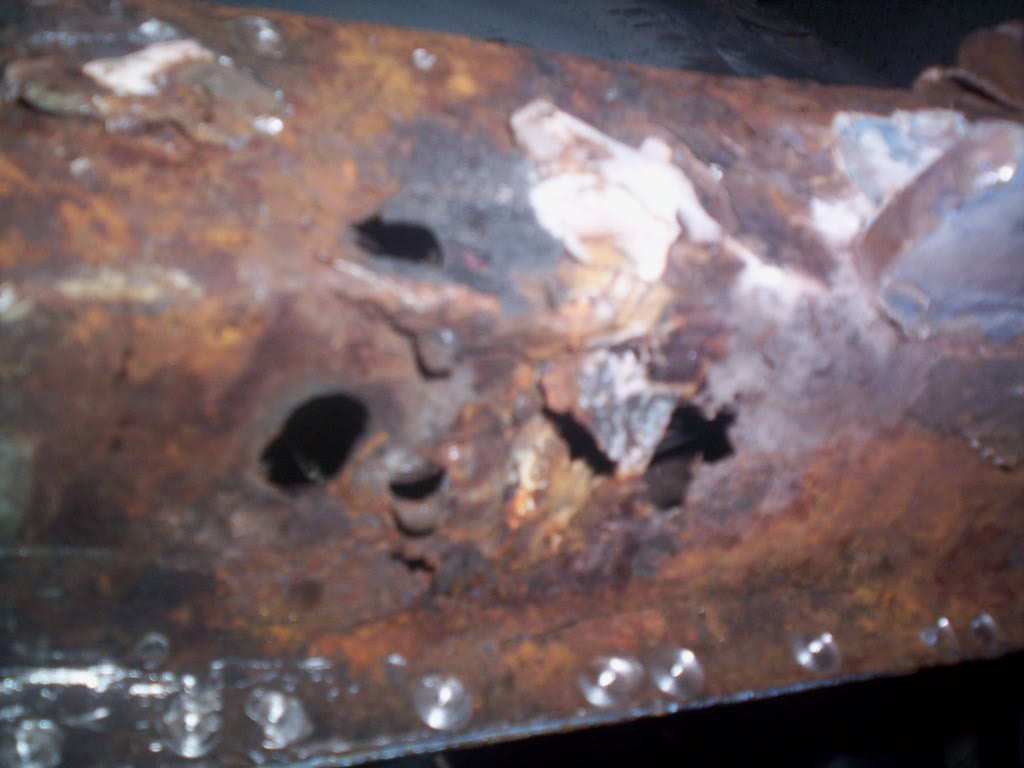
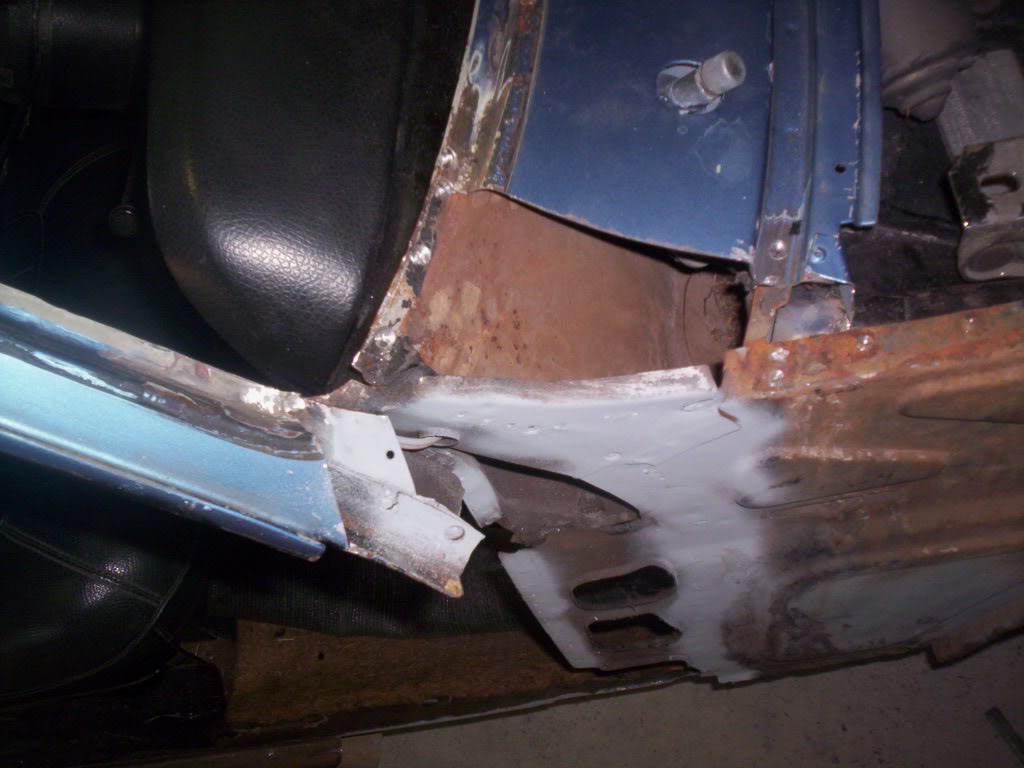
I had a look at the front A pillar.
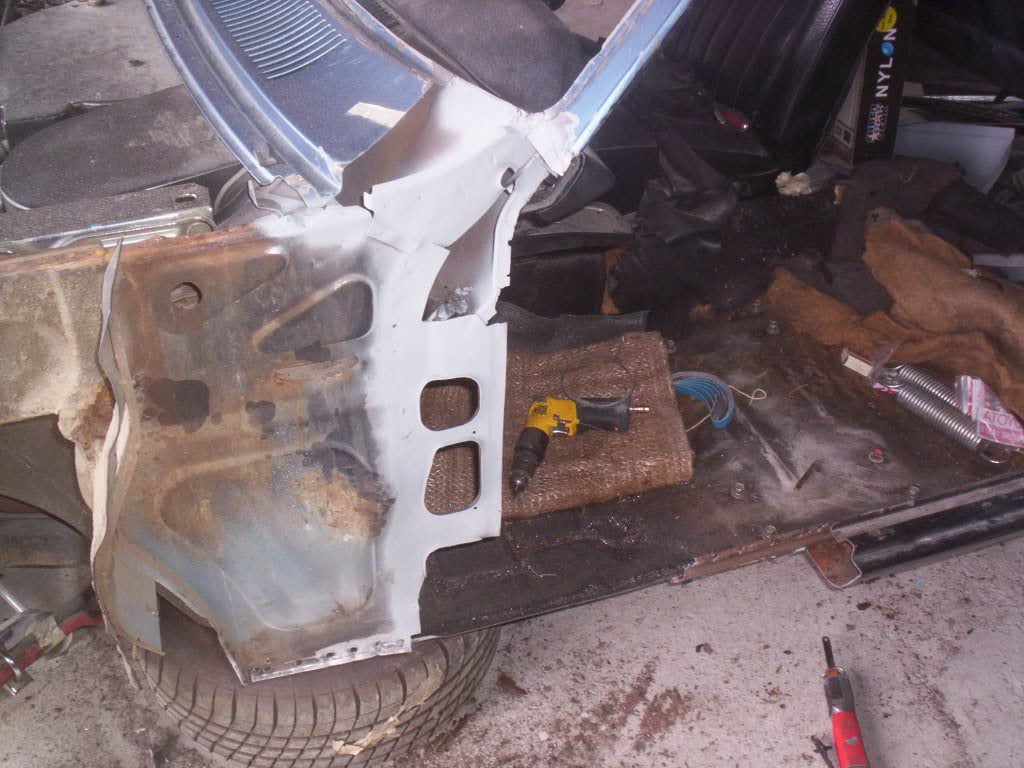
After sandblasting....I discovered that it was repaired before...They didn’t do too good a job.. Actually they made it worse. The dodgy guys are back!
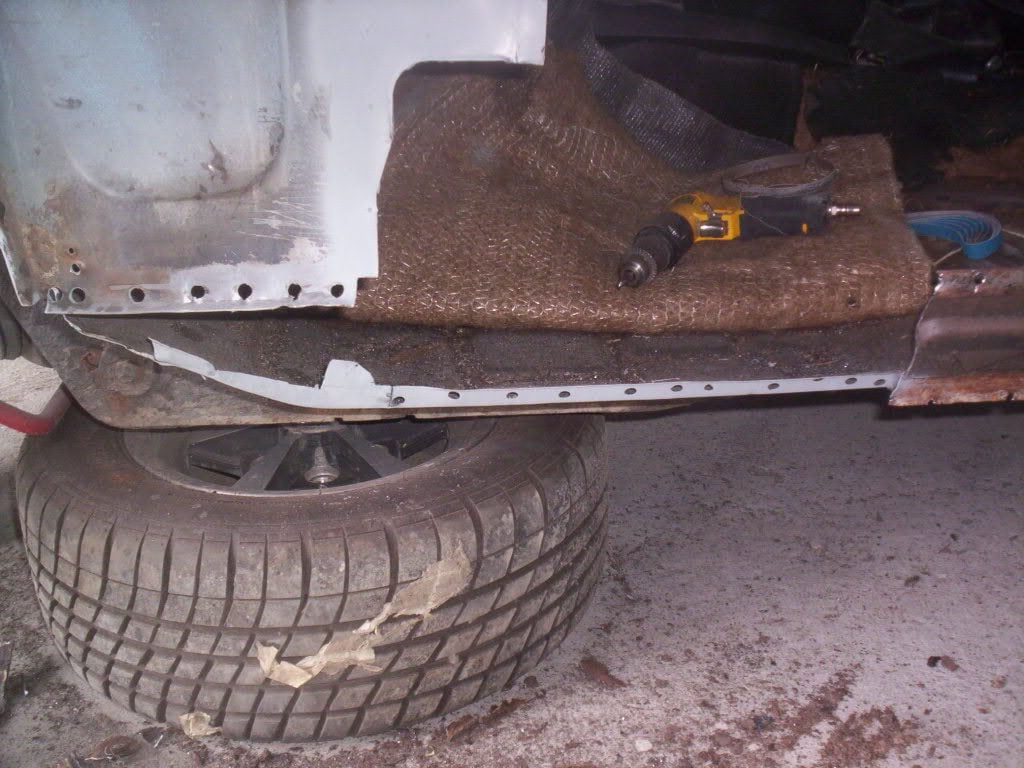
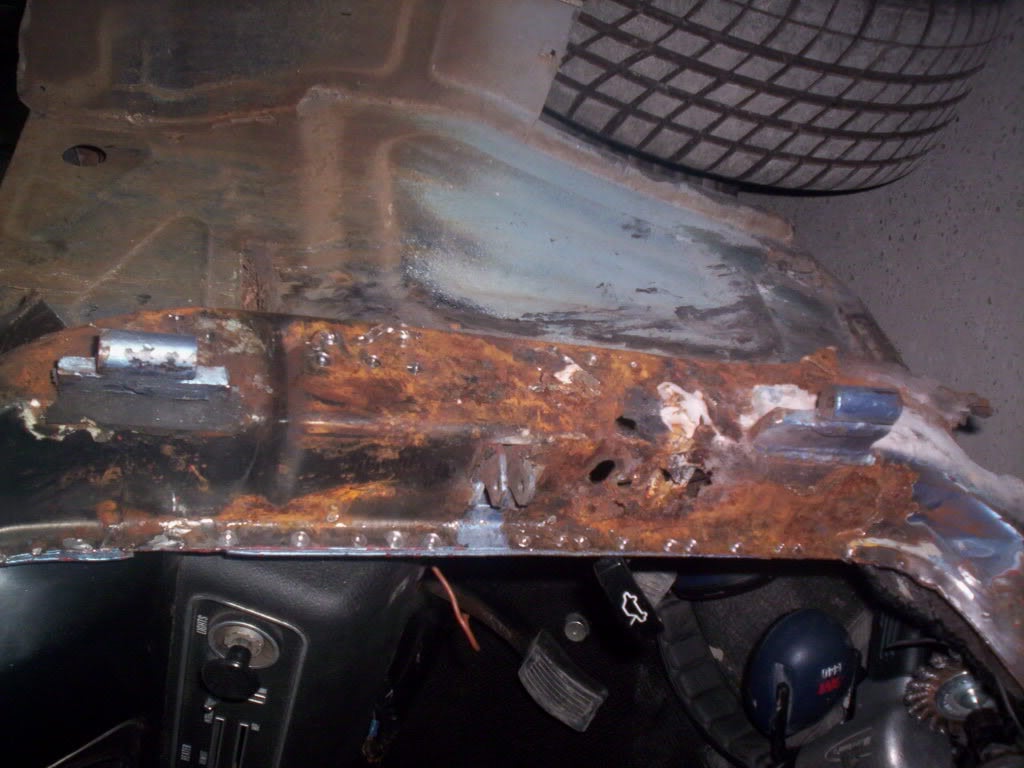
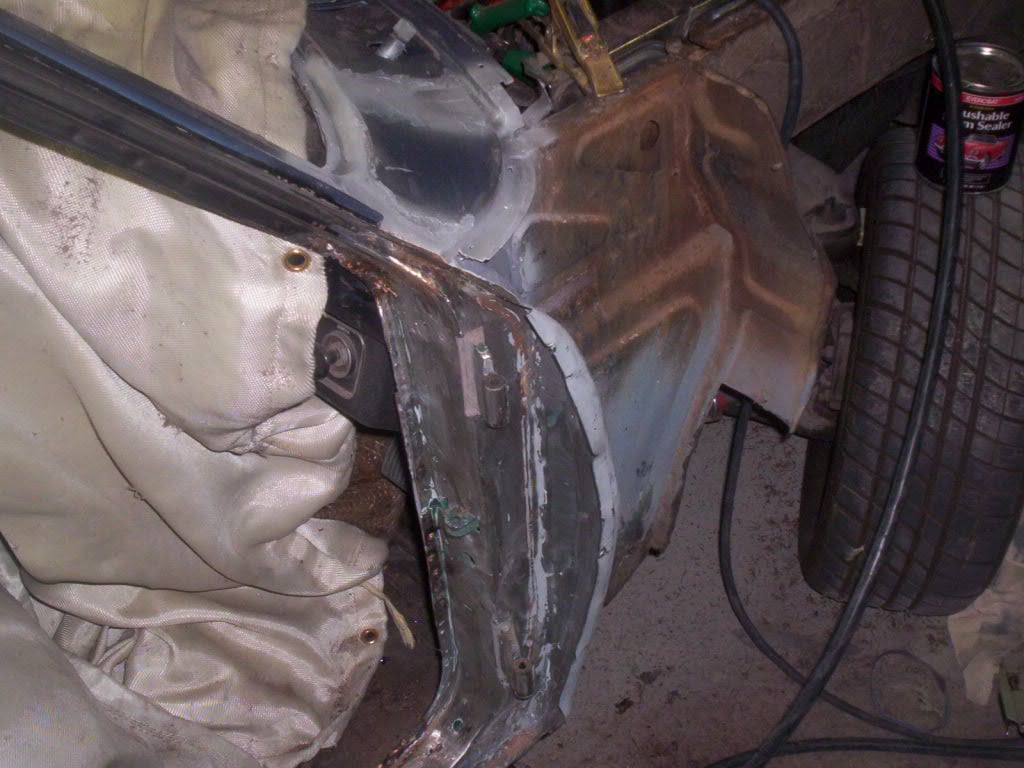
I knew when looking that the front body pillar that it will be a mess under it...and I was right...
Will have to think how to fix this as I’m not too sure about removing the whole piece as I’m worried that I won’t get the hinges in the right spot..Ide like to..The A pillars off the donor car are perfect..Shame to cut up really.
ANY ideas????
I was thinking of just taking off the first layer; fix/patch the reinforcing pillar. Then put a pillar outer piece off the donor car back on...That way I won’t move the hinges?
dodgy repairs
The result of the repairs
I had a look at the front A pillar.
After sandblasting....I discovered that it was repaired before...They didn’t do too good a job.. Actually they made it worse. The dodgy guys are back!
I knew when looking that the front body pillar that it will be a mess under it...and I was right...
Will have to think how to fix this as I’m not too sure about removing the whole piece as I’m worried that I won’t get the hinges in the right spot..Ide like to..The A pillars off the donor car are perfect..Shame to cut up really.
ANY ideas????
I was thinking of just taking off the first layer; fix/patch the reinforcing pillar. Then put a pillar outer piece off the donor car back on...That way I won’t move the hinges?
dodgy repairs
The result of the repairs
#79
S pack
-

- Members
-

- 15,767 posts
Scrivet Counter
- Name:Dave
- Location:Luggage Point
- Car:73 LJ
- Joined: 25-January 10
Posted 15 June 2012 - 08:36 AM
Ill have a go at using them..If not, Ill get the complete seal with ends on them...
Hi Mike
Great job, keep up the good work.
It would be more expensive but a much better job to use the complete repro sills.
Personally I'd use the complete A pillars from the donor car if they are in good nick, just measure twice or three times and cut once.
You could even go to the trouble to make up jigs that lock into the door openings and attach to the hinges just to make sure the replacement A pillars hinges will be in the exact location.
Just a thought.
Cheers
Dave.
#80
_Agent 34_
_Agent 34_
-
- Guests
Posted 15 June 2012 - 04:18 PM
Mike,
give me a call as i just replaced both sides on my car and can help with some advice on how i did it and this maybe able to help you make a decision on how to attack you car.
you really need to at least to pull off the out skin of the pillar and then treat that rust and then fix the new outer skin.
OR it may be better to just replace back to the factory join as i did and it just slips in the same spot and then re butt weld up the drilled out spot welds. I was very surprised how well it lined back up with the door.
0401816661 call over the week end.
text me and i'll send some photos as well.
grant
#81
_mikecatts_
_mikecatts_
-
- Guests
Posted 15 June 2012 - 08:25 PM
Hi all....Thanks for the advice.
I’m not working on the car this weekend, I’m busy else ware...I’ll call next week if I get stuck Grant, and thanks for the offer, you’re a champ and one day I’ll buy you dinner for the help/advice
I’m going to get the proper seal panels that have the ends on...Same old story, I tried to save a buck, but it just ends up costing more. That’s car resto I suppose. Live and learn.
After staring/ scratching my head ALL day over this, I’ve decided to replace the WHOLE A pillar. The inner panel is stuffed, totally, can’t be fixed... I spoke to Gavin at Retro Rods...he explained the best way to go about it. First I will make some bracing to keep everything as it is... Then Ill mount my door, with the guard on, get it right then tack in place double, triple check...Then weld in. The way Im going to do it to the orginal factory spots/joins as Grant suggested..no cut and shut.. Im going to do this right....So my next job is to fix a small hole in the RH guard and clamp on to aline the door properly...When the guard is in place, I will then fix the window cowl...so it all matches..Might be the go I recon...
What I think is strange is that I tried the donor LJ car door on my car...And it comes up too short to engage the lock, by about 7mm...Why is this? Is the LJ longer in the door opening??? Or being a Brisbane built car, are the dies/jigs different as to Adelaide build???
I measured both cars hinge placing and they are roughly the same.
I was hoping to use the donor door as its in better nick than the original...
I put the donor A pillar on my door and its fine in alignment...Then back on LJ door and it’s the same...but when I put LJ door on LC...it’s too short...
I can’t put LC door on LJ as I took off the A pillar...Maybe I should of!!!!!!
Ill place in my rust bath for a week just to make sure, then seal before it goes on.
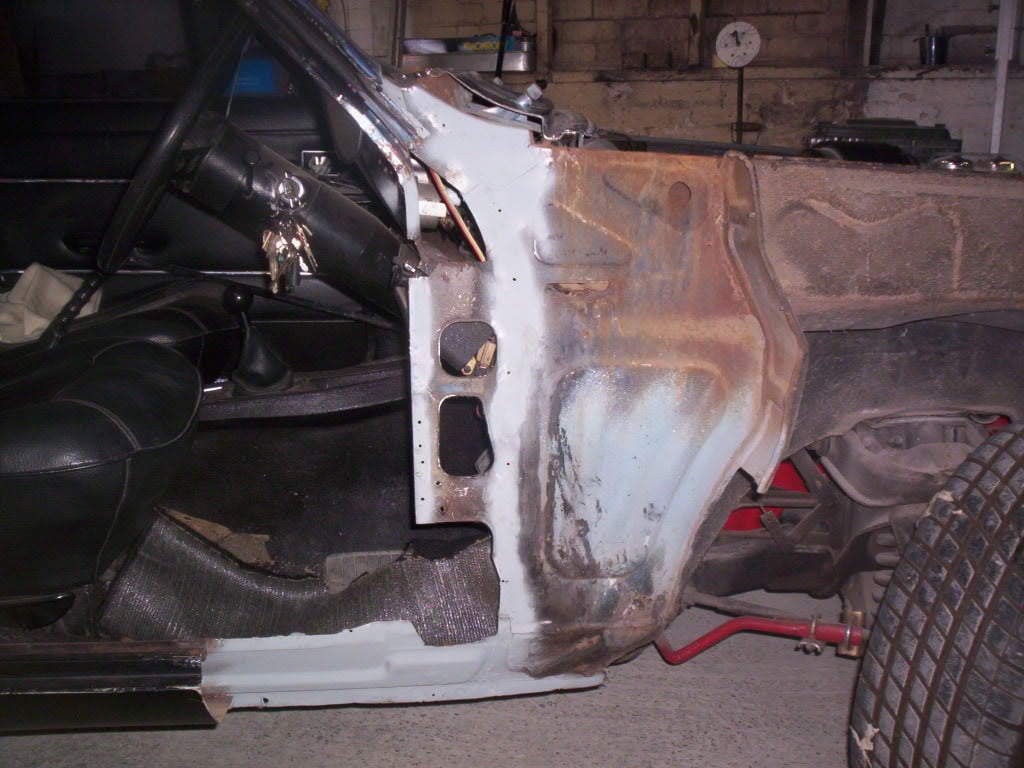
Cut RH A pillar..in exellant condition..no rust at all..Im mad not to use.
The donor piece lines up with the door ok..Hope it fits as well.
poor donor car.. Getting lighter every week..wont be much left by the time Ive finnished I reacon
I’m not working on the car this weekend, I’m busy else ware...I’ll call next week if I get stuck Grant, and thanks for the offer, you’re a champ and one day I’ll buy you dinner for the help/advice
I’m going to get the proper seal panels that have the ends on...Same old story, I tried to save a buck, but it just ends up costing more. That’s car resto I suppose. Live and learn.
After staring/ scratching my head ALL day over this, I’ve decided to replace the WHOLE A pillar. The inner panel is stuffed, totally, can’t be fixed... I spoke to Gavin at Retro Rods...he explained the best way to go about it. First I will make some bracing to keep everything as it is... Then Ill mount my door, with the guard on, get it right then tack in place double, triple check...Then weld in. The way Im going to do it to the orginal factory spots/joins as Grant suggested..no cut and shut.. Im going to do this right....So my next job is to fix a small hole in the RH guard and clamp on to aline the door properly...When the guard is in place, I will then fix the window cowl...so it all matches..Might be the go I recon...
What I think is strange is that I tried the donor LJ car door on my car...And it comes up too short to engage the lock, by about 7mm...Why is this? Is the LJ longer in the door opening??? Or being a Brisbane built car, are the dies/jigs different as to Adelaide build???
I measured both cars hinge placing and they are roughly the same.
I was hoping to use the donor door as its in better nick than the original...
I put the donor A pillar on my door and its fine in alignment...Then back on LJ door and it’s the same...but when I put LJ door on LC...it’s too short...
I can’t put LC door on LJ as I took off the A pillar...Maybe I should of!!!!!!
Ill place in my rust bath for a week just to make sure, then seal before it goes on.
Cut RH A pillar..in exellant condition..no rust at all..Im mad not to use.
The donor piece lines up with the door ok..Hope it fits as well.
poor donor car.. Getting lighter every week..wont be much left by the time Ive finnished I reacon
#82
S pack
-
- Members
-
- 15,767 posts
Scrivet Counter
- Name:Dave
- Location:Luggage Point
- Car:73 LJ
- Joined: 25-January 10
Posted 15 June 2012 - 09:09 PM
G/day Mike
The LC and LJ have the same chassis & body structure so an LJ door should theoretically fit straight onto an LC and vise versa.
Quality control back in the 70's wasnt crash hot so alignment of panels and gaps wasn't always consistent.
Compare the measurements of the doors you have and they should be relatively identical.
The way to adjust the door alignment on these cars is to slightly bend the A pillar hinges (using leverage or whacking with a block of wood and hammer) to move the door forwards or backwards and up or down (at the striker end) in the opening.
The hinge piece on the door frames can also be adjusted slightly with suitable force from either inside the door or from outside to help obtain the desired result.
These adjustment methods may have been employed during the manufacture (or during repairs later in life) of one or both of your cars, this may be why you can't take a door from one car and put it onto another and have it fit up correctly.
Many many years ago my dad bought some rust free doors to replace the rusty ones on mums EH wagon. All the replacement doors fitted fine (with slight hinge adjustments) but the replacement L.H rear door stuck out about 10mm past the dogs leg and if we adjusted it so it sat right at the dogs leg the top of the door and window frame sat way out. Dad took it to the panelbeater and he somehow twisted the door to suit the car.
Hope this bit of drivel is of some help.
Cheers
Dave.
#83
_Agent 34_
_Agent 34_
-
- Guests
Posted 16 June 2012 - 09:32 AM
stagger the cut and the weld through the top window pillar section in order to get the best strength from the join.
#84
brocks72xu1
-

- Members
-
- 733 posts
Forum Fixture
- Location:somewhere in nsw
- Joined: 21-October 07
Posted 16 June 2012 - 12:39 PM
i hand made my sill end caps
this is the driver side inner
these are easy to do,if spraypainters can do it and sometimes even have to go to panelshops to
show panel beaters how to put the on
#85
_BARRY JACKPOT_
_BARRY JACKPOT_
-
- Guests
Posted 16 June 2012 - 08:25 PM
Holy c r a p! I thought I had rust issues when I did dads car, it was practically showroom condition compared to that, well done fellas.
#86
_mikecatts_
_mikecatts_
-
- Guests
Posted 17 June 2012 - 07:23 AM
Thanks guys..after talking/reading some posts/emails...Im a bit more confident about mounting the A pillar...Instaed of "tacking" on..Im going to "tech" screw on..then position correctly..then weld....
After seeing the pics from Brocks72...looks easy but difficult if you guys know what I mean....I like your hand made seal ends..I might have a go at making mine..Will save me $900....
Guys..Im having trouble buying some Worth weld through zinc primer..The Worth people is out of stock..any ideas where I can get some???? I only want the Worth brand, as I know it works..
Grant...good tip..I would not have done that..I will stagger the joins...
Keep your fingers crosed for me..Ill post the results next week...
Mike
#87
brocks72xu1
-
- Members
-
- 733 posts
Forum Fixture
- Location:somewhere in nsw
- Joined: 21-October 07
Posted 17 June 2012 - 08:44 AM
mike go buy some cam weld thru primer much better product than wurth and not as dear to buy ,grant where did you get the idea of
staggering your joins lol,
mike i made my sill ends out of left over sill panels very easy and simple you just need to to tapper the ends slightly where you cap goes ,put the piller on you old marks and use panel screws and clamps to hold it ,once your happy with where it sits put the door on and check gaps (door to quater if you have your guards there try them aswell)the trick is to check ,check and check again,open door and close it close it make sure its close's easy(you dont have lift the door for it to latch)you can do the piller and inner sill at one go just dont leave the floor attached hey grant,
#88
_Agent 34_
_Agent 34_
-
- Guests
Posted 17 June 2012 - 08:46 AM
Mike,
Rule No 1 don't weld untill it's all lined up.
OK here are my tips for you mike on this as you really need some detailed help here.
1) the cars are really flexible once you take out this part of the car ( window pillar) so don't do any repairs to the car unless it's sitting on the car stands so this means dropping it down off the rotisseri
2) once on the car stands make sure that they are all level and the car is sitting square- also the pillar does drop slightly and the dash does flex as you have taken out the support
3) select the best point to join - in your case this will now be up the pillar and not as per brocks 72 car, which is lower
4) prepare the donor panel and if you join on the factory spot welds ( this is the lower section only )it sould just slip in ( actually you will have to spend heaps of time with this )
5) once close to fitting start to trim the top pillar and stagger the cut - leave the top longer and join up the outside of the window pillar like a flap and weld where required - but weld not now -
6) fit and screw in place and then fit door to check gaps - this will also take a while and you then need to massage the A pillar around until you get the correct gap or the best is going to be
7) check and re check the fit then screw off properly ready for welding
8) you really need to also set the front guards on as well or dummy position it as you also have a front GAP between the guard and the door and you need to make sure that the rear gap and the front gap are the same or close
9) once butt welded ( through the spot welds ) you can still adjust the door with up and down movement - physical lifting
10 ) have a beer and then swear that you will never do this job again
11) remember to put a feeder wire up the window pillar for the interior light and it cannot be anything else as it will melt when you weld up the pillar and you will need this to drag through the new wire for the light
good luck and may the A pillar replacement force be with you
Edited by Agent 34, 17 June 2012 - 08:55 AM.
#89
_mikecatts_
_mikecatts_
-
- Guests
Posted 18 June 2012 - 09:24 AM
Guys..you are legends...Thanks for the pics and desription...I will make some bracing to keep from moving first, then ill do as you guys say..I will keep a level head and look 3-4 times before ANY welding is done.
After reading, I am more confident...Ill keep you all posted..
Mike
After reading, I am more confident...Ill keep you all posted..
Mike
#90
_mikecatts_
_mikecatts_
-
- Guests
Posted 19 June 2012 - 08:57 PM
Hi all....I didnt get around to doing the A pillars..A mate is comming around on the weekend to give me a hand..I might need it..
I dont want to do the door sills until ive done the A pillars
So I decided to do the rear parcel tray as the cars off the rotisserie...Didnt take long to take off, clean the spots and fix the two side areas on the car. I had to make these sections out of .8 zinc. I will have to get something to grind the welds down in the inner area that I fixed..My grinder and Dremel wont do..Im thinking of a belt linnisher..Ive seen some small ones.. The parcel shelf just needed a little cleaning.
Ive zinc primed the overlapping ares so they dont rust..I will have to POR15 the box section before it goes on..Im going to weld in place the parcel shelf then put on the new rear window bottom sill..I thought this way would be the go so I dont loose my window opening..The parcel shelf fits a treat..Looks 100% better than the old smelly one with rust and speaker holes..One thing I did loose by taking away the old shelf..are the roll bar mounting holes that were in it...I wanted to keep to show/prove it was raced at one stage early in its life..The floor mounts are still in place.
Will finnish tomm after work...
Mike
#91
_mikecatts_
_mikecatts_
-
- Guests
Posted 19 June 2012 - 09:01 PM
I just had a thought..Guys..Did the LC XU-1 come out with rear seat belts?
Why Im asking is that I dont have the bolts in the rear parcel shelf the same as My 2 door donor car. They are blank??? no nuts in place, and it hasnt been changed. And the nuts in the rear inner guard have been blocked from factory, It has the hard black sikaflexy stuff all over them, They did it when they sealed that area as its done as one, its right into the plastic bolt cover thats on this nut. and no floor mounting for the rear belts as my 2 door donor has..
I only have bolts positions for the front belts?? Is this correct.
Ive looked through my manuls documents and cant seem to find anything..I know the early cars didnt have belts..But I thought from 1966 you had to have belts.
Mike
Edited by mikecatts, 19 June 2012 - 09:05 PM.
#92
S pack
-
- Members
-
- 15,767 posts
Scrivet Counter
- Name:Dave
- Location:Luggage Point
- Car:73 LJ
- Joined: 25-January 10
Posted 19 June 2012 - 09:27 PM
I just had a thought..Guys..Did the LC XU-1 come out with rear seat belts?
Why Im asking is that I dont have the bolts in the rear parcel shelf the same as My 2 door donor car. They are blank??? no nuts in place, and it hasnt been changed. And the nuts in the rear inner guard have been blocked from factory, It has the hard black sikaflexy stuff all over them, They did it when they sealed that area as its done as one, its right into the plastic bolt cover thats on this nut. and no floor mounting for the rear belts as my 2 door donor has..
I only have bolts positions for the front belts?? Is this correct.
Ive looked through my manuls documents and cant seem to find anything..I know the early cars didnt have belts..But I thought from 1966 you had to have belts.
Mike
Hi Mike
Don't quote me on this but I think the rear seat belt rule came in 1971, so Pre 1971 GTR XU1, GTR, S & SL models and all the 4cyl cars as well probably won't have come ex factory with rear seat belts. Rear seat belts may have been an option way back then but I don't know for certain.
Cheers
Dave.
#93
_oz772_
_oz772_
-
- Guests
Posted 19 June 2012 - 10:51 PM
Rear belts were optional in 1970, compulsory in 1971. My 8/70 XU1 I owned back in 1981 had rear belts, thank goodness.
#94
_mikecatts_
_mikecatts_
-
- Guests
Posted 20 June 2012 - 09:10 AM
Thanks guys.....A mate and I were looking at the roll bar mounts and discovered the missing rear belt holders...So I dont have to panic...Should I put some belts in????
Scott...You have an email
Mike
Scott...You have an email
Mike
Edited by mikecatts, 20 June 2012 - 09:23 AM.
#95
_mikecatts_
_mikecatts_
-
- Guests
Posted 21 June 2012 - 09:19 PM
Hi all...Got the rear parcel shelf in..Fixed in place as per original with tabs that i made when making the rust repair pieces..Was pretty easy to do..Was going to plug weld the window channel on. I decided to wait and see if i can lend/hire a spot welder..I dont really want to grind in the channel..will make a mess and I have enough work to do as is..
The Rear window channel repair piece fitted exactly in place..I was im pressed..Thanks John Gong....
Now Im back to the A pillar.....
Had an explore..not as bad as I thought..will hopefully get it done this weekend...
Mike
MY Shadow
The Rear window channel repair piece fitted exactly in place..I was im pressed..Thanks John Gong....
Now Im back to the A pillar.....
Had an explore..not as bad as I thought..will hopefully get it done this weekend...
Mike
MY Shadow
#96
_mikecatts_
_mikecatts_
-
- Guests
Posted 26 June 2012 - 07:55 PM
Hi all.
I didnt get a chance to do the A pillar over the weekend. Maybee this one
So I started fixing the RH door...I was going to use the original door, The LJ door is better, so thats the one to use..
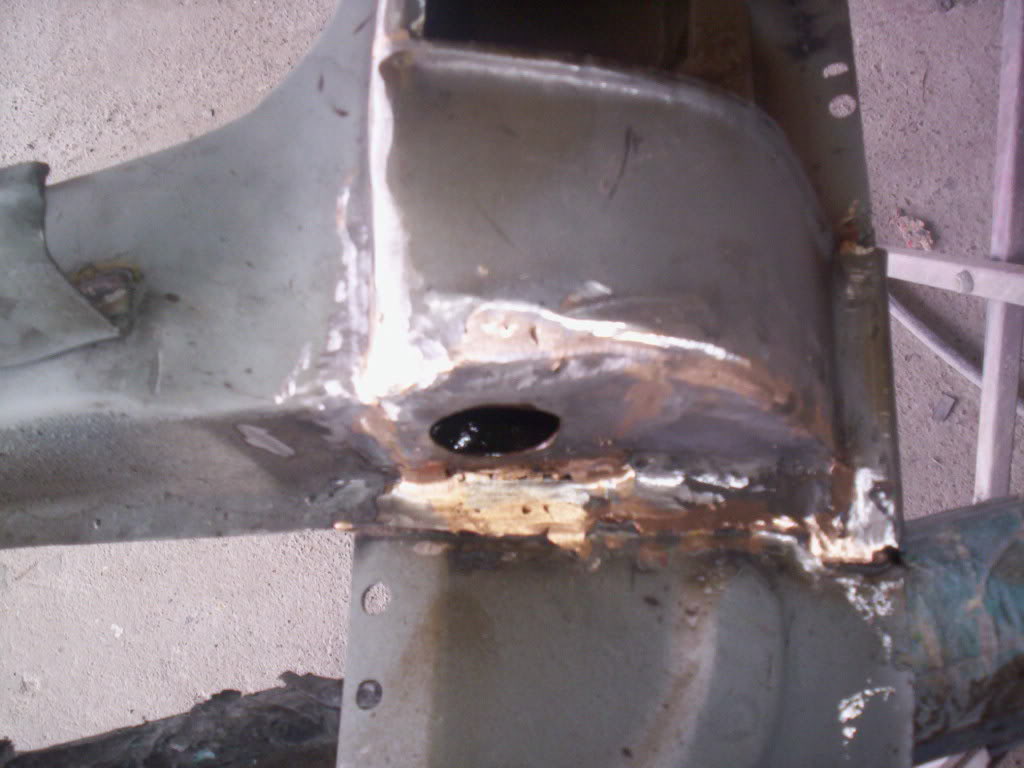
As expected. A little rust hole reveals a major rust repair...
I had to custom make a new section as the outer piece is a mess, not worth fixing.
Wasn’t too hard to make, Just flattened out and traced, drilled the holes for rubbers, door trim and the latch. Held in place on door to get the right bend, the celco clips and a couple of pop rivets help heaps, bent, cut, fitted and welded. Done..
I want to fix the outer sections before I weld this in...I have access to the inner door with this off so I can rust proof after fixing the outer rust holes a lot easier...
Used pieces from the LJ guard to fix the sections...Looks good...
Now the top of the door...I wire wheeled and this is what I have to fix...Ill make a new piece...
I’ll continue tomm...
Mike.
I didnt get a chance to do the A pillar over the weekend. Maybee this one
So I started fixing the RH door...I was going to use the original door, The LJ door is better, so thats the one to use..
As expected. A little rust hole reveals a major rust repair...
I had to custom make a new section as the outer piece is a mess, not worth fixing.
Wasn’t too hard to make, Just flattened out and traced, drilled the holes for rubbers, door trim and the latch. Held in place on door to get the right bend, the celco clips and a couple of pop rivets help heaps, bent, cut, fitted and welded. Done..
I want to fix the outer sections before I weld this in...I have access to the inner door with this off so I can rust proof after fixing the outer rust holes a lot easier...
Used pieces from the LJ guard to fix the sections...Looks good...
Now the top of the door...I wire wheeled and this is what I have to fix...Ill make a new piece...
I’ll continue tomm...
Mike.
Edited by mikecatts, 26 June 2012 - 07:59 PM.
#97
_mikecatts_
_mikecatts_
-
- Guests
Posted 27 June 2012 - 06:41 PM
Hi all...
Finnished the RH door rust repairs..All told it took about 14 hours or two evenings in the shed..Turned out brilliant and no more rust...You wouldnt even know by looking...I cleaned the welds on the inside as well....
Will sandblast when finnshed the LH door..Then POR 15 the insides and 2 pack prime...
I bought a spot welder..I tried to hire/borrow one and no luck..I hope it works as it will save a LOT of time...
Mike
#98
_toranatime_
_toranatime_
-
- Guests
Posted 27 June 2012 - 06:59 PM
nice repairs mate, your getting through it 
just curious what sort of spot welder you got? whether it was one of the kelarc spot weld guns or the real deal? Anyway whichever one should make it much easier for your build. i'm borrowing one to fit my new front guards instead of plug welding them.
cheers
just curious what sort of spot welder you got? whether it was one of the kelarc spot weld guns or the real deal? Anyway whichever one should make it much easier for your build. i'm borrowing one to fit my new front guards instead of plug welding them.
cheers
#100
_sunburst73-xu1_
_sunburst73-xu1_
-
- Guests
Posted 27 June 2012 - 07:34 PM
Yeah great work on the door repair,just keep chipping away.


1 user(s) are reading this topic
0 members, 1 guests, 0 anonymous users

