Hi Nick, nothing is easy to me mate. It's very time consuming and most times it takes 2 or 3 goes to get things where I am happy with them. In a lot of ways I regret going LS1 as nothing ever just fits in and it is draining getting things to work and sit where they should. It would have been so much easier with a holden v8.
Anyway, so bolted up the motor, trans and k-frame today. All slotted in great and really happy except for the stupid trans mount which was supposed to be to suit 4l60e but clearly isn't. You can see the 2 holes I needed to drill to get it to work. I should have checked this ages ago but when I dummy fitted it all before the car went to the shop, I just had a trolley jack under the rear of the box sitting it in the right spot.
 IMG_1428.JPG 258.85K
31 downloads
IMG_1428.JPG 258.85K
31 downloads
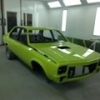
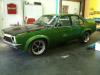
So, here it is all bolted up and in....
IMG_1436.JPG 211.52K
26 downloads
IMG_1437.JPG 194.06K
22 downloads
Annoyingly, I've got to pull it out again as one of my extractors is just too close to the k-frame (about 5mm clearance and I need 10mm all around for the engineer to be happy). I was able to get another mm or 2 by moving the engine on the mounts but it's still not enough. Doesn't matter. When I pull it, I'm also going to change out my trans oil lines for something better. Not sure yet but I'm not happy with my modified VZ ones, they feel sloppy at the trans end and I am worried they'll leak (which will mean I need to pull it all out again once it's running). I'd rather just change them out now for something more robust. I'm thinking just plain screw in fittings with a barbed hose end. I'll see whats available.
Thanks.


 )
)