Jump to content


Photo
- - - - -

Lone Ranger LC 2door


  • Please log in to reply
230 replies to this topic

#176 Davis

Davis

    Forum Fan

  • Members
  • PipPipPipPip
  • 343 posts
  • Name:Drew
  • Location:.
  • Car:LC 2 door
  • Joined: 26-October 13

Posted 15 October 2015 - 06:36 PM

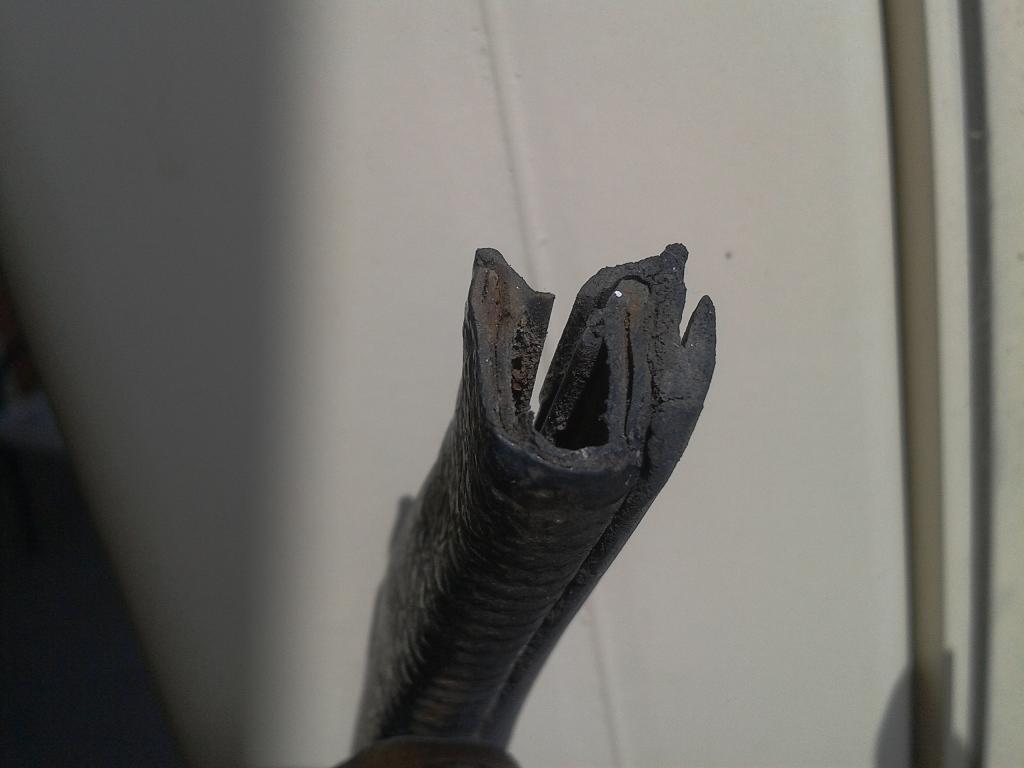
Well decided to treat myself this week, picked up the complete rubber kit from rare spares and got to work. Front 1/4 window rubbers fit up nicely as per recent positive reviews.


Also got my headlining from C&G upholstery (I think they are a member on here), no complaints, easy to deal with and promptly supplied.


If you want to test your patience, I suggest installing your own headlining, very tedious and frustrating job....about 8 hours later, job done, not perfect but pretty happy for my first effort.


Lastly picked up a recon 173 hi comp head (2811929) with a 28H5 date code (so Im guessing maybe a HJ or similar). Has got new valves, new valve springs and been faced. Only cost me $150 so I took the punt (pretty sure I would spend that on new valves alone). Can anyone confirm will the rockers and pushrods from my 202 bolt onto this head???


Cheers

Attached Files


#177 Davis

Davis

    Forum Fan

  • Members
  • PipPipPipPip
  • 343 posts
  • Name:Drew
  • Location:.
  • Car:LC 2 door
  • Joined: 26-October 13

Posted 31 October 2015 - 08:19 PM

So Im finally making some progress, over the past week I've fitted all the body rubbers, put the door internals back together and today fitted both front and rear windows (cheers to Darway for the extra set of hands). Overall everything went in without too many dramas...


Next on the cards will probably be getting new brake lines made up and fitted. I really need to start the ball rolling on my engine too, so hopefully some interesting updates to come.


cheers

Attached Files


#178 rodomo

rodomo

    To advertise here, call 13TORANA

  • Members
  • PipPipPipPipPipPipPip
  • 17,999 posts
  • Name:R - O - B Dammit!
  • Location:Way out west of Melbourne Awstraylya
  • Joined: 10-December 05

Posted 31 October 2015 - 10:20 PM

Nice work! :driving:


Edited by rodomo, 31 October 2015 - 10:23 PM.


#179 _mikecatts_

_mikecatts_
  • Guests

Posted 01 November 2015 - 06:29 AM

Nice.

Question Andrew.. what Rear quarter window seal do u have? and does it look like original?


Is it like the pic?


and,, how did the door belt weather strips work? not the main seal, the ones that go against the window both inside and out.

Attached Files


Edited by mikecatts, 01 November 2015 - 06:31 AM.


#180 Davis

Davis

    Forum Fan

  • Members
  • PipPipPipPip
  • 343 posts
  • Name:Drew
  • Location:.
  • Car:LC 2 door
  • Joined: 26-October 13

Posted 01 November 2015 - 07:33 AM

Mike, the rear window rubber is the generic rare spares one, and looks nothing like the pic you have added. I never had any rubbers on my car when I bought it, so unsure what the originals look like.

The weather strips are a pain in the arse, I found the best way was;

Instal 1/4 window first, secure at the top in position, but leave the bottom screw out for now.
Instal glass, but just let it sit in the bottom of the door, so u can move it around.
Now start with the external weather strip, it only goes one way, I put the little metal clip sideways in a pair of needle nose pliers then reach up through the door and try to secure (you will drop the clip a dozen times before you get it right. Once I had two clips on, I applied the sealant to glue, then attached the other two clips.
Now attach window mechanism, and get glass in the runner. Wind window all the way.
Instal internal weather strip, this one is a little easies because clips are attached to strip. Use pliers or screwdriver to reach inside door and put pressure against clips. I didn't glue this strip, as it didn't feel necessary.
Leave the door for a day so glue can dry.
Install window Chanel, I started with 1/4 window side, you will need silicon spray to help lubricate, window should be in down position, start feeding channel, eventually u will get too much friction and can't push it anymore. Wind window up, reach in door and start to pull channel from the bottom. Use silicon spray as required. Repeat process for other side of door, make sure channel isn't twisted, once in place, wind window down and glue channel into position.

Hope this helps, it's a pain in the arse, and tests your patience. If your still having dramas, happy to give you a hand, I start holidays next week. Cheers

#181 Davis

Davis

    Forum Fan

  • Members
  • PipPipPipPip
  • 343 posts
  • Name:Drew
  • Location:.
  • Car:LC 2 door
  • Joined: 26-October 13

Posted 01 November 2015 - 07:45 AM

Sorry mike, just realised you said rear 1/4 window seal not rear window seal. The rares one I was provided is very similar to the pic you posted, however rather then the V shaped section of rubber, it's more of a U

Edited by Davis, 01 November 2015 - 07:46 AM.


#182 _mikecatts_

_mikecatts_
  • Guests

Posted 01 November 2015 - 09:04 AM

this is the orginal seal.. note the rubber bit to seal against the frame to stop water getting under the pinch weld..


post-10252-0-68862900-1446161365.jpg


#183 darway43

darway43

    Forum Member

  • Members
  • PipPipPip
  • 215 posts
  • Name:David
  • Location:Glenelg East, South Australia
  • Car:LJ 2 door
  • Joined: 29-July 08
Garage View Garage

Posted 02 November 2015 - 12:17 PM

Nice work Andrew looking sweet!


#184 Davis

Davis

    Forum Fan

  • Members
  • PipPipPipPip
  • 343 posts
  • Name:Drew
  • Location:.
  • Car:LC 2 door
  • Joined: 26-October 13

Posted 12 November 2015 - 04:20 PM

Currently on leave so spending a bit more time in the shed this week. Started by Finishing my MDF boot floor and covered it black carpet,  then mounted up my battery box. Also made a parcel shelf from MDF and covered it in the same vinyl as my roof, fairly cheap to do and looks the part.


I've just finished coving my B pillars in vinyl and fitted my rear 1/4 windows and latches. The rubbers are the rare spare ones, they fit well but make the windows really hard to shut...hopefully they will soften up over time.


I'm taking the car to a mates mates workshop in a couple weeks, going to get it on the hoist and fit all my brake and fuel lines. Am I correct in saying the brake lines are 3/16 and the fuel line is 5/16?....I was thinking of running 3/8 for the fuel line just in case I opt for a higher performance engine in the future.


Cheers


Attached Files


#185 Davis

Davis

    Forum Fan

  • Members
  • PipPipPipPip
  • 343 posts
  • Name:Drew
  • Location:.
  • Car:LC 2 door
  • Joined: 26-October 13

Posted 05 December 2015 - 04:30 PM

What better way to spend a 39 degree Saturday in Adelaide then making new brake hard lines...Big thanks to my mate Aaron from All Clutch & Brake for the use of his hoist/equipment/expertise, very tedious and fiddly job especially without templates to work from, but enjoyable none the less. Those with a keen eye will notice I have mounted the distribution block further back towards the firewall, this was due to the car being drum brake initially and I didn't have the original mount on the chassis rail, so I used one of the rat trap mounts. I opted to run braded brake hoses with slightly transparent grey covers, look really good in person. Still need to fit my rear wheel cylinders, rebuild front callipers and then I can fill the system and check for any issues. Cheers 

Attached Files


#186 _ChaosWeaver_

_ChaosWeaver_
  • Guests

Posted 05 December 2015 - 06:15 PM

looking good ...........   :spoton:


#187 Davis

Davis

    Forum Fan

  • Members
  • PipPipPipPip
  • 343 posts
  • Name:Drew
  • Location:.
  • Car:LC 2 door
  • Joined: 26-October 13

Posted 13 December 2015 - 01:57 PM

So I dropped my 202 off at the engine builders last week, will hopefully have some good updates on that build in the next few months...not going over the top, just building a nice street engine.


In the mean time I've just been messing around with some of my interior parts, finally finished my under dash and heater control panel, got the decals of marty (sibhs) which turned out great, easy to apply and look the part (flick him a PM if u want a set).


Also cleaned up my loom and re wrapped it, I hate wiring and am not looking forward to this part of the build...


Cheers

Attached Files


#188 Davis

Davis

    Forum Fan

  • Members
  • PipPipPipPip
  • 343 posts
  • Name:Drew
  • Location:.
  • Car:LC 2 door
  • Joined: 26-October 13

Posted 06 January 2016 - 06:05 PM

Update from the engine builder yesterday, block stripped and sent to the machine shop, pulled the box down, only very minor wear on the cluster gear so not worth replacing, hopefully have some pics in the near future.


Also treated myself to a little xmas present...new rally stripe gear knob ordered from the states...pretty happy with the colour match.


Cheers

Attached Files


#189 _duggan208_

_duggan208_
  • Guests

Posted 06 January 2016 - 10:46 PM

Its always good to see something different and even better that the different part matches up, cool.

regards


#190 Davis

Davis

    Forum Fan

  • Members
  • PipPipPipPip
  • 343 posts
  • Name:Drew
  • Location:.
  • Car:LC 2 door
  • Joined: 26-October 13

Posted 07 January 2016 - 07:15 AM

Cheers Jon

This is the mob I used http://www.speeddawg.com

Good selection and easy to deal with, unfortunately the US dollar conversion and international postage prices doesn't help the wallet at this end.

#191 Davis

Davis

    Forum Fan

  • Members
  • PipPipPipPip
  • 343 posts
  • Name:Drew
  • Location:.
  • Car:LC 2 door
  • Joined: 26-October 13

Posted 04 February 2016 - 04:17 PM

Quick update: Slight setback, the virgin 202 I was using for this build had a couple hairline cracks in one of the bores, so has been scrapped. Then my engine builder opened up a spare he had, but it was already to far oversize (60 thou I think). Fortunately Darway has come through with the goods and offered me his spare virgin 202...will be dropping it off at the engine builders this weekend, fingers crossed this one comes back from the machine shop without any issues.

Apart from that not much progress, have started re fitting the loom and tidying up little bits and pieces. Hopefully have some good engine pics and updates soon. Cheers

#192 Davis

Davis

    Forum Fan

  • Members
  • PipPipPipPip
  • 343 posts
  • Name:Drew
  • Location:.
  • Car:LC 2 door
  • Joined: 26-October 13

Posted 06 February 2016 - 11:46 AM

Dropped the replacement 202 at the engine builders this morning, this one is a HL prefix which make's it a LH,LX,UC era. Hopefully this one is all good...time will tell.


Whilst there I picked up my Aussie 4 speed, got lucky with the box as it only had minor wear to the cluster gear. Just need to get some different linkages so they don't hit the tunnel and shorten the shifter.


And whilst I think about it I'm trying to sort my handbrake but turns out I'm missing the equaliser and clevis which connects both cables to the handbrake. If anybody has a spare let me know. Cheers

Attached Files


#193 Davis

Davis

    Forum Fan

  • Members
  • PipPipPipPip
  • 343 posts
  • Name:Drew
  • Location:.
  • Car:LC 2 door
  • Joined: 26-October 13

Posted 29 February 2016 - 11:48 AM

Can't catch a break...my third red 202 in the scrap bin, this one had holes in bores and would need to be sleeved, despite being virgin bore! Also my 9 port yella terra head was cracked between ports 7 and 8, very frustrating. So new plan....black 202 with 12 port head, currently being stripped and off to the machine shop this week...hoping for some good news.

#194 lctriples

lctriples

    Forum Fan

  • Members
  • PipPipPipPip
  • 405 posts
  • Name:paul
  • Location:melbourne
  • Car:LC 2 door, HR prem wagon
  • Joined: 02-April 15

Posted 10 May 2016 - 06:31 PM

Davis, have been following your thread and congrats on doing such a great job, just wondering how the build is going as you havn't updated for a while, and would like to ask the following:

Was paint acrylic or 2 pak and did you have any background in panel beating or spray painting before the project?

How did you go with an under dash heater?

How did you go with cable clutch?

The reason I ask is that I hope do do a few things on my project the same as you have, kind regards and hope all is well, paul


#195 Davis

Davis

    Forum Fan

  • Members
  • PipPipPipPip
  • 343 posts
  • Name:Drew
  • Location:.
  • Car:LC 2 door
  • Joined: 26-October 13

Posted 19 June 2016 - 08:23 PM

Apologies Paul, didn't see your post til now. Thanks for your comments, unfortunately I have got much more done lately...but hopefully that will change soon.

-paint is 2pac, I wish I could take credit for the paint and panel work but I paid for that to be done. I helped out were I could to keep labour costs down.
-havnt done the underdash heater yet, still trying to work out the best method, will prob buy an aftermarket unit.
-hopefully start sorting the clutch cable setup once I get the engine and box in.

Sorry I can't be more help. Will be picking up my engine next week. will throw some progress pics up now.

Cheers

Edited by Davis, 19 June 2016 - 08:24 PM.


#196 Davis

Davis

    Forum Fan

  • Members
  • PipPipPipPip
  • 343 posts
  • Name:Drew
  • Location:.
  • Car:LC 2 door
  • Joined: 26-October 13

Posted 19 June 2016 - 08:42 PM

So it only took me 4 x engines to get a good one, wasted a couple dollars on machine work and typically issues were only identified by the time they machined 5th or 6th cylinder...oh well shit happens. I ended up with a black motor taken out to 40 thou, bottom end is standard, running the same cam as Darway had in his previous engine which is a waggott #667 (Ive attached the specs for those interested). Being a black motor, obviously has the 12 port head,  I'm sticking with this with some minor flow work being done, studs have been machined for roller rockers and new valves fitted. I will be running the factory 12 port manifold for now with a 500 holey...long term some triples will be on the cards. Hopefully get some pic's of the completed engine up by next weekend. cheers

Attached Files


#197 lctriples

lctriples

    Forum Fan

  • Members
  • PipPipPipPip
  • 405 posts
  • Name:paul
  • Location:melbourne
  • Car:LC 2 door, HR prem wagon
  • Joined: 02-April 15

Posted 28 June 2016 - 06:23 PM

Andrew, my build project is very similar to yours, also going with a 3.3 blue motor, cable clutch set up. Hope to paint myself in acrylic. I will post pics and updates as I go which may help you, cheers paul.


#198 Davis

Davis

    Forum Fan

  • Members
  • PipPipPipPip
  • 343 posts
  • Name:Drew
  • Location:.
  • Car:LC 2 door
  • Joined: 26-October 13

Posted 08 July 2016 - 03:53 PM

Couple progress pics, got the engine painted up and pretty happy with the result. Decided to go with chev orange. Also had to get myself alloy hi rise rocker cover because the roller rockers were to tall for standard rocker cover...decided to get the matching side plate. With any luck might drop the engine in the bay in the next few weeks. cheers

Attached Files


#199 _mikecatts_

_mikecatts_
  • Guests

Posted 10 July 2016 - 03:42 AM

Hi Andrew.. Looks like you beat me on engine builds, even though u had to get more blocks?

Where did you get the rocker cover riser from????? and what thickness?


#200 Davis

Davis

    Forum Fan

  • Members
  • PipPipPipPip
  • 343 posts
  • Name:Drew
  • Location:.
  • Car:LC 2 door
  • Joined: 26-October 13

Posted 10 July 2016 - 09:56 AM

Cheers mike, yes finally got there with the engine. The rocker cover is a KC (kilkenny casting) alloy type, u can get them on ebay or vpw.com.au was the cheapest i could find, around $250 ish. Personally i wouldnt put one of these on ur xu1 given how original it is. Are you running roller rockers? If so u might just need to do the double rocker cover gasket trick and use ur factory rocker cover.


0 user(s) are reading this topic

0 members, 0 guests, 0 anonymous users