The C pillars on both sides were totally shot. (non existent) the RHS was a lot better than the left but it was cut out and repaired too.
 pillar1.jpeg 51.26K
21 downloads
pillar1.jpeg 51.26K
21 downloads
pillar2.jpeg 23.98K
19 downloads

 1 votes
Forum Member

Posted 02 January 2017 - 08:41 PM
The C pillars on both sides were totally shot. (non existent) the RHS was a lot better than the left but it was cut out and repaired too.
pillar1.jpeg 51.26K
21 downloads
pillar2.jpeg 23.98K
19 downloads
Forum Member
Posted 02 January 2017 - 08:46 PM
footwell.jpeg 83.67K
22 downloads
Both floor sections drivers side and passenger were repaired. Drivers side had previously been patched fairly well, but a replacement panel was cheap enough so decided to re do the repair and do it properly. Passengers side was pitted fairly badly and required replacement. It was later discovered that this may have been due to a rusted section behind the heater box (small circular hole) which was likely leaking water into the foot well over time.
Sorry, forgot to post the repair on the RHS C Pillar.
repair c.jpeg 140.81K
23 downloads
Forum Member
Posted 02 January 2017 - 08:57 PM
Lastly the windscreen channel needed to be replaced the whole way along.
front ws.jpeg 111.17K
22 downloads
That was pretty much the last of the major rust work, there were small sections around the plenum, around the window pillar, radiator support and hatch area that were all repaired.
Forum Member
Posted 02 January 2017 - 09:00 PM
I had the chassis rails trimmed and the battery box area smooth'd out, as i plan to run a 383 SBC and could use the extra room for pipes. The firewall lip will also be trimmed for distributor clearance.
rails.jpeg 93.8K
27 downloads
Cool

Posted 02 January 2017 - 09:01 PM
Forum Member
Posted 02 January 2017 - 09:07 PM
SO...
After a long 12 months, and a lot of people around me (work colleagues, family, friends) all not understanding why i was putting so much ($$) most of my income into this shell of a car. I now have a completed shell in high fill, getting the last few bits of body work and then she is home for the build! Plan is to fit the running gear and then get the car painted (as i want the flares to be fitted perfectly to the diff/wheel combination). Just wanted to say thanks to everyone who has given me words of support, i am very new to the classic car hobby and to be honest i need all the advice i can get and take all your suggestions on board, so thank you all.
Christo.
highfil2.jpeg 113.97K
28 downloads
highfil3.jpeg 49.49K
20 downloads
Socially Distant

Posted 02 January 2017 - 09:25 PM
So you're not fitting very wide wheels then? I would've assumed you'd have cut the guards by now if you were fitting big wheels and flares?
Are you having the underbody and engine bay painted before you start assembling?
Forum Member
Posted 02 January 2017 - 09:53 PM
I am fitting wide wheels and flares, didn't want to cut just yet. I'll get the wheels and may cut before getting the 9" diff made up
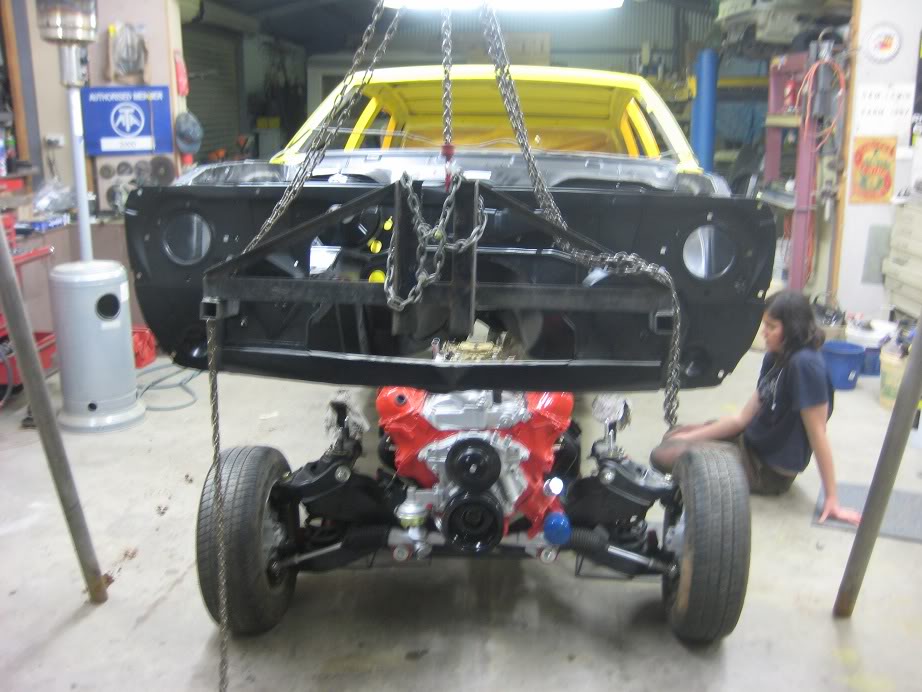
I am having the underbody painted, but not the engine bay. Will likely just be a dummy fit to get everything in, i have heard with a lot of builds it's engine in/out a few times so i didn't want to have the bay scratched. I will get the K Frame back in the next week or so hopefully.

Posted 02 January 2017 - 10:56 PM
Forum Member
Posted 02 January 2017 - 11:07 PM
Thanks LX SS EFI - I originally wanted to go a Metallic Gunmetal Grey with Blackouts, but I think white highlights the blackouts better...so i think i have convinced myself to go white instead....
Forum Fixture

Posted 07 January 2017 - 06:16 PM

Forum Participant
Posted 07 January 2017 - 08:58 PM
Looks fantastic Chris, well done. Mine is Grey with the blackouts around the window. Certainly stands out.
Great job on planning and executing this build. Will be keen to follow your progress.
Cheers Matty.
Forum Member
Posted 17 January 2017 - 10:36 PM
Cheers Covert & Matty, i appreciate the support! hopefully the ball keeps rolling...panel work has come to a standstill over the break. was supposed to have the car back this week...bit of a waiting game atm.
Forum Member
Posted 26 February 2017 - 10:31 PM
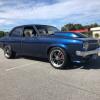
And...SHE IS HOME!
20170226_191829.jpg 124.58K
31 downloads
20170226_191459.jpg 125.74K
25 downloads
Posted 27 February 2017 - 08:26 PM
Looks neat and tidy. The bonnet cowl looks small though.
Forum Member
Posted 27 February 2017 - 11:02 PM
does it? its from Ernicks WIslon. Ridgy Dige copies apparently
Socially Distant
Posted 27 February 2017 - 11:20 PM
Looks like the normal A9X bonnet scoop to me, maybe you're thinking of those full-length cowls with the big ridge up the centre, Brandon?
BTW Chris, how good does the old girl look now! Bet you can't wait to get some paint on it?
Forum Member
Posted 28 February 2017 - 12:52 AM
mate, i tell ya...it has been a long time coming. I'm relieved it has turned out so well and am really hoping to get some paint on it although i have changed my mind on the planned colour scheme a few times!
Posted 28 February 2017 - 04:09 PM
Maybe I am just used to the big reverse cowls now? I like the one you have. Will look tough as nails with the flares and big wheels.
Driving the Dream
Posted 28 February 2017 - 05:37 PM
Forum Participant
Posted 04 March 2017 - 01:16 AM
Forum Fan

Posted 15 March 2017 - 01:08 AM
I have heard with a lot of builds it's engine in/out a few times so i didn't want to have the bay scratched. I will get the K Frame back in the next week or so hopefully.
To avoid damage mount and remove by dropping the complete driveline, kframe, suspension gearbox etc under the car.
Cameron

Forum Fixture

 View Garage
Posted 15 March 2017 - 09:11 AM
Only way I can get mine in or out!
Forum Member
 View Garage
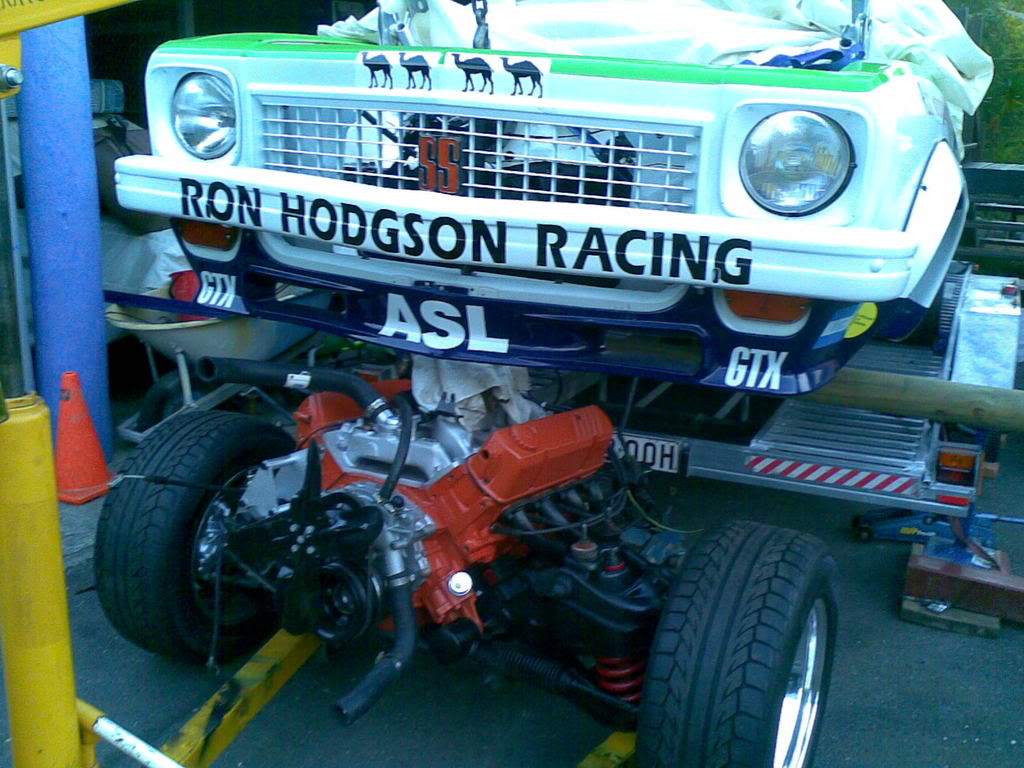
Posted 15 March 2017 - 02:06 PM
IMG_7828.JPG 158.22K
33 downloads
IMG_7829.JPG 156.44K
41 downloads
Socially Distant
Posted 15 March 2017 - 02:46 PM
^^^ Ingenious use of a car trailer and a treated pine log... you gotta love bush mechanics!


0 members, 1 guests, 0 anonymous users

