
Fantastic work all from home! Pure credit to you. Look forward to seeing it in the flesh 👌👌

The Sally Report
Started by
_The Handbrake_
, Jun 23 2019 10:29 PM
LC GTR Restoration 1971 The Marty Report Girl Power
1003 replies to this topic
#926

Holdenbn74
 View Garage
-
- Members
-

- 152 posts
Forum Member
- Name:Brendan Nichol
- Location:Perth
- Car:LH
- Joined: 29-January 13
View Garage
Posted 25 January 2023 - 10:16 AM
#927
sibhs
-

- Members
-
- 2,724 posts
Lotsa Posts!
- Name:Martin
- Location:Perth
- Car:LJ Coupe S
- Joined: 27-July 12
Posted 03 February 2023 - 09:45 PM
Continuing that fantastic attention to detail.
Love this build. Certainly one of the most interesting build threads for an original restoration that I have ever heard of.
Thanks Heath, I love your build too. You ooze talent and ingenuity.
Fantastic work all from home! Pure credit to you. Look forward to seeing it in the flesh 👌👌
Cheers Holdenbn74, drop by one day or wait till it's on the road.
Still struggling to get really stuck into this resto, still only little updates.
Finally assembled the steering column. I found the LC version a lot harder to assemble than the LJ.
Layed out all the bits on the coffee table.
 IMG_1142.jpeg 444.36K
13 downloads
IMG_1142.jpeg 444.36K
13 downloads
Inserted the inner tube and secured with the locking clamp and two bolts.
IMG_1145.jpeg 118.49K
7 downloads
The collar bit needs to be pushed on over ridges and turned to lock in position. I found this couldn't be done until all the bits are threaded on the shaft in correct order.
IMG_1147.jpeg 88K
8 downloads
IMG_1148.jpeg 247.2K
7 downloads
The three screws secured hold it all together.
IMG_1150.jpeg 83.79K
7 downloads
The finished product in a foam padded case.
IMG_1152.jpeg 246.91K
7 downloads
Marty
#928
madtoranajzedded
-
- Members
-
- 2,893 posts
Sir ask alot
- Name:Maz
- Location:Southern Tasmania
- Car:72 LJ SL SEDAN.
- Joined: 30-September 13
Posted 13 February 2023 - 06:00 PM
Your doing some great work Marty.I got the wheels on and the ball joints turn pretty easy now with more leverage.still a huge strain on the steering rack I’d imagine….ahh so that’s what the steering column bolts look like.I’ve been trying to find those to no avail.
#929
sibhs
-
- Members
-
- 2,724 posts
Lotsa Posts!
- Name:Martin
- Location:Perth
- Car:LJ Coupe S
- Joined: 27-July 12
Posted 17 March 2023 - 10:11 PM
Shocking News
I wasn't sure what shocks to put in this car. The LJ had the Koni's which I got for a good price but that option isn't available any more and full price is close to $1000. I want to paint the shocks to look like that original green colour so was looking for a cheaper option.
Monroe were the original brand so I though I get them. Full price was about $580 but luckily I knew someone and got a set for $340.
Finding the correct colour paint was difficult (still don't know what colour it is)
I had a couple of pics of original shock and just picked a similar colour.
IMG_2708 (1).jpeg 12.2K
7 downloads
IMG_1496.jpeg 47.83K
5 downloads
IMG_1497.jpeg 56.77K
5 downloads
IMG_1586.jpeg 175.53K
5 downloads
I converted my shelves into a spray booth. Fitted an extractor fan and light. I really enjoy painting and this should stay once the car is finished.
IMG_1589.jpeg 190.4K
7 downloads
IMG_1596.jpeg 84.93K
10 downloads
IMG_1597.jpeg 137.02K
7 downloads
IMG_1598.jpeg 103.81K
7 downloads
Marty
#930
jd lj
-

- Members
-
- 2,120 posts
Forum Fixture
- Name:James D
- Location:in the shed
- Car:LJ
- Joined: 03-December 10
Posted 18 March 2023 - 10:15 AM
That colour looks close to Balmoral green Marty. That's what I used on my Koni's.
#931
Ice
-

- Members
-
- 15,221 posts
Cool
- Name:Gene
- Location:Galaxy's away from Ipswich
- Car:77 HZ Sandman Van
- Joined: 03-January 07
Posted 18 March 2023 - 10:28 AM
Top work as usual Marty
#932
yel327
-

- Members
-
- 13,790 posts
Oh My, Don't you post alot
- Joined: 10-February 08
Posted 18 March 2023 - 11:29 AM
Are these the same colour as the rears on later Torana and Holden? I got that paint matched a while back, have the formula here. So I can get original HJ shocks rebuilt for my HJ Premier and paint them the same colour as originals.
#933
4dabush
-

- Members
-
- 233 posts
Forum Member
- Name:Adam
- Location:Cairns
- Car:73 LJ S
- Joined: 04-February 19
Posted 12 April 2023 - 09:34 PM
Hi Marty,
sorry for completely off topic, I tried to PM you but the site won’t let me, Are you still doing dash lettering, LJ ?
cheers,
Adam
#934
sibhs
-
- Members
-
- 2,724 posts
Lotsa Posts!
- Name:Martin
- Location:Perth
- Car:LJ Coupe S
- Joined: 27-July 12
Posted 14 April 2023 - 09:12 PM
Hi Marty,
sorry for completely off topic, I tried to PM you but the site won’t let me, Are you still doing dash lettering, LJ ?
cheers,Adam
Hi Adam, I've only got a few sets left and I'm going to start restoring some dash's so until I print some more I'm not selling any more for a while.
As we're talking about dash's I'll put up some pics of a few i'm restoring at the moment. These are plastic LC ones. One was broken in half but all need strengthening in the narrow section.
IMG_1699.jpeg 634.15K
21 downloads
Gave them a bath in the kitchen sink, much to Sallys discussed.
IMG_1704.jpeg 166.12K
19 downloads
Drilled holes through the fin and fitted metal strips before pouring black resin. It reminds me of grout filling a block to take out the flex.
IMG_1758.jpeg 121.73K
20 downloads
IMG_1759.jpeg 86.35K
18 downloads
Made a couple of moulds of the two different textures.
IMG_1765.jpeg 154.45K
19 downloads
This is one of the holes needing repair and the results of the two patterns once I poured resin into the area.
IMG_1768.jpeg 223.33K
20 downloads
IMG_1789.jpeg 252.08K
18 downloads
IMG_1786.jpeg 228.45K
20 downloads
I'll post more pictures as these progress.
Marty
#935
S pack
-

- Members
-
- 15,764 posts
Scrivet Counter
- Name:Dave
- Location:Luggage Point
- Car:73 LJ
- Joined: 25-January 10
Posted 14 April 2023 - 09:29 PM
Love your work Marty.
#936
Ice
-
- Members
-
- 15,221 posts
Cool
- Name:Gene
- Location:Galaxy's away from Ipswich
- Car:77 HZ Sandman Van
- Joined: 03-January 07
Posted 15 April 2023 - 10:57 AM
Awesome work Marty
#937
Bruiser
-

- Members
-
- 871 posts
Forum Fixture
- Name:Bruce
- Location:Barossa valley, S.A.
- Car:FC Holden, VK Commodore, - Ex torana owner
- Joined: 05-May 21
Posted 15 April 2023 - 11:33 AM
Me too, you’re a clever bloke
#938
sibhs
-
- Members
-
- 2,724 posts
Lotsa Posts!
- Name:Martin
- Location:Perth
- Car:LJ Coupe S
- Joined: 27-July 12
Posted 15 April 2023 - 10:31 PM
Thanks Dave, Gene and Bruce. Definitely a step-up from my last effort repairing the LJ dash where I used epoxy putty and just scratched in a messy pattern.
I've got the K-frame together after a few months of bit-by-bit work.
IMG_1039.jpeg 138.51K
7 downloads
I'm keeping the original GTR springs in, I liked the ride height.
IMG_1040.jpeg 111.97K
8 downloads
IMG_1206.jpeg 224.91K
8 downloads
I used the hydraulic table to get some compression on the spring before fitting the spring compressor.
IMG_1209.jpeg 123.63K
6 downloads
IMG_1212.jpeg 79.14K
5 downloads
IMG_1454.jpeg 120.91K
5 downloads
IMG_1464.jpeg 138.21K
7 downloads
I'm using a blue paint pen to identify all the bolts done up to final tension. I'm hoping this will also make the inspector think it's been professionally assembled.
IMG_1465.jpeg 79.95K
6 downloads
IMG_1606.jpeg 166.6K
9 downloads
Getting the old wheels back on to move it around.
IMG_1609.jpeg 183.72K
8 downloads
Marty
#939
sibhs
-
- Members
-
- 2,724 posts
Lotsa Posts!
- Name:Martin
- Location:Perth
- Car:LJ Coupe S
- Joined: 27-July 12
Posted 22 April 2023 - 08:18 PM
A bit more work on the dashs.
This one was missing a section above steering arch, I dammed the area with plasticine then poured a bit of resin.
IMG_1976.jpeg 136.57K
6 downloads
All the dash were missing the section for the lock barrel and most locating pins were missing. I copied these from a good dash and fitted them to dash where required.
IMG_1979.jpeg 169.9K
6 downloads
IMG_1988.jpeg 118.12K
7 downloads
All the flat line areas which need the chrome were sanded flat to give a clean edge for the chrome. After plastic primer was applied it was time to paint black.
IMG_2035.jpeg 245.34K
7 downloads
IMG_2036.jpeg 254.84K
7 downloads
The bottom dash was very good so I touched up the font and just cleaned the plastic. I always try and keep them plain plastic if possible because that's how they were.
IMG_2043.jpeg 620.88K
8 downloads
Next step is apply the decals and then chrome edging.
Marty
#940
sibhs
-
- Members
-
- 2,724 posts
Lotsa Posts!
- Name:Martin
- Location:Perth
- Car:LJ Coupe S
- Joined: 27-July 12
Posted 23 April 2023 - 10:03 PM
When I do some painting I try mix up extra paint and have extra bits ready to spray to use the excess.
After the dash's were done I grabbed a couple of rims and the steering column bracket to use up paint.
IMG_2037 (1).jpeg 250.8K
10 downloads
IMG_2038 (1).jpeg 162.48K
7 downloads
IMG_2044 (1).jpeg 371.74K
9 downloads
I got lucky a few years ago at the opening of a Rare Spares store. Some of the management team from over east were there for the special occasion. They were keen to speak to clients and find out what we liked and disliked. I asked why the wheel trims were no longer made, it was due to the maker increasing the price by more than double. Then he said he had a set in his office in Melbourne and I could have it for a good price. Yes please. It was sent over and offered to me for $250 or $300 with a set of centre caps and wheel nuts. I paid the $300.
Since then they have been harder and more expensive to find so very happy with that purchase.
IMG_2046.jpeg 214.93K
11 downloads
I had to see how they look, I didn't seat the trims because the paint hasn't fully cured. Once all the rims are painted I'll apply the speckle silver paint.
IMG_2047.jpeg 249.44K
8 downloads
Bought some stickers and fitted them to the rocker cover.
IMG_2051.jpeg 360.86K
7 downloads
IMG_2054.jpeg 98.39K
9 downloads
Marty
#941
MODNIZD
-

- Members
-
- 460 posts
Forum Fan
- Name:Phil
- Location:Perth WA
- Car:4 Door LC RB25DET
- Joined: 12-November 05
Posted 25 April 2023 - 05:48 PM
Looking great Marty. Loving the resto work too.
#942
yel327
-
- Members
-
- 13,790 posts
Oh My, Don't you post alot
- Joined: 10-February 08
Posted 26 April 2023 - 08:46 AM
When I do some painting I try mix up extra paint and have extra bits ready to spray to use the excess.
After the dash's were done I grabbed a couple of rims and the steering column bracket to use up paint.
I got lucky a few years ago at the opening of a Rare Spares store. Some of the management team from over east were there for the special occasion. They were keen to speak to clients and find out what we liked and disliked. I asked why the wheel trims were no longer made, it was due to the maker increasing the price by more than double. Then he said he had a set in his office in Melbourne and I could have it for a good price. Yes please. It was sent over and offered to me for $250 or $300 with a set of centre caps and wheel nuts. I paid the $300.
Since then they have been harder and more expensive to find so very happy with that purchase.
I had to see how they look, I didn't seat the trims because the paint hasn't fully cured. Once all the rims are painted I'll apply the speckle silver paint.
Bought some stickers and fitted them to the rocker cover.
Marty

Do they still make the caps? I need to get 4 and butcher them for the red logo to put on some Rallye II HQ-HZ caps. I'm using them on a set of 15" repro Chevelle SS wheels on my HK and the red cap logos look far better.
Edit - just looked at their site and they have them. Are they plastic or metal? Hopefully plastic so easier to cut the logo out. The Rares HQ caps are just a sticker so I can replace that with the LC cap top.
Edited by yel327, 26 April 2023 - 08:51 AM.
#943
claysummers
-

- Members
-
- 3,716 posts
Lotsa Posts!
- Name:Clay
- Location:Willunga
- Car:186 FB Ute, 3.3 EK sedan
- Joined: 13-December 18
Posted 26 April 2023 - 09:52 AM
Bought a set on gumtree a couple years ago which I run on my ute with HT steelies as an alternative to the Sampson Magnums. I have to take the dust caps off the front hubs for them to fit. They were about $120 the set from memory.
Sent from my iPad using Tapatalk
Sent from my iPad using Tapatalk
#944
Heath
View Garage
-

- Administrators
-
- 18,403 posts
I like cars.
- Name:Heath
- Location:Eastern Suburbs, Melbourne
- Car:Heavily Modified UC Sunbird Hatchback
- Joined: 07-November 05
View Garage
Posted 28 April 2023 - 10:50 AM
Duuuuude! The mould of the dash grain.
Mate. Get outta here hahahhaaha. That is awesome.
#945
sibhs
-
- Members
-
- 2,724 posts
Lotsa Posts!
- Name:Martin
- Location:Perth
- Car:LJ Coupe S
- Joined: 27-July 12
Posted 11 May 2023 - 11:27 PM

POPULAR
Looking great Marty. Loving the resto work too.
Thanks Phil.
Duuuuude! The mould of the dash grain.
Mate. Get outta here hahahhaaha. That is awesome.
Heath, I take this as high praise coming from you. I think I have a 'man crush' on you. I love your work ethic and ability to sort out challenges that come your way. You're a genius!
Thanks, Marty
Final pics of the dash resto
Cutting up and applying the decals.
IMG_2066.jpeg 233K
6 downloads
IMG_2069.jpeg 279.02K
6 downloads
Then sprayed them with a clear varnish to protect the decals
IMG_2073.jpeg 279.89K
5 downloads
Found another brand of chrome pen I'm happy with, 3mm seems the go.
IMG_2185.jpeg 153.92K
7 downloads
A before and after shot. I've kept them in the same order so top one was snapped in two. This also has a grain repair which isn't as good as the rest. Still experimenting with the process. I also made this a GTR version which has no choke wording and I made some blanking plates for the hole. The bottom dash was not painted and is still original font.
IMG_1699 (1).jpeg 634.15K
5 downloads
IMG_2184a.jpg 307.03K
10 downloads
Marty
#946
sibhs
-
- Members
-
- 2,724 posts
Lotsa Posts!
- Name:Martin
- Location:Perth
- Car:LJ Coupe S
- Joined: 27-July 12
Posted 22 May 2023 - 10:46 PM
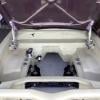
With the KFrame ready and the engine painted it's time to lift it into position. It all went well as I reminded myself on which mount goes on what side after the LJ getting them wrong. Also which mount sits in front and the other behind.
IMG_2208.jpeg 54.8K
7 downloads
IMG_2214.jpeg 100.07K
13 downloads
IMG_2217.jpeg 61.89K
7 downloads
Got all the engine bits that were restored years ago out of the bedroom wardrobe.
IMG_2220.jpeg 379.06K
6 downloads
IMG_2228.jpeg 80.15K
7 downloads
IMG_2257.jpeg 96.93K
7 downloads
Thought I'd better check the spigot bush and I'm glad I did. I used the wet paper method to remove it and it wasn't the correct one and was well worn.
IMG_2260.jpeg 34.61K
5 downloads
Soaked it in oil and squeezed it into the pores then tapped it into position.
IMG_2325.jpeg 55.96K
6 downloads
Fitted the fly wheel and lock tighten the bolts and torqued them up.
IMG_2326.jpeg 58.17K
6 downloads
Marty
#947
claysummers
-
- Members
-
- 3,716 posts
Lotsa Posts!
- Name:Clay
- Location:Willunga
- Car:186 FB Ute, 3.3 EK sedan
- Joined: 13-December 18
Posted 22 May 2023 - 10:55 PM
Must feel pretty good Marty 8) 8)
Sent from my SM-G781B using Tapatalk
Sent from my SM-G781B using Tapatalk
#948
sibhs
-
- Members
-
- 2,724 posts
Lotsa Posts!
- Name:Martin
- Location:Perth
- Car:LJ Coupe S
- Joined: 27-July 12
Posted 05 June 2023 - 05:06 PM
Must feel pretty good Marty 8) 8)
Sent from my SM-G781B using Tapatalk
Hi Clay, feel like I'm getting my Mojo back. This wet weather is actually giving me more time on the car.
Prepped and masked up the bits I've just bolted on.
IMG_2336.jpeg 126.48K
4 downloads
Got the heater warming up the paint and bits.
IMG_2337.jpeg 167.93K
4 downloads
Sprayed the front and added some over spray to the bell housing.
IMG_2338.jpeg 139.09K
4 downloads
IMG_2339.jpeg 162.81K
4 downloads
IMG_2340.jpeg 142.92K
4 downloads
Fitted the pulley and fan.
IMG_2342.jpeg 137.87K
4 downloads
Bolted on the manifolds and carby.
IMG_2351.jpeg 202.03K
4 downloads
Fitted the clutch and bell housing.
IMG_2355.jpeg 163.65K
4 downloads
IMG_2356.jpeg 143.03K
4 downloads
IMG_2364.jpeg 233.33K
8 downloads
Please excuse that poxy fuel pump, just using that until I get the real one sorted. Now I'm just waiting on the gearbox to be recond which will hopefully be ready in a couple of weeks.
Marty
Edited by sibhs, 05 June 2023 - 05:08 PM.
#949
claysummers
-
- Members
-
- 3,716 posts
Lotsa Posts!
- Name:Clay
- Location:Willunga
- Car:186 FB Ute, 3.3 EK sedan
- Joined: 13-December 18
Posted 05 June 2023 - 05:45 PM
Nothing like bolting stuff together. Detail is horn. If only they put an original type knurled nut on those things, but no it's plastico.
Sent from my SM-G781B using Tapatalk
Sent from my SM-G781B using Tapatalk
#950
bat 53
-

- Members
-
- 521 posts
Forum Fixture
- Name:albert
- Location:perth
- Car:lc gtr
- Joined: 17-December 17
Posted 06 June 2023 - 10:41 AM
marty my water pump pully is painted
feels good when we bolt things together 

looking good


Also tagged with one or more of these keywords: LC GTR, Restoration, 1971, The Marty Report, Girl Power
General →
General Discussion →
Hole for reverse cabling to gearboxStarted by dacastle , 02 Aug 2025 |
|

|
||
Holden Tech →
Electrical →
LC rear indicator screwsStarted by dacastle , 06 Apr 2024 |
|
|
||
General →
General Discussion →
What can you identify from stamped body number onlyStarted by 70 XU-1 , 21 Dec 2018 |
|
|
||
General →
General Discussion →
Resto Rage HelpStarted by Rainman , 16 Sep 2017 |
|
|
||
Holden Tech →
General LH-LX-UC →
LH Torana rear windscreen SpecificationStarted by _Pjabrown_ , 06 Sep 2016 |
|

|
1 user(s) are reading this topic
0 members, 1 guests, 0 anonymous users

