
Wow looks good keep the updates coming !

GREENMACHINE'S LX HATCH
Started by
_greenmachine215_
, Jun 29 2007 12:45 AM
345 replies to this topic
#27

barny_lx
-

- Members
-

- 599 posts
Forum Fixture
- Location:Country South Australia
- Joined: 08-November 05
Posted 01 May 2009 - 02:06 AM
BUMP!!
#28
_j7723_
_j7723_
-

- Guests
Posted 02 May 2009 - 11:35 AM
hay mate you need to polish more under the car 
I know you can do it
I know you can do it
#29
_greenmachine215_
_greenmachine215_
-
- Guests
Posted 12 May 2009 - 12:05 AM
Barny- Thanks for the "WAKE UP CALL"
Jeremy- Ive 2pac'd the whole front end in gloss black and re assembled it, But ive polished my rack, Calipers and all the assembly bolts, i dont wanna go overboard its just a JUNKY STREET CAR
But ill have an update within the next 2 weeks, im very busy working on it at the moment,
its ALL NEW inside, And has some extra cubes
stay tuned...
#31
bullitA9X
 View Garage
-
- Members
-
- 4,160 posts
Oh My, Don't you post alot
- Location:south australia
- Joined: 08-November 05
View Garage
Posted 06 June 2009 - 06:17 PM
awesome work mark these threads keep me going to finish mine keep up the great work!!!!!! and pics 
#32
barny_lx
-
- Members
-
- 599 posts
Forum Fixture
- Location:Country South Australia
- Joined: 08-November 05
Posted 29 June 2009 - 06:44 PM
Bump matey
#33
_greenmachine215_
_greenmachine215_
-
- Guests
Posted 29 June 2009 - 11:32 PM
Yeah Yeah relax. Im getting there. All the photos are sorted i just cant seem to load them up on photobucket from my computer so ive got to find another way to do this.
Good things come to those who wait.... Ive been waiting a fkn long time so it better be real good
update with in the next week I PROMISE
Good things come to those who wait.... Ive been waiting a fkn long time so it better be real good
update with in the next week I PROMISE
#34
_greenmachine215_
_greenmachine215_
-
- Guests
Posted 02 July 2009 - 01:30 AM
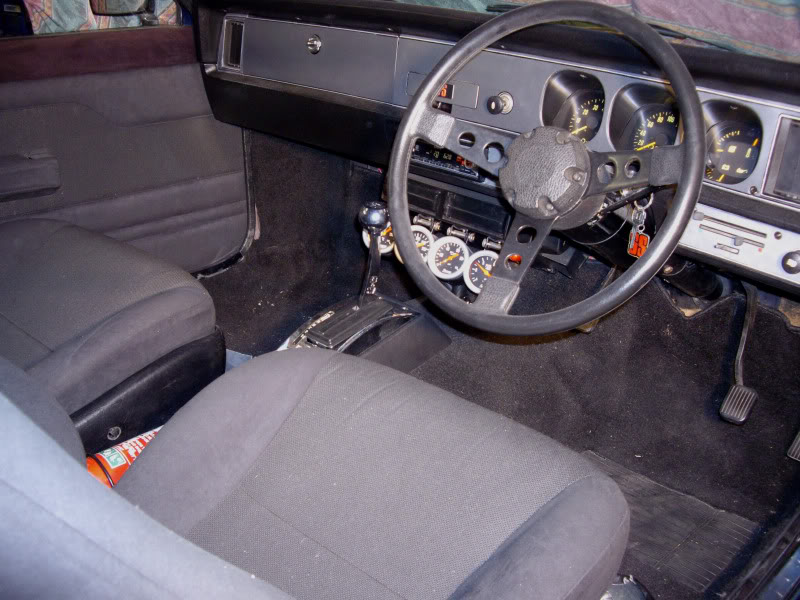
Okay, Heres the update as promised, I will be posting more often so my upload of pics arent so huge.
Since the last update Ive finally got my trim done its been 2 years in the waiting due to very very slack trimmer/mate
But its in and im happy.
The last time the hatch was running is pushing almost 3 years believe it or not.
This is what the old trim looked like
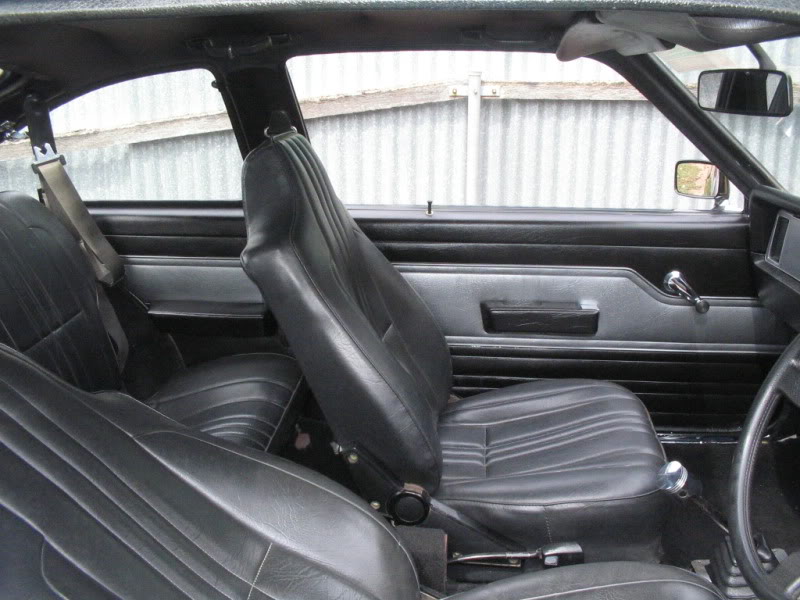
Since that ive done away with the front seats (in storage)
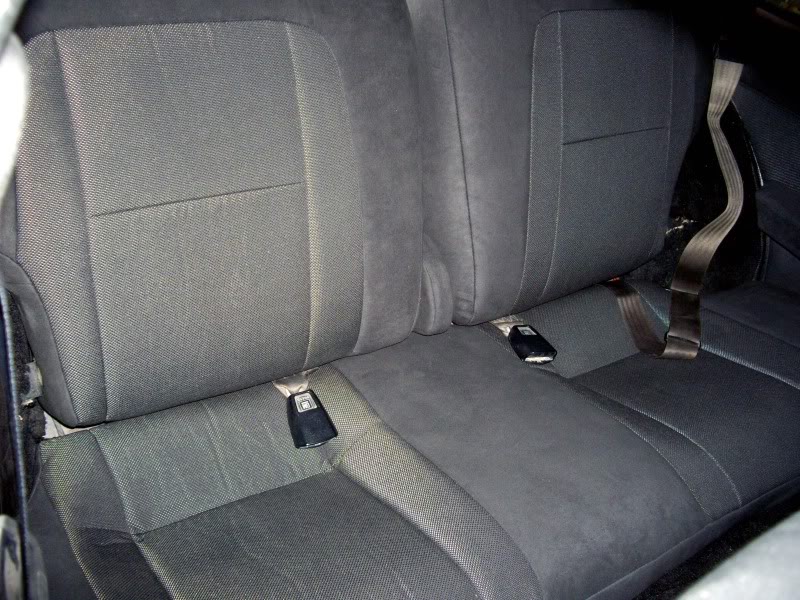
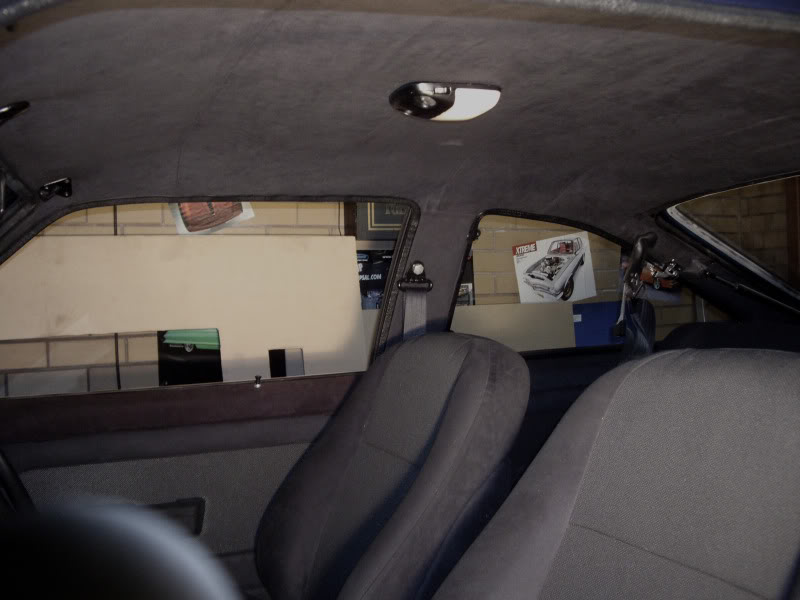
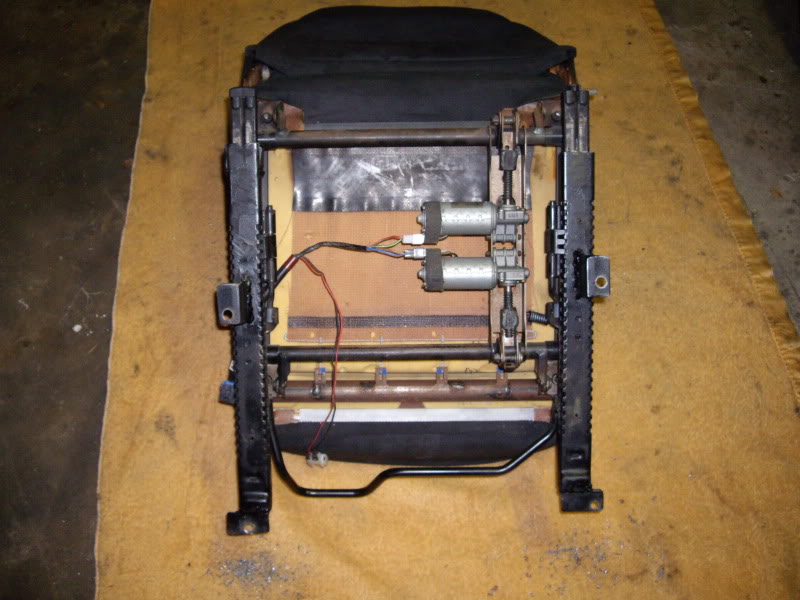
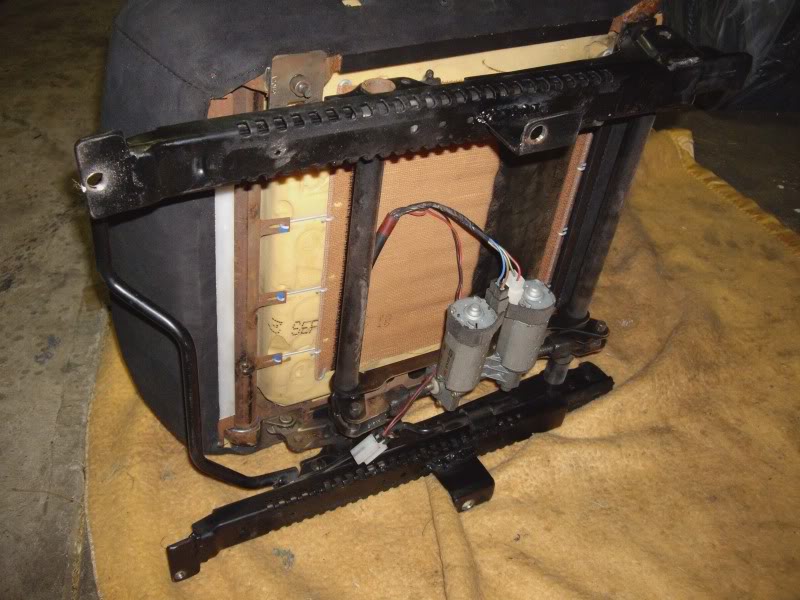
i purchased some VT Series 2 front seats and had the Head rests removed and tops smoothed out, extra lumbar support and the base shaved down to gain more bucket and also to sit lower in the car, Ive kept the commodore rails and modified them this way ive kept the electric bases. They match perfect in height with the rear seats too.
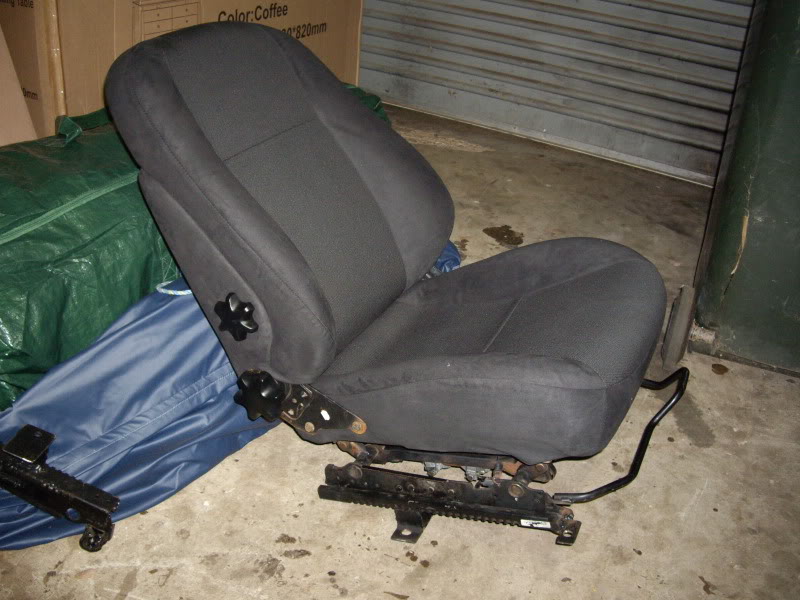
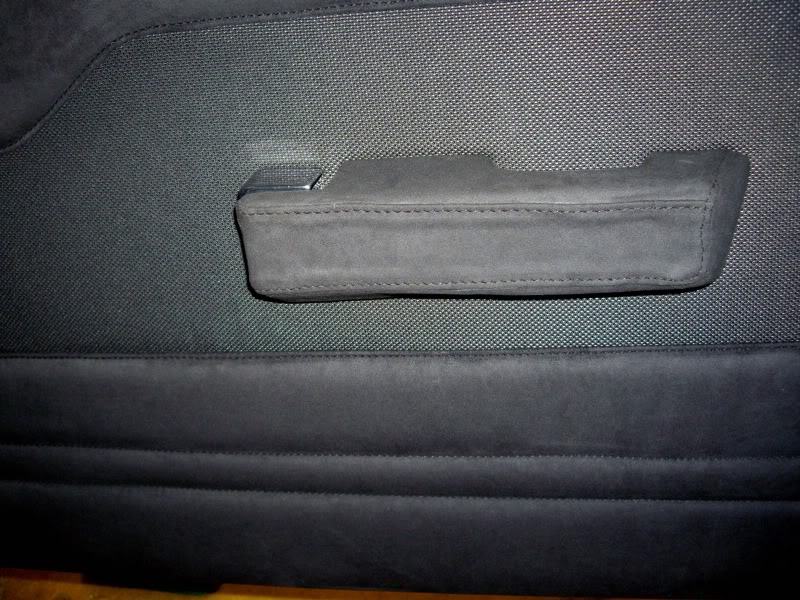
I had all the seats done, Door trims, arm rests, roof lining all trimmed in the VE Slate black Suede and used a black/silver backed mesh insert I wanted to keep the trim simple but still stand out,
This is how it looks now.
The commodores dont come out with inner seat rail covers and having no center console i improvised and made my own
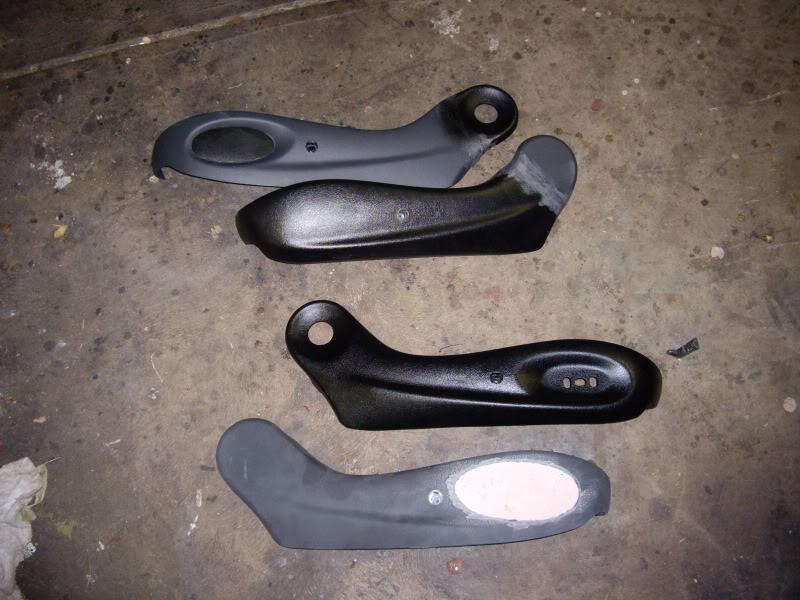
got another left and right, cut them, swapped them, bogged a bit then covered them in vinyal
Now i got the inner rails covered
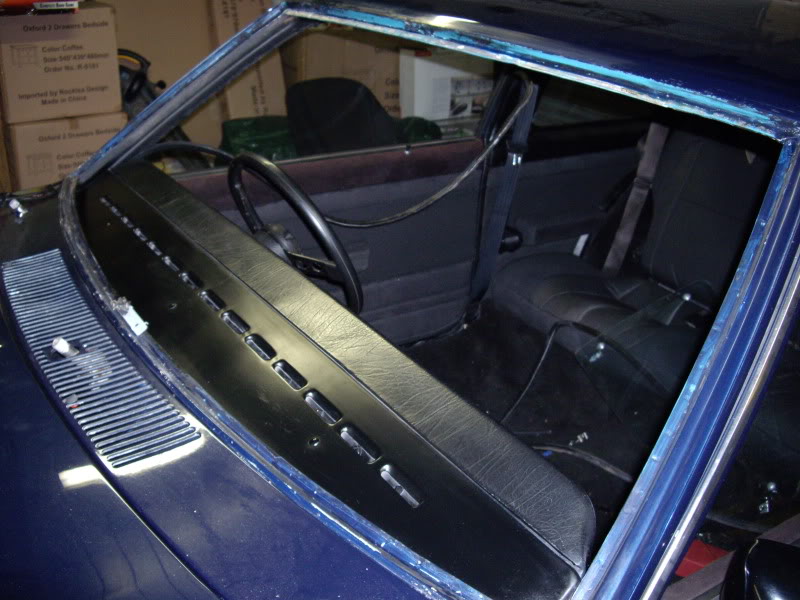
I Kicked the chipped/scratched windscreen out to do the roof lining, Thought id just replace the screen with a new one and new seal
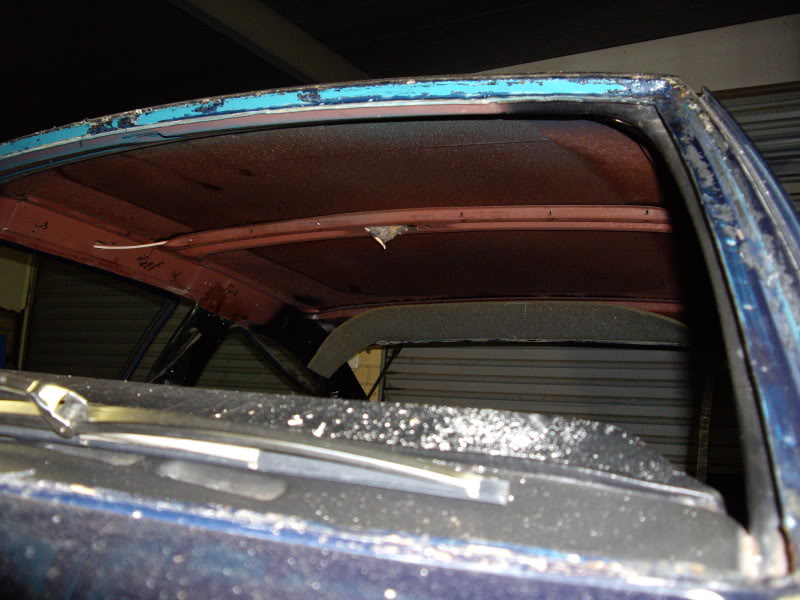
While the screen was out i also gave the dash a rub back and respray behind the crash pad
This is the roof lining in, also trimmed the B and C pillars, I also popped in a VQ Statesman interior light and done away with the Roof Handles.
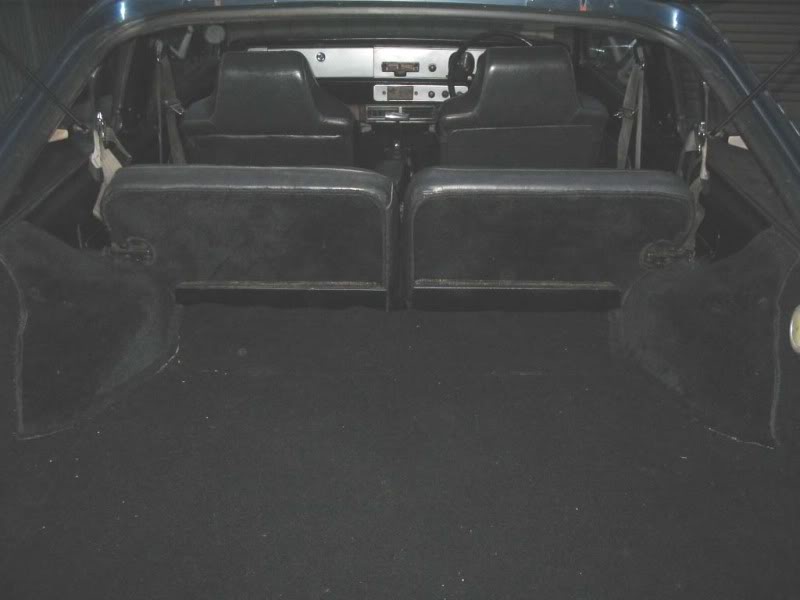
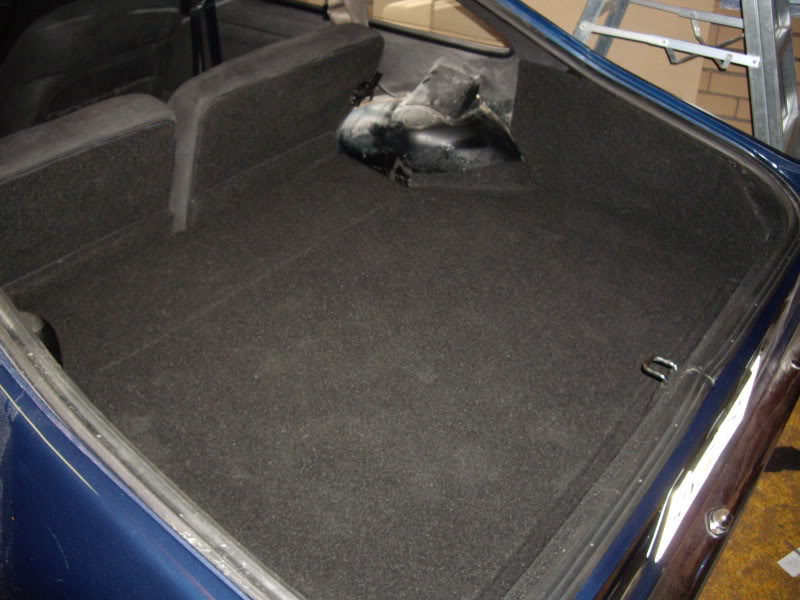
The boot space i trimmed out 4 years ago did not match the back rests of the rear seats so i purchased the matching carpet and re done the whole lot, This is the old trim out
And the Stereo fit out that lived underneath the trapdoor
I wanted to keep the stereo out of sight so living behind the Qauter cards are a 6x9 speakers
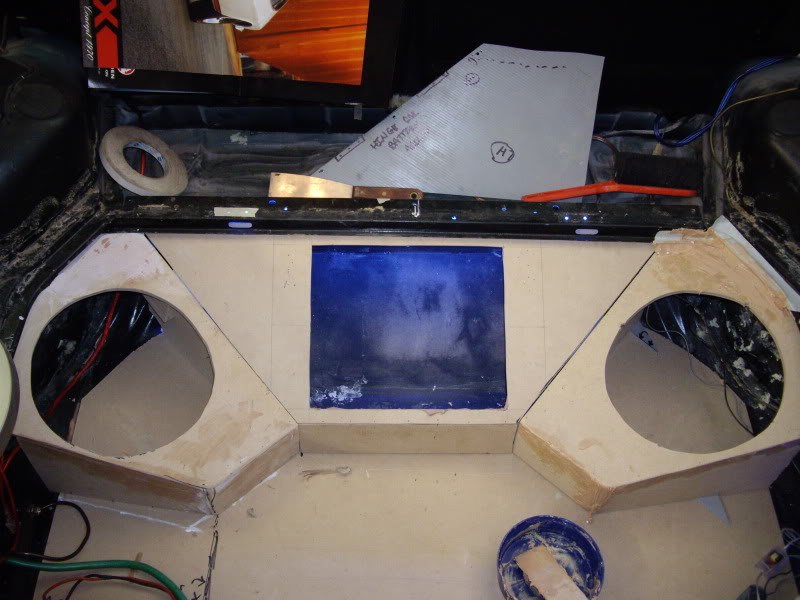
This is the New Boot space trim out
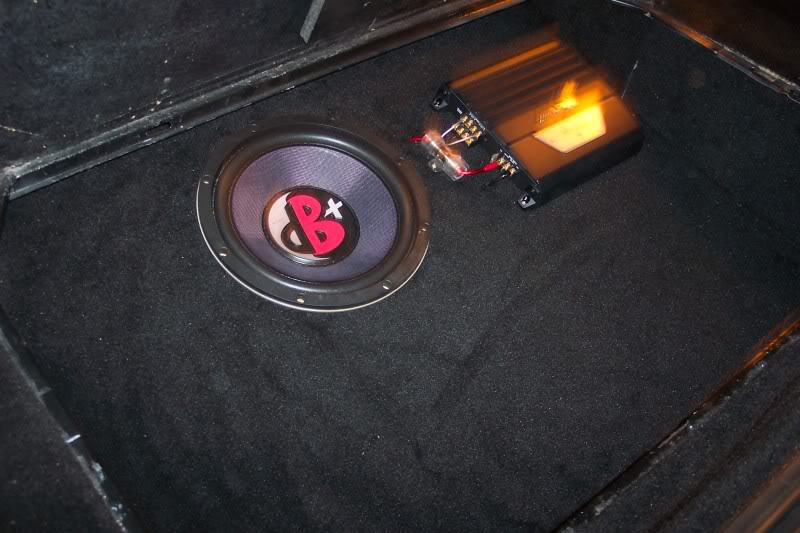
And when the trap door is lifted this is what the eye is met with

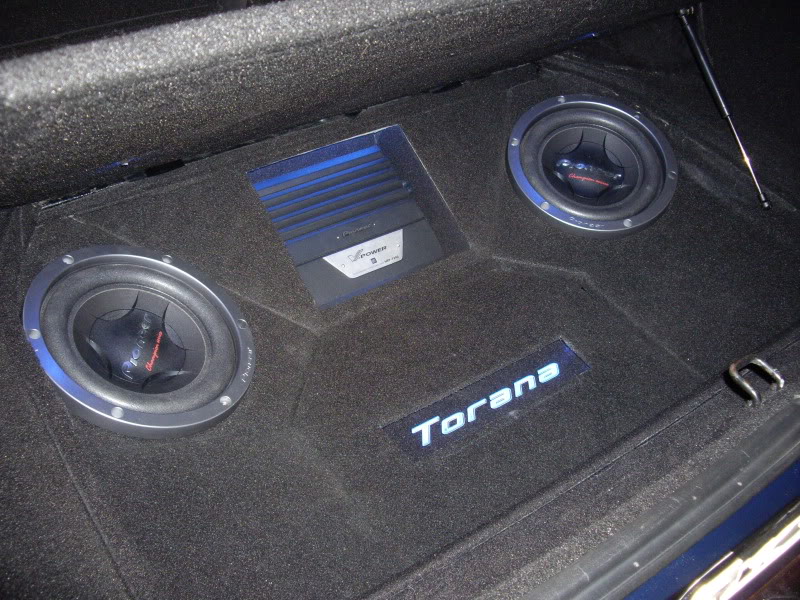
The trapdoor is self raising with a gas strut and has LED lights installed under the carpet directing onto the subs for highlighting
I wanted to do the whole car properly this time, and i was absolutely chuffed how the stereo fit turned out, I spent about 3 weeks worth of nights doing this setup and it turned out better than i expected
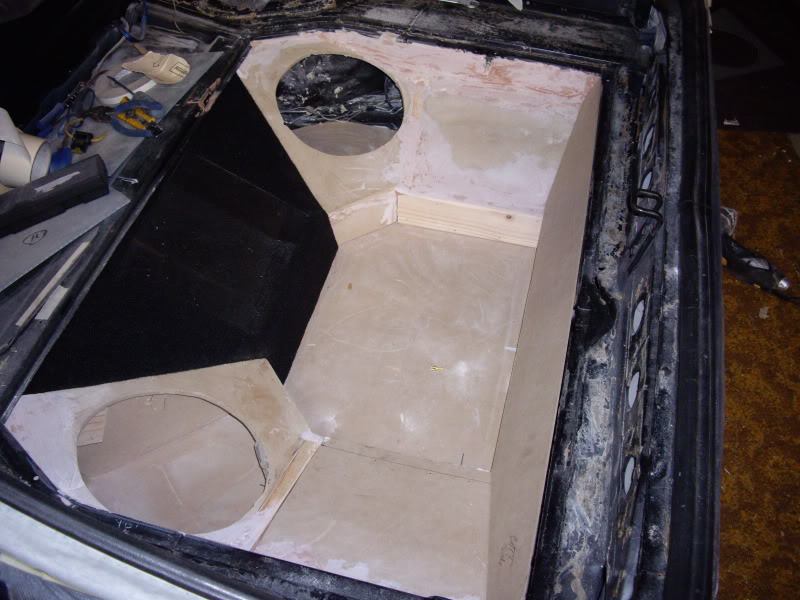
This is how it started out
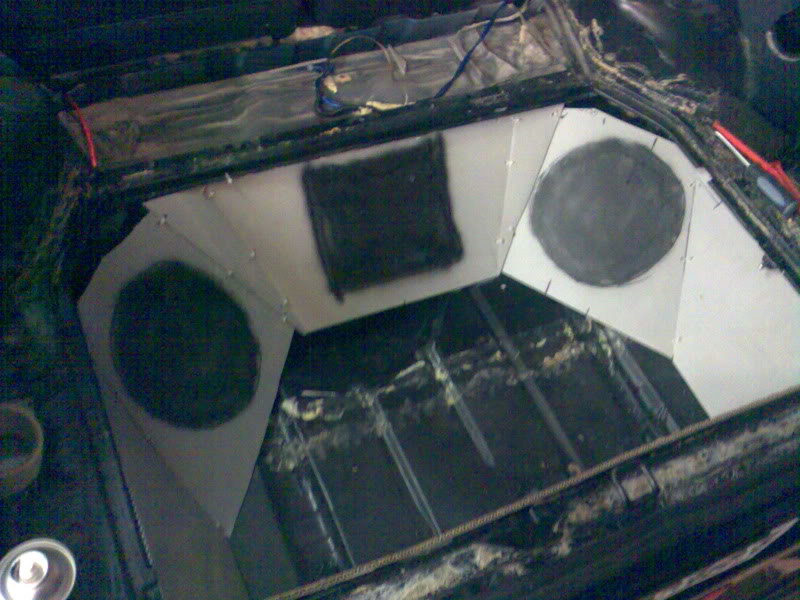
From this i got my visions and the brain started ticking...
I couldnt fit a 12" sub in this setup so i scrapped it and went with 2 10" pioneer subs
^^Left hand side of this pic is where the battery still lives,i made a lift out panel for access
I thought there was just one last thing missing so it got me thinking what can i put in that will just finish it off and not over do it. TORANA
I rang around and found a company called sign class in adelaide a bloke called matt i told him what i wanted to do and we sat down and went through fonts and I eventually found the one i wanted He demonstrated how it might look then kindly let me watch the process of CNC Routing on clear acrylic for my feature. It was awesome to watch it appear from a computer screen etched into plastic
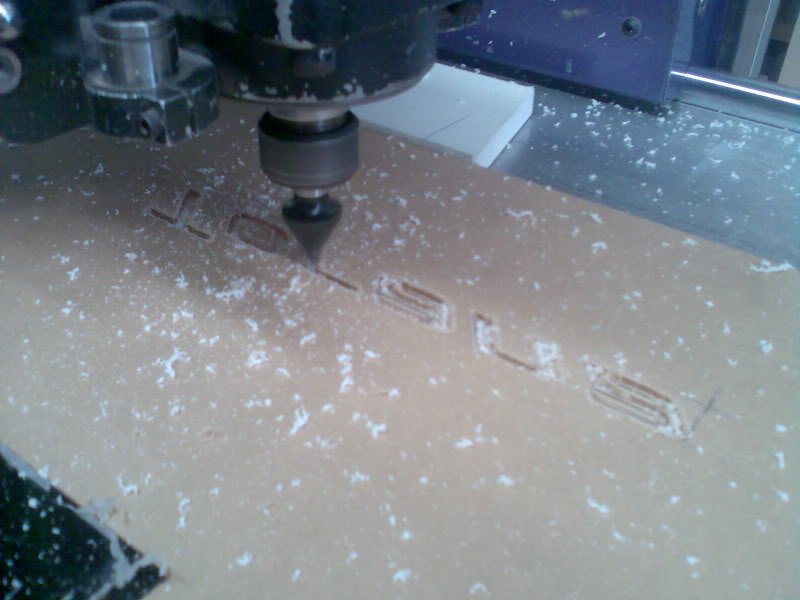
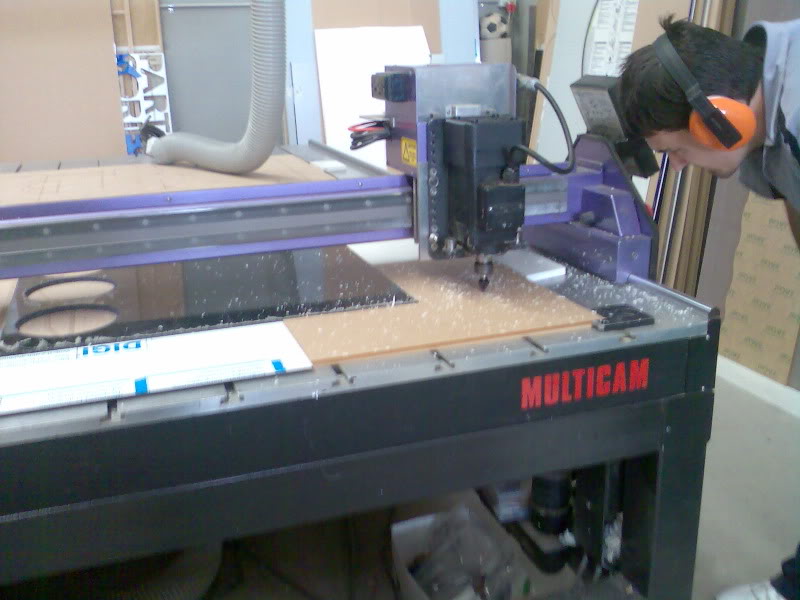
The whole process took about 12minutes to CNC, the Routing was cut into the underside giving the top a flat glass finish,
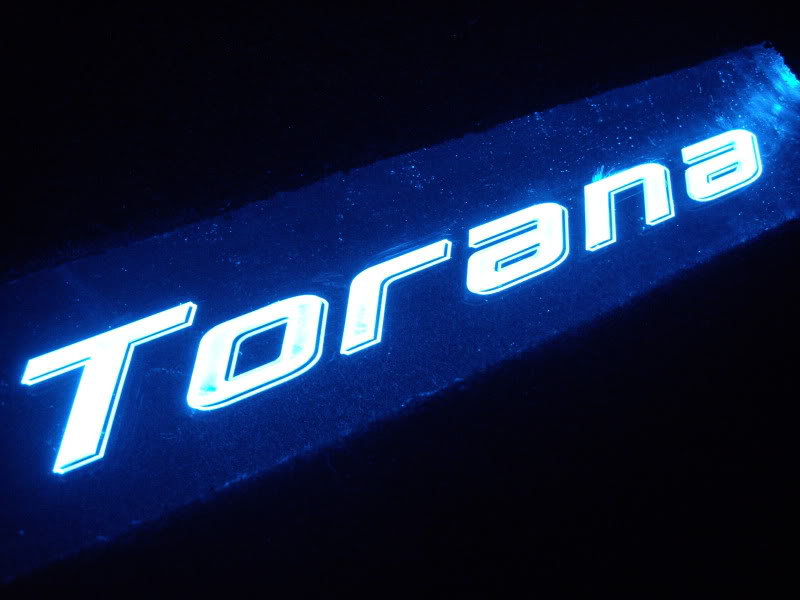
this is how it looks close up, and looking at it with the naked eye it seems to pop out even more.
The whole stereo setup set me back around $500, I Took a photo into a stereo install mob and said i want my car to look like this, they quoted me up 2weeks and $3700
Thanks for lookin and ill update on the new engine and other bits very soon
Cheers
Marc
Since the last update Ive finally got my trim done its been 2 years in the waiting due to very very slack trimmer/mate
But its in and im happy.
The last time the hatch was running is pushing almost 3 years believe it or not.
This is what the old trim looked like
Since that ive done away with the front seats (in storage)
i purchased some VT Series 2 front seats and had the Head rests removed and tops smoothed out, extra lumbar support and the base shaved down to gain more bucket and also to sit lower in the car, Ive kept the commodore rails and modified them this way ive kept the electric bases. They match perfect in height with the rear seats too.
I had all the seats done, Door trims, arm rests, roof lining all trimmed in the VE Slate black Suede and used a black/silver backed mesh insert I wanted to keep the trim simple but still stand out,
This is how it looks now.
The commodores dont come out with inner seat rail covers and having no center console i improvised and made my own
got another left and right, cut them, swapped them, bogged a bit then covered them in vinyal
Now i got the inner rails covered
I Kicked the chipped/scratched windscreen out to do the roof lining, Thought id just replace the screen with a new one and new seal
While the screen was out i also gave the dash a rub back and respray behind the crash pad
This is the roof lining in, also trimmed the B and C pillars, I also popped in a VQ Statesman interior light and done away with the Roof Handles.
The boot space i trimmed out 4 years ago did not match the back rests of the rear seats so i purchased the matching carpet and re done the whole lot, This is the old trim out
And the Stereo fit out that lived underneath the trapdoor
I wanted to keep the stereo out of sight so living behind the Qauter cards are a 6x9 speakers
This is the New Boot space trim out
And when the trap door is lifted this is what the eye is met with
The trapdoor is self raising with a gas strut and has LED lights installed under the carpet directing onto the subs for highlighting
I wanted to do the whole car properly this time, and i was absolutely chuffed how the stereo fit turned out, I spent about 3 weeks worth of nights doing this setup and it turned out better than i expected
This is how it started out
From this i got my visions and the brain started ticking...
I couldnt fit a 12" sub in this setup so i scrapped it and went with 2 10" pioneer subs
^^Left hand side of this pic is where the battery still lives,i made a lift out panel for access
I thought there was just one last thing missing so it got me thinking what can i put in that will just finish it off and not over do it. TORANA
I rang around and found a company called sign class in adelaide a bloke called matt i told him what i wanted to do and we sat down and went through fonts and I eventually found the one i wanted He demonstrated how it might look then kindly let me watch the process of CNC Routing on clear acrylic for my feature. It was awesome to watch it appear from a computer screen etched into plastic
The whole process took about 12minutes to CNC, the Routing was cut into the underside giving the top a flat glass finish,
this is how it looks close up, and looking at it with the naked eye it seems to pop out even more.
The whole stereo setup set me back around $500, I Took a photo into a stereo install mob and said i want my car to look like this, they quoted me up 2weeks and $3700
Thanks for lookin and ill update on the new engine and other bits very soon
Cheers
Marc
#35
_doucmyuc_
_doucmyuc_
-
- Guests
Posted 02 July 2009 - 02:06 AM
Thats some awesome work right there!!!
Id love for our hatch at home to have a rear boot/trap segment like that!!!!
How did you pull the roof lining so tight?! Any tricks, it woul dhave taken ages! Or did you use a false flat roof behind it?
Id love for our hatch at home to have a rear boot/trap segment like that!!!!
How did you pull the roof lining so tight?! Any tricks, it woul dhave taken ages! Or did you use a false flat roof behind it?
#36
_ass308_
_ass308_
-
- Guests
Posted 02 July 2009 - 08:16 AM
looks real good
what did u do with your old trims ?
what did u do with your old trims ?
Edited by ass308, 02 July 2009 - 08:17 AM.
#37
MRLXSS
-

- Members
-
- 12,396 posts
The Render Garage
- Name:Matt
- Location:Upwey, Melbourne
- Car:355 LX Hatchback, DeLorean DMC-12, LX SS Hatch, VY Cross8 Crewman
- Joined: 09-November 05
Posted 02 July 2009 - 08:34 AM

That is fantastic mate! Love the Hatch install!!!
#38
TerrA LX
-

- Members
-
- 14,241 posts
Fulcrum Fixture
- Location:Sid 'n' knee
- Joined: 31-May 06
Posted 02 July 2009 - 10:00 AM
Looking good mate but where have your front seat head rests gone?
Don't you need them for rego?
Don't you need them for rego?
#39
Heath
View Garage
-

- Administrators
-
- 18,322 posts
I like cars.
- Name:Heath
- Location:Eastern Suburbs, Melbourne
- Car:Heavily Modified UC Sunbird Hatchback
- Joined: 07-November 05
View Garage
Posted 02 July 2009 - 10:42 AM
Yeah I like the look of it without the headrests, an the feel (ability to turn your head around uninterupted etc) but unless you have like an LC, that isn't legal 
The 'under the trap door' fit-out is obviously awesome, you don't need anyone to tell you that haha.
You've done some very nice custom work, looks good, especially the headlining which looks sensational, along with the Stato interior light
The 'under the trap door' fit-out is obviously awesome, you don't need anyone to tell you that haha.
You've done some very nice custom work, looks good, especially the headlining which looks sensational, along with the Stato interior light
#40
_Torrie_Man_
_Torrie_Man_
-
- Guests
Posted 02 July 2009 - 11:23 AM
thats awesome! i love the stealth doof doof setup
#41
_greenmachine215_
_greenmachine215_
-
- Guests
Posted 02 July 2009 - 03:39 PM
Thanks for the posotive comments guys. This has just given me a massive boost to get more work done and keep a high standard.
DOUCMYUC- The suede material has no stretch in it at all, the trimmer didnt have a hassel with putting it in, i think thats why it looks so tight because there is no stretch and its been pulled to its limits.
ASS308- Ive kept all the standard trims in a vac sealed bag i didnt want to lose them, and the seats are in storage.
TERRALX- The headrests are probly sitting at the bottom of a rubbish dump right now, In S/A We dont have rego checks like other states, but if it was defected for any reason i would have to put the standard hatch flip foward seats in to pass.
Thanks again everyone
cheers
marc
#42
Guns n roses
-

- Members
-
- 575 posts
Forum Fixture
- Joined: 08-November 05
Posted 02 July 2009 - 05:41 PM
looking good mate!!what material did you use for the inserts??did you get any pics of the rails modified?
#43
_greenmachine215_
_greenmachine215_
-
- Guests
Posted 02 July 2009 - 06:34 PM
Guns n roses-
The Insert material i picked from the trim book at the trimmers, Its like black mesh with silver/grey thread woven into it, I know that Mazda 323 sp20 uses it, also subaru liberty's use a similar style The trim itself is from a company called DALEY'S Auto & marine upholstery.
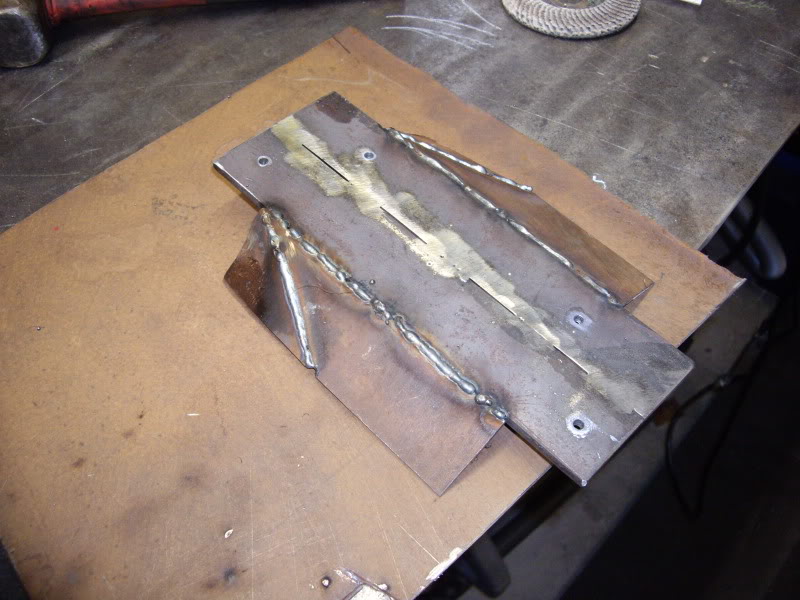
The seat rails these are the only pics i have of them,
I cut off the commodore bits sat the chairs in and lined them up where i wanted them, then used Angle steel for the rear legs and flat bar for the front mounts, The hardest part was actually drilling the holes in the front mounts to bolt up.
note: this is not the LEGAL way of doing it, but its not going to move after the welds that hold it in place

The Insert material i picked from the trim book at the trimmers, Its like black mesh with silver/grey thread woven into it, I know that Mazda 323 sp20 uses it, also subaru liberty's use a similar style The trim itself is from a company called DALEY'S Auto & marine upholstery.
The seat rails these are the only pics i have of them,
I cut off the commodore bits sat the chairs in and lined them up where i wanted them, then used Angle steel for the rear legs and flat bar for the front mounts, The hardest part was actually drilling the holes in the front mounts to bolt up.
note: this is not the LEGAL way of doing it, but its not going to move after the welds that hold it in place
#44
Guns n roses
-
- Members
-
- 575 posts
Forum Fixture
- Joined: 08-November 05
Posted 02 July 2009 - 07:07 PM
cheers for that marc.looks good!!i was looking at doing a similair insert.which ive already got it
#45
_HatchmanSS76_
_HatchmanSS76_
-
- Guests
Posted 02 July 2009 - 07:49 PM
Nice work tart
About time you got off the nest and did something.
The Venga bus will be pumpin now wiff the doof doof, fully sic maaaaate. We like to  we like to
On a side note. I ended up getting another VX wagon.
About time you got off the nest and did something.
The Venga bus will be pumpin now wiff the doof doof, fully sic maaaaate.
We like to we like to On a side note. I ended up getting another VX wagon.
#46
_greenmachine215_
_greenmachine215_
-
- Guests
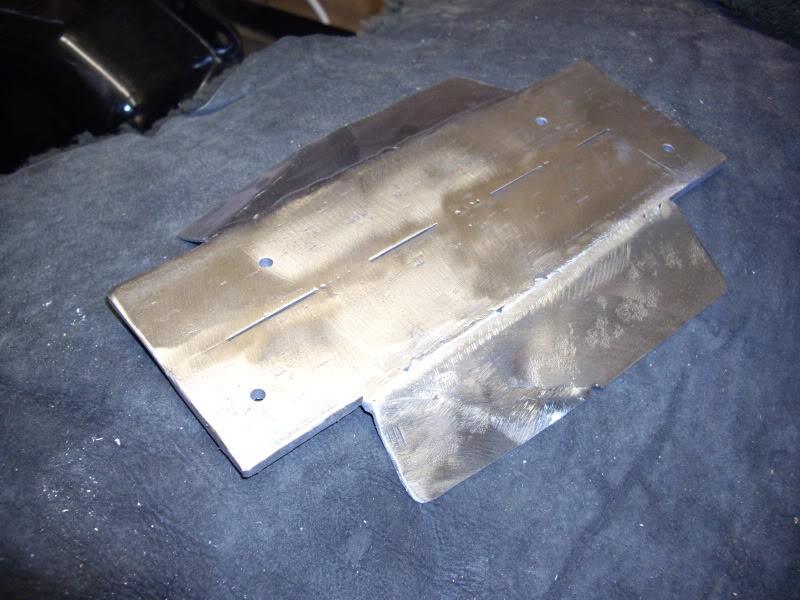
Posted 13 July 2009 - 01:18 AM
Hey all
Ive properly mounted my B&M Shifter and knocked another job off the TO DO list.
The B&M's are very common to flog out if they aren't mounted properly, which in turn can cause cable snapping.
The guys that built my trans stressed it to me that when i mount the shifter to make a thick base plate to mount on to stop the flexing of the shifter body,
Heres the one i fabbed up
Used 3mm flat plate
1.6mm plate sides curved to completely cover the factory floor hole.
and a nice matt black finish to stop the rust

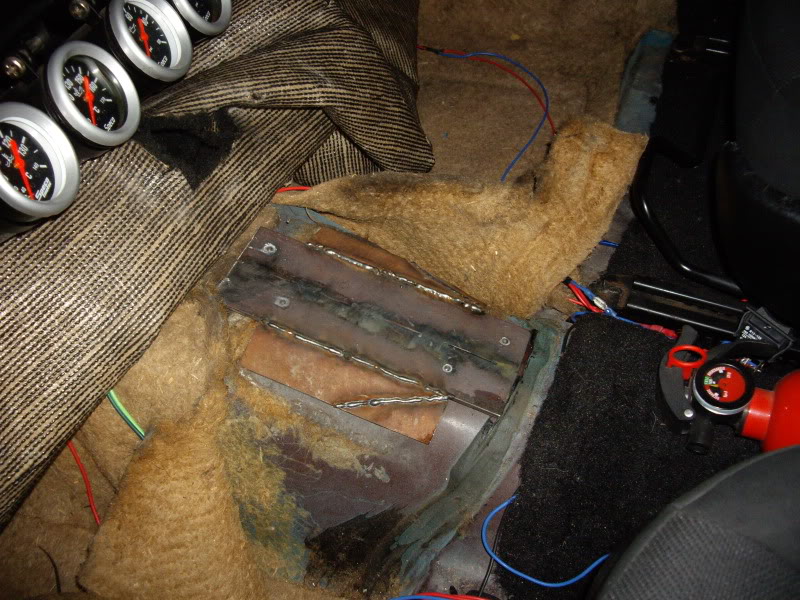
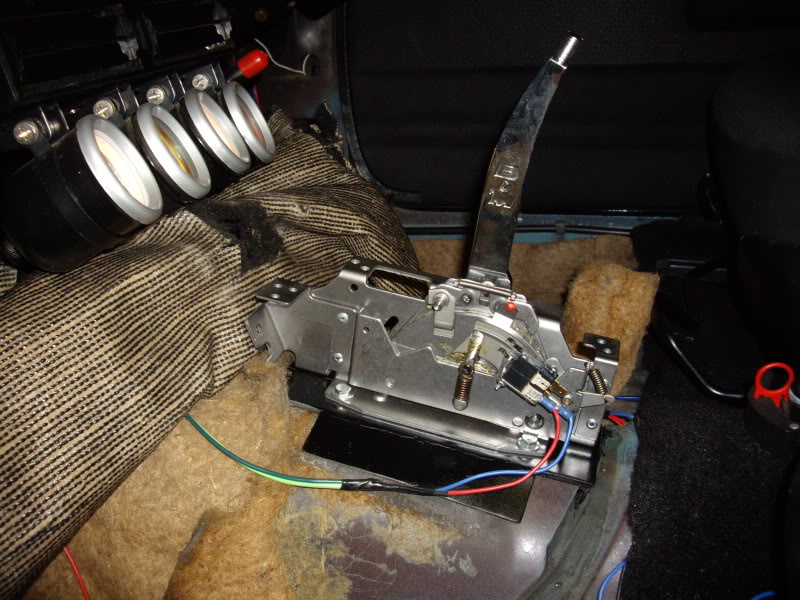
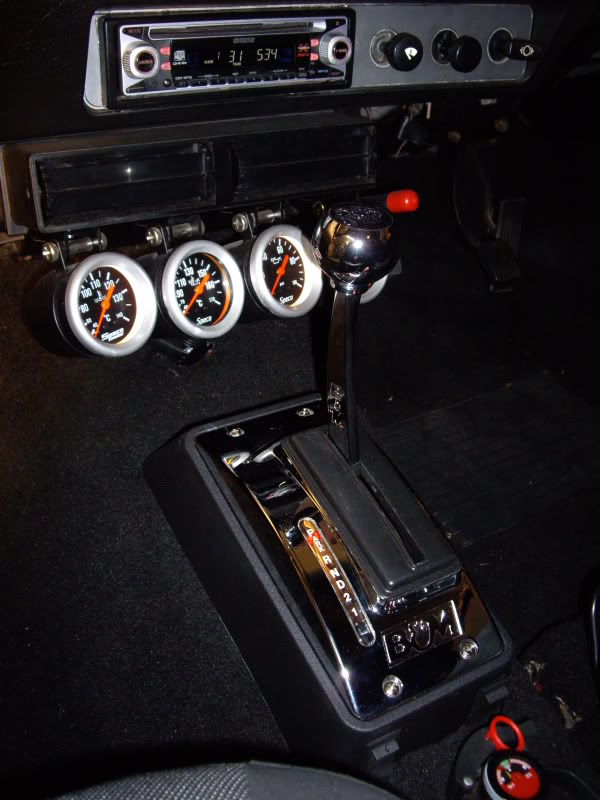
I Was pretty pleased with the finished product and once the carpet was back on i wired up the neutral safety switch and reverse light switch
Also in the back panel of the shifter cover i mounted my Power window switches Out of sight.
Cheers for lookin.
Marc
Ive properly mounted my B&M Shifter and knocked another job off the TO DO list.
The B&M's are very common to flog out if they aren't mounted properly, which in turn can cause cable snapping.
The guys that built my trans stressed it to me that when i mount the shifter to make a thick base plate to mount on to stop the flexing of the shifter body,
Heres the one i fabbed up
Used 3mm flat plate
1.6mm plate sides curved to completely cover the factory floor hole.
and a nice matt black finish to stop the rust
I Was pretty pleased with the finished product and once the carpet was back on i wired up the neutral safety switch and reverse light switch
Also in the back panel of the shifter cover i mounted my Power window switches Out of sight.
Cheers for lookin.
Marc
#47
_ass308_
_ass308_
-
- Guests
Posted 13 July 2009 - 07:36 AM
top job mounting the shifter.looks really good
#48
lxsstorana
-

- Members
-
- 2,499 posts
Forum Fixture
- Name:Mick
- Location:Eastwood, Sydney
- Car:SS Hatchback
- Joined: 23-March 06
Posted 13 July 2009 - 08:07 AM
What a great rebuild. 
I've just read this thread from start to finish and you can't help but be impressed.
Looking forward to seeing this hatch on the road.
Cheers Mick.
I've just read this thread from start to finish and you can't help but be impressed.
Looking forward to seeing this hatch on the road.
Cheers Mick.

#50
MRLXSS
-
- Members
-
- 12,396 posts
The Render Garage
- Name:Matt
- Location:Upwey, Melbourne
- Car:355 LX Hatchback, DeLorean DMC-12, LX SS Hatch, VY Cross8 Crewman
- Joined: 09-November 05
Posted 13 July 2009 - 08:31 AM
Top stuff mate!
That is another Job i have to do... The neutral safety switch and reverse light switch! LOL... I'll do it one-day.
I like the Power Window switch too! Very smart!
That is another Job i have to do... The neutral safety switch and reverse light switch! LOL... I'll do it one-day.
I like the Power Window switch too! Very smart!


0 user(s) are reading this topic
0 members, 0 guests, 0 anonymous users

