Jump to content


- - - - -

GREENMACHINE'S LX HATCH


  • Please log in to reply
345 replies to this topic

#51 _doogs_

_doogs_
  • Guests

Posted 13 July 2009 - 05:57 PM

Love the boot install mate, nice touch.
Top notch car. :spoton:

#52 _UNVSM8_

_UNVSM8_
  • Guests

Posted 13 July 2009 - 06:26 PM

nice work mate looking good :D

#53 Heath

Heath

    I like cars.

  • Administrators
  • PipPipPipPipPipPipPip
  • 18,321 posts
  • Name:Heath
  • Location:Eastern Suburbs, Melbourne
  • Car:Heavily Modified UC Sunbird Hatchback
  • Joined: 07-November 05
Garage View Garage

Posted 19 July 2009 - 01:26 PM

Love the power window switches, great idea!

#54 _2wild4u_

_2wild4u_
  • Guests

Posted 22 July 2009 - 12:19 AM

coming along very nicely, looks great

#55 _greenmachine215_

_greenmachine215_
  • Guests

Posted 22 July 2009 - 02:10 AM

Thanks for the nice comments fella's Its keepin me on target with the work being done

The engine is 99.9% complete Ill have piccys up soon

Just waiting for my mate to tig the new baffles into the rocker covers.

#56 LX 0076

LX 0076

    Forum Member

  • Members
  • PipPipPip
  • 199 posts
  • Location:nsw
  • Joined: 25-April 07

Posted 22 July 2009 - 05:17 AM

Some really nice work going on here. The little things that take up all that time and effort will set your car apart from the rest :clap: . Keep it up

#57 _greenmachine215_

_greenmachine215_
  • Guests

Posted 29 July 2009 - 11:24 PM

Hey all,
Got another update and another huge tick off my to do list

Ive finally completed my new motor, After selling my uncompleted 383 i summed up what it would cost to re build another 383 I didnt like the $$$ figure
so i decided to go second option and put together a 355 stroker

Its a 308 Black motor Fully prepped and running
COME Crank- 2 stud ARP Mains
Eagle I Beams with ARP Bolts
JP Forged pistons 10:1 comp
Custom ground WADE Solid cam 260@50"
Crane solid lifters
Crow pushrods
Roll master timing set
JP High vol oil pump

Heads are VN Castings Had full port work Bench flowing 540hp
Still using 1.60" & 1.94" Tufftrided Valves with 3 Angle grind
(I Planned to go the Alloy heads but price was going to blow the budget through the roof and im on a very tight budget)

This combo was run in on the engine dyno using a Torque power single plain manifold and 850cfm carby
it spat out a healthy figure of 482hp @ 6900rpm (356kw) and 424ftlb

I wish id bumped up the comp a bit more to get me that tad closer to 500hp but thats next time.

Im using the COME EFI Manifold twin 62mm throttles with blue top injectors, Port matched to the heads for smooth flow, I wasnt happy with the location of the senders and vacuum lines on the manifold, So i had the holes all welded up and re located everything to the rear of the manifold so its out of eyes sight
Hopefully when the hatch is dynoed with the EFI Gear it makes more power than the carby set up

Also the Heater outlets have been blanked off again i dont like the location of them so ive had -10 fittings welded onto the timing cover and will run the heater pipes down each side of the block and meet up at the rear again.

Ive moved the Oil temp sender to a threaded plug in the sump
and the Water temp sender i silver soldered a threaded nut into a stainless welch plug on the side of the block Again just to be out of eyes sight.

The rocker covers have had the Breather outlets welded up and located to the rear and baffled inside again i didnt want to run filters or see any ugly breather pipes running around the engine bay so from the rear of the covers it will run to a closed catch can located under the front gaurd

I also removed the casting from the block and smoothed it before drenching it in high finish metalic blue

Posted Image

Posted Image

Posted Image

Posted Image

Posted Image

Posted Image

Posted Image

Posted Image

I almost got a chubby when i stood back and looked at the motor finished :D

Posted Image

Posted Image

Im waiting on my TAX Return so i can go buy some more goodies, im about 5 grand away from total completion

Next on the list are a set of 1-3/4 headers ceramic coated.
Haltech E6GMX ECU so it can be live tuned on the dyno and give me the option to run multiple maps.
See my trans mates to match up a stall convertor to suit the engine and driveline
Set up the fuel system Ill be running a carter lift pump into 2L surge tank feeding 2 Bosch 044 Pumps 1/2" lines, malpassi fuel reg to the motor

Ill put more pics up as i get to buying the rest of the bits and Putting the engine in
Not long now Im so so exited that its nearing completion after 5 long years of time and money

I can soon start saving for a house deposit :spoton:

Cheers
Marc

#58 Guns n roses

Guns n roses

    Forum Fixture

  • Members
  • PipPipPipPipPip
  • 575 posts
  • Joined: 08-November 05

Posted 30 July 2009 - 07:09 AM

awesome job!!luvvv it

#59 _ass308_

_ass308_
  • Guests

Posted 30 July 2009 - 07:09 AM

top stuff :)

#60 MRLXSS

MRLXSS

    The Render Garage

  • Members
  • PipPipPipPipPipPipPip
  • 12,396 posts
  • Name:Matt
  • Location:Upwey, Melbourne
  • Car:355 LX Hatchback, DeLorean DMC-12, LX SS Hatch, VY Cross8 Crewman
  • Joined: 09-November 05

Posted 30 July 2009 - 08:49 AM

VERY VERY NICE!

#61 _SS Hatchback_

_SS Hatchback_
  • Guests

Posted 30 July 2009 - 07:14 PM

Great thread, so very nice mods in there

#62 _HatchmanSS76_

_HatchmanSS76_
  • Guests

Posted 30 July 2009 - 09:37 PM

:surrenderwave: I think you may finish yours before mine now.

Hmm. Thinking how he can stall green for another 5years. I think you should also do .............................

Edited by HatchmanSS76, 30 July 2009 - 09:39 PM.


#63 _BAILLIE_

_BAILLIE_
  • Guests

Posted 30 July 2009 - 11:03 PM

Great thread :spoton:
It's nice to see some good progress and attention to detail.

I am currently re-doing most of the wiring in my LX and i've caught the bug for hiding as much as i can. Could you please explain how to 'back wire' the wiper motor and fan motor?

Also, any more info on the VN master cylinder conversion would be much appreciated.

Cheers

PS- When are you expecting your to get your tax return?

#64 barny_lx

barny_lx

    Forum Fixture

  • Members
  • PipPipPipPipPip
  • 599 posts
  • Location:Country South Australia
  • Joined: 08-November 05

Posted 30 July 2009 - 11:05 PM

looking insane mate.... i gotta pull my finger out and get into mine!!!!!

#65 _LJ355_

_LJ355_
  • Guests

Posted 30 July 2009 - 11:38 PM

Great looking motor mate you done well

#66 _sshatch355_

_sshatch355_
  • Guests

Posted 31 July 2009 - 10:08 AM

looking sweet!! great idea moving the fittings on the come. there a pain in the ass where they are atm

#67 _greenmachine215_

_greenmachine215_
  • Guests

Posted 31 July 2009 - 04:57 PM

BALLIE-
Thanks mate, Im no auto elec but even if your mechanically minded you should be able to pull the back wiring off,
Pretty much pull the wiper motor apart,remembering where everything goes and cut the plugs off keeping in mind what wire runs to which connector of the lume, (to blank off the plug hole use body filler and paint it later) Try and run your wires through the internals of the motor without getting near rotating parts, Once at the base of the motor you can drill a hole for your new wires to poke through, Also drilling a hole in the firewall bulkhead and installing rubber grommets, you can connect your motor wires under the dash using a universal 4pin plug. I had a couple of attempts at my wiper motor, But i got it in the end.

The fan motor was almost the same, i ran my wires along side of the magnets in the casing, but you dont need to drill any holes in the motor casing you can slide the wires through the existing ventilation holes, Keeping in mind youve got a big fan attached to the end of this, Your going to have to try and run the wires as tight and close as you can to the base of the fan box perhaps using some hot glue to hold it in place, Once thats done, drill a hole big enough to run your wires from the fan box ducting under the passenger side of the dash again connecting your universal 2 pin plug.
The process is pretty straight foward just time consuming thats all.

The VN Master conversion you have to use the torana booster Rear half, and the VN Front half Also you must now use the VN Pushrod. Your fittings will be different to the torana ones that attach lines to the master so you will have to make new steel brake lines using the VN Threads at the master cylinder and torana threads at the hose ends that lead onto the calipers, DATTOMAN is the one that helped me out with info on this conversion.

TAX return should be in the next week hopefully im checkin my bank every day.

HATCHMAN- Yes its true i will be done before you now, Unless something really turns to shit,
theres gonna be no stallin me up either, and what is it that i should just do................?????

SSHATCH355- Yes them fittings are pure uglyness on them manifolds, I figured the plenums alsways goint to have Vacuum so put them at the back, and the water temps always going to be the same either end so why not move them, I think its a bit shit that COME Have made a nice looking manifold and seemed not to give a shit where the fittings went.

Everyone else thanks for the comments, I really cant wait to get my tax back and blow it all :spoton:

cheers
marc

#68 _BAILLIE_

_BAILLIE_
  • Guests

Posted 31 July 2009 - 05:55 PM

Thanks heaps mate, i appreciate it.

Sounds reasonably straight forward with the wiring so i'll give it a go.

Is it really as simple as joining the 2 halfs of the boosters and using the VN pushrod or do parts need modding for them to fit together? Are steel lines needed or can you run braided lines the whole way?

Cheers, and good to hear your tax is not far off : )

#69 _greenmachine215_

_greenmachine215_
  • Guests

Posted 31 July 2009 - 06:26 PM

BALLIE- The mastercyl conversion is as easy as that, no hidden mods or tricks

#70 _doogs_

_doogs_
  • Guests

Posted 31 July 2009 - 06:46 PM

Looking tops mate. Nice individual and custom touches.

#71 _LH SLR 3300_

_LH SLR 3300_
  • Guests

Posted 31 July 2009 - 10:15 PM

Very nice! :spoton: 
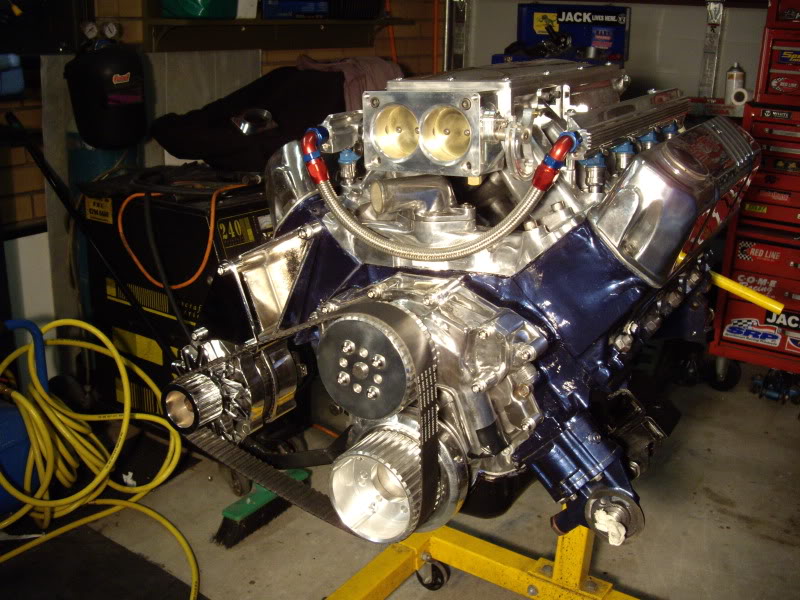
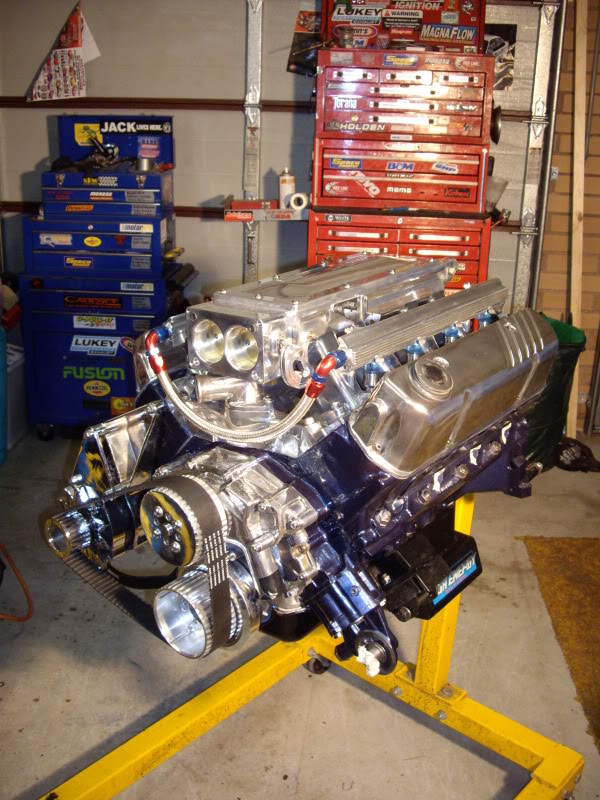
I bet you're proud as punch & rightly so. A very high quality build all round. If you're after compact & hidden accessories, you might be intersted in using a Sard fuel pressure reg instead of a Malpassi. It is about half the size of a Malpassi & mounted between the booster & heater pipes on the firewall of my SLR you have to really look to see it. I'm sure you could find an even better hiding spot for one based on the quality of your build so far.

#72 _BAILLIE_

_BAILLIE_
  • Guests

Posted 31 July 2009 - 10:31 PM

^ Sweet as, thanks again dude : )

#73 _greenmachine215_

_greenmachine215_
  • Guests

Posted 01 August 2009 - 12:21 PM

LH SLR 3300- Thanks for the heads up, ill be sure to check the sard unit out before i spend my cash.

Thanks

#74 _lX HATCH 76_

_lX HATCH 76_
  • Guests

Posted 01 August 2009 - 12:39 PM

Lovely stuff!!It all takes time though.Yes,proud as punch,I'd say..I'm a big hatch fan obviously!

#75 _greenmachine215_

_greenmachine215_
  • Guests

Posted 01 August 2009 - 05:21 PM

LX HATCH 76- Thanks, Yeah shitloads of time and the hardest part is comin by the money to do it, Time is free money unfortunatley is not,
whats the plans for your hatch??


0 user(s) are reading this topic

0 members, 0 guests, 0 anonymous users