
its getting there now, good to see,

Clints LH Project
Started by
_Viper_
, Mar 27 2006 10:51 PM
307 replies to this topic
#77
 _Viper_
_Viper_
-

- Guests
Posted 16 May 2010 - 03:16 PM
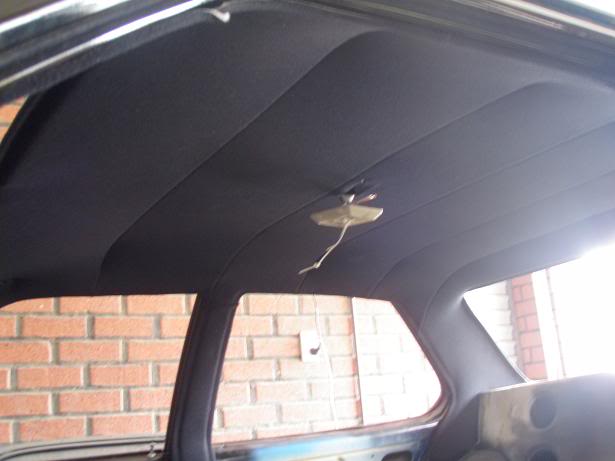
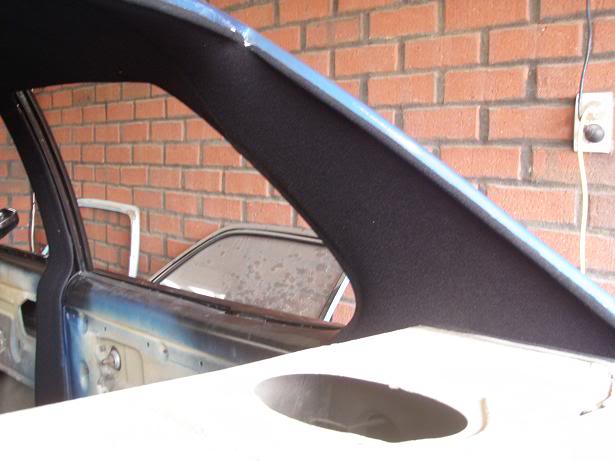
Small update, Got the car back the other day from the trimmers, Having trouble finding material to match my front seats so he hasnt done the rear seats yet but has finished the roof lining and A,B,C pillars.
Also fitted my Billet Ignition lead covers as well as a Stainless steel bolt set for the Intake manifold
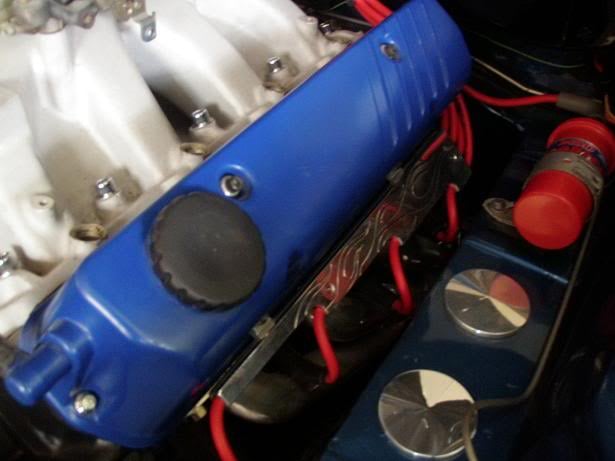
Stainless steel Washer bottle (with motor hidden underneath)
Polished Alternator bracket with bolts matching the intake manifold
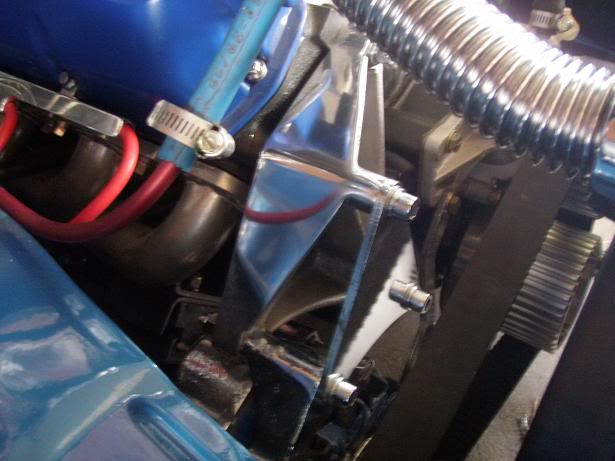
And engine bay as is, oh also got a Chrome thermo housing and Stainless steel Rad hose
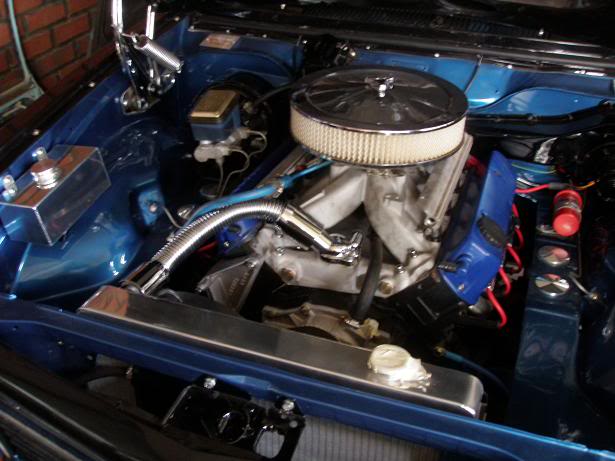
I will get the Intake manifold ceramic chrome coated next time it comes off (to be drilled for larger injectors) Also want a chrome wiper motor and then I think its pretty much done, oh cept the Procharger at a later date
Also fitted my Billet Ignition lead covers as well as a Stainless steel bolt set for the Intake manifold
Stainless steel Washer bottle (with motor hidden underneath)
Polished Alternator bracket with bolts matching the intake manifold
And engine bay as is, oh also got a Chrome thermo housing and Stainless steel Rad hose
I will get the Intake manifold ceramic chrome coated next time it comes off (to be drilled for larger injectors) Also want a chrome wiper motor and then I think its pretty much done, oh cept the Procharger at a later date
#79
_Viper_
_Viper_
-
- Guests
Posted 17 May 2010 - 09:28 AM
Nah, couple of tiny things to sort out first (accel cable, battery in boot etc) but motor has never been started, Once I think its ready goto take it to the engine builder and were gonna run it in on the Dyno with the temporary petrol setup. then It will goto the gas guys and have the Liquid LPG injection system fitted.
#80
_2wild4u_
_2wild4u_
-
- Guests
Posted 18 May 2010 - 11:47 PM
when you aiming to have it finished by?????????
#81
_Viper_
_Viper_
-
- Guests
Posted 19 May 2010 - 01:03 AM
Powercruise would be nice... but im still working away so only home one day a week :/
#82
_Viper_
_Viper_
-
- Guests
Posted 19 May 2010 - 07:59 PM
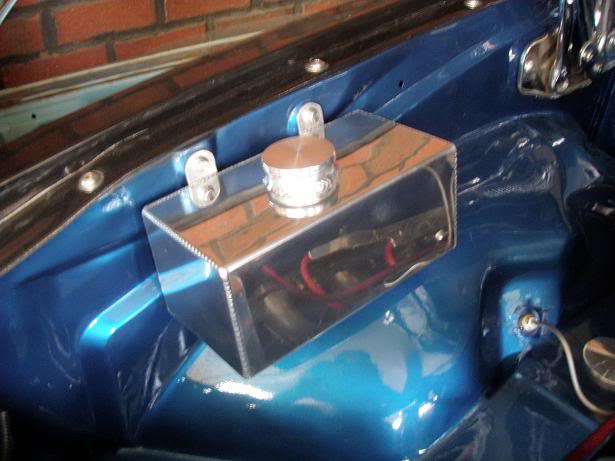
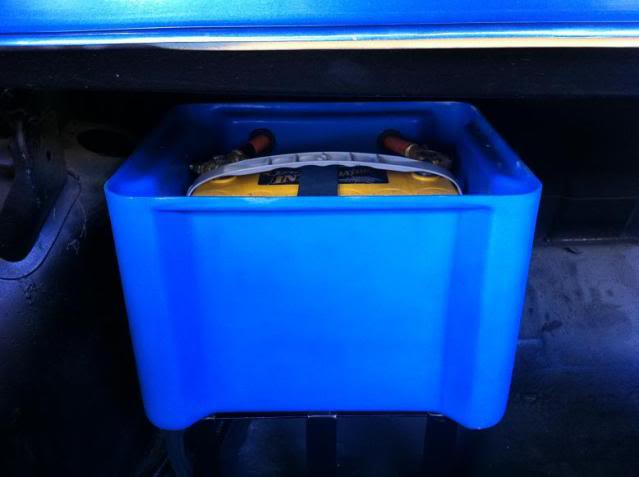
Had a play with mounting my Battery and Moroso battery box the other day... It sat alright just behind the passenger side tail light but took up a fair bit of room, Tried to place it up on the diff hump but because it was so tall/wide it hung over the diff hump with nothing to support it...
So off to bunnings and grabbed a length of 30mmx3mm Flatbar and whipped up a little stand/base for it, Welded a couple of nuts to the bottom of the bracket for the hold down clamp to bolt into and all works pretty good... only negative is that I cant remove the battery from the box while its in place but thats not really a problem just means I goto pull the box out with the battery inside and I dont really plan to be putting the battery in and out too often.
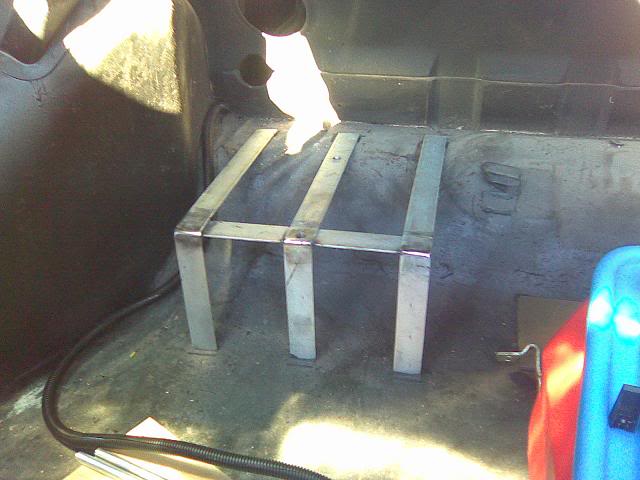

Just goto weld the bracket to the floor and give it a coat of paint
So off to bunnings and grabbed a length of 30mmx3mm Flatbar and whipped up a little stand/base for it, Welded a couple of nuts to the bottom of the bracket for the hold down clamp to bolt into and all works pretty good... only negative is that I cant remove the battery from the box while its in place but thats not really a problem just means I goto pull the box out with the battery inside and I dont really plan to be putting the battery in and out too often.
Just goto weld the bracket to the floor and give it a coat of paint
Edited by Viper, 19 May 2010 - 08:00 PM.
#83
_Viper_
_Viper_
-
- Guests
Posted 06 January 2011 - 09:35 PM
Aha! progress... Only took me 6 months to Finish the battery install with all the cables and everything in place!
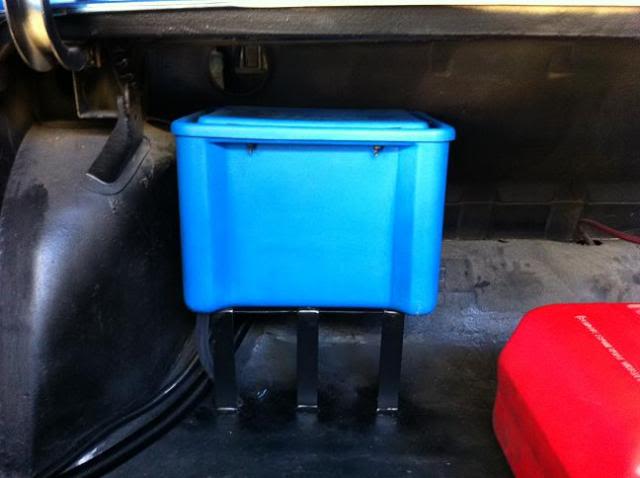
Actually only took me a couple hours to finish off just aint touch the car in that time, But watch this space... Im on holz till Feb so plan to get alot done.
Actually only took me a couple hours to finish off just aint touch the car in that time, But watch this space... Im on holz till Feb so plan to get alot done.
#84
_Viper_
_Viper_
-
- Guests
Posted 07 January 2011 - 09:19 PM
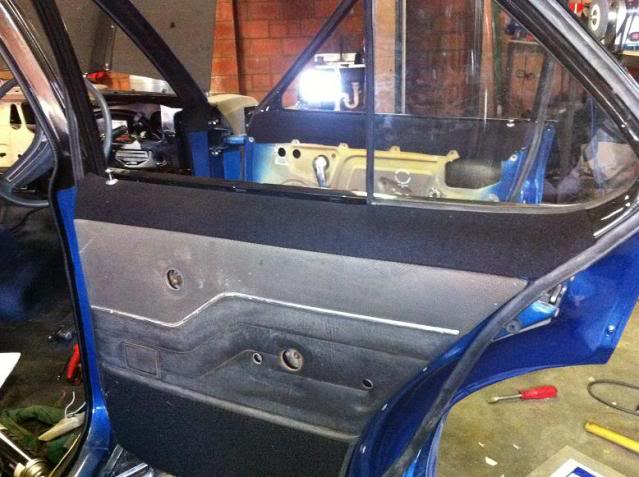
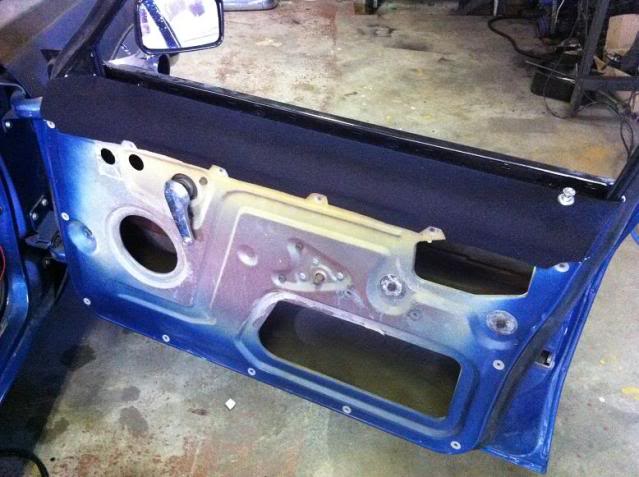
I bought a set of rusty doors as I was missing alot of the internals so been busy putting my doors back together, Dam those bailey channels are a bitch, anyone got any tips? altho Ive almost finished
Also trimmed the tops of my doors with the same Black velour as the roof lining
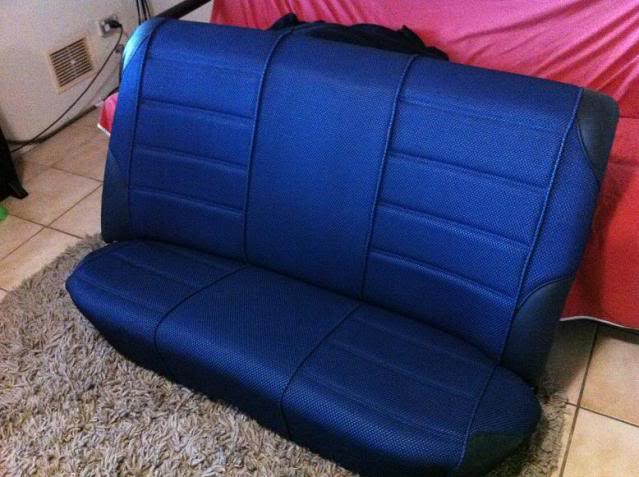
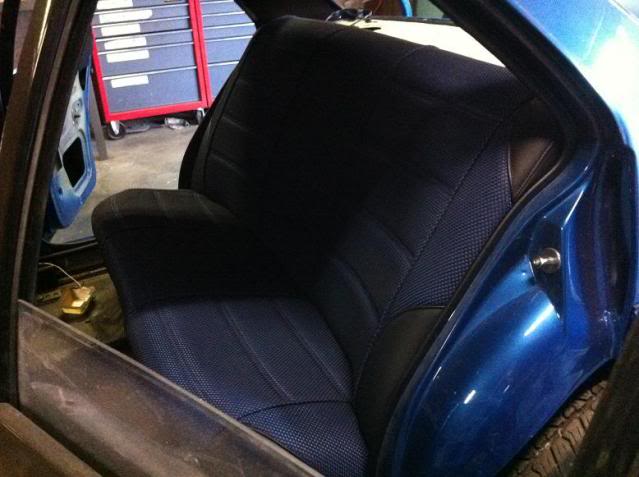
And I had the rear seat trimmed a couple months ago... Tired to get the same material as the front seats but the supplyer doesnt sell it anymore so had to settle for something a little different (black and blue pattern) but I think it turned out alright
Also spent bout an hour trying to work out why the headlights were not working! drove me nuts but turned out to be one of the terminals on the UC dipper switch on the steering column was touching abit of metal and shorting it out
Im just happy stuff is actually being done on it
#85
_Liam_
_Liam_
-
- Guests
Posted 07 January 2011 - 09:28 PM
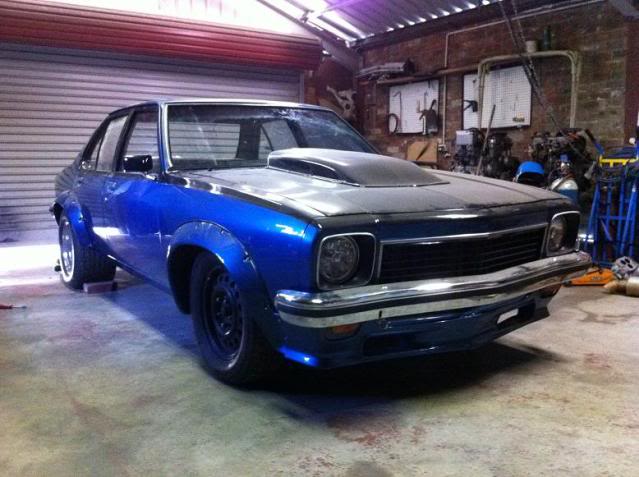
Tell you what clint, that car is absolutely mint. I was looking for that pic you posted of some users Torana not so long ago, Windsor Blue is one of my favourite colours easily.
Your set up looks ideal. Good work by the way, I might PM you about your brake set up if you don't mind.
Your set up looks ideal. Good work by the way, I might PM you about your brake set up if you don't mind.
#86
_Viper_
_Viper_
-
- Guests
Posted 11 January 2011 - 04:23 PM
Amazing how much time it takes to fit all the bailey channells, door internals, door belts, windscreen seals. now have very sore fingers but Finnally for the 1st time in SEVEN years it has some windows!
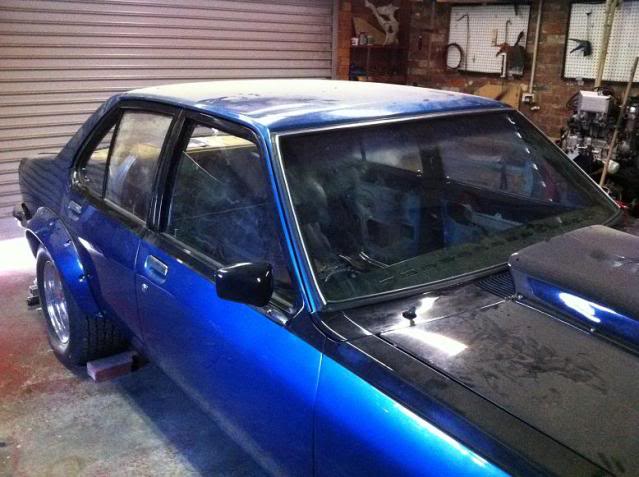
Now I can give it a wash! Altho I did have some trouble with the rear doors and its still an issue, more info can be seen here: http://www.gmh-toran...29
All thats really left now is fit the carpet, Make up a parcel shelf, Fab some front seat brackets, Fab a dash facia to suit my Dakota Digital Dash, double check all the wiring and tidy up last couple of things then its off to the Dyno!
#88
Potta
-

- Members
-

- 6,026 posts
Oh My, Don't you post alot
- Name:Craig
- Location:Gozzy, WA
- Car:LC GTR, LC 4 door
- Joined: 01-May 09
Posted 11 January 2011 - 05:06 PM
Good to see you're nearly there.
She's lookin sweet!
She's lookin sweet!
#89
_Viper_
_Viper_
-
- Guests
Posted 12 January 2011 - 07:28 PM
Made a start on the custom Dash panel, Just made it out of 3mm mdf at this stage, Will possibly transfer it to steel not sure what Finish I want yet but even if I dont use the MDF it will serve as a template.
So using the stock dash to get me a rough outline I cut a piece out, and after some careful trimming and sanding got it to fit quite snug and then I cut the hole for my Dakota Digital Cluster...
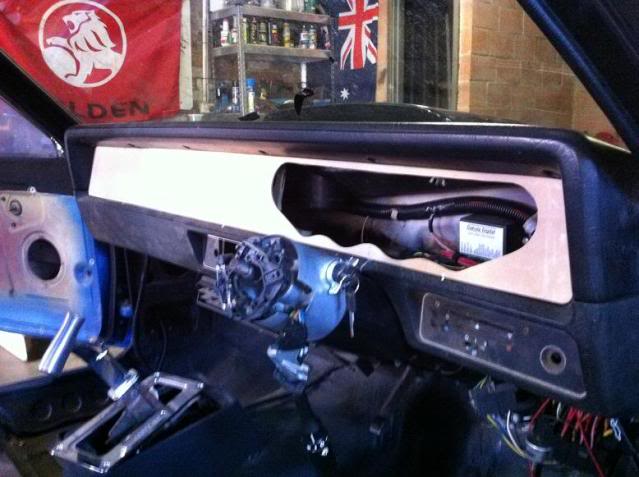
I had marked a centerline on the lower dash panel just using the steering column opening to work it out while it was out of the car... But once I actually fit the cluster it became apparent that this isnt actually center, and the steering rack comes out at abit of an angle so ill have to move the hole over about 10mm to the drivers side. (looking at the pic use the steering wheel mounting spindle.. thats center) But thats ok isnt hard to cut a new one out now that I have a template
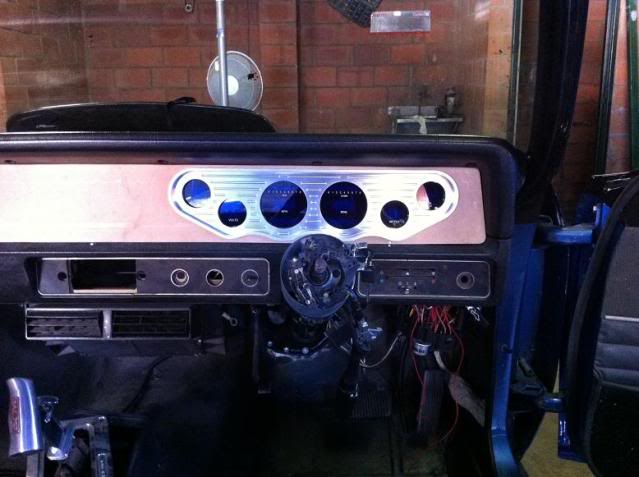
Once this peice is finalised Ill start welding in some mounting plates behind the dash, Think I will just have 8 allen key button head bolts evenly spaced to hold the front panel down... Unless I can think of a way to have the bolts hidden or something?? I suppose I could make it like a door trim and just have those plastic plugs to hold it on? It fits pretty snug as is so should be enough to hold it in place... Altho I dont think button head bolts would look bad either... Also need to think of something to fill in the rest of the dash... 4" LCD screen? aftermarket heater vents? (since I deleted the 2 stock ones) or maybe just some nice cup holders which slide away into the dash... decisions decisions
So using the stock dash to get me a rough outline I cut a piece out, and after some careful trimming and sanding got it to fit quite snug and then I cut the hole for my Dakota Digital Cluster...
I had marked a centerline on the lower dash panel just using the steering column opening to work it out while it was out of the car... But once I actually fit the cluster it became apparent that this isnt actually center, and the steering rack comes out at abit of an angle so ill have to move the hole over about 10mm to the drivers side. (looking at the pic use the steering wheel mounting spindle.. thats center) But thats ok isnt hard to cut a new one out now that I have a template
Once this peice is finalised Ill start welding in some mounting plates behind the dash, Think I will just have 8 allen key button head bolts evenly spaced to hold the front panel down... Unless I can think of a way to have the bolts hidden or something?? I suppose I could make it like a door trim and just have those plastic plugs to hold it on? It fits pretty snug as is so should be enough to hold it in place... Altho I dont think button head bolts would look bad either... Also need to think of something to fill in the rest of the dash... 4" LCD screen? aftermarket heater vents? (since I deleted the 2 stock ones) or maybe just some nice cup holders which slide away into the dash... decisions decisions
#90

 View Garage
Posted 12 January 2011 - 08:26 PM
You made it looking easy putting that template together...
I'd have the bolts/screws external and try to make them part of the design, especially if you're going to use some sort of metal (maybe alloy sheet?) - you could possibly make them a feature by etching some sort of line around the edges similar to an original style dash. If button heads don't work then stainless countersunk allen or even philips head screws would look good I reckon.
I'd have the bolts/screws external and try to make them part of the design, especially if you're going to use some sort of metal (maybe alloy sheet?) - you could possibly make them a feature by etching some sort of line around the edges similar to an original style dash. If button heads don't work then stainless countersunk allen or even philips head screws would look good I reckon.
#91
_Viper_
_Viper_
-
- Guests
Posted 12 January 2011 - 09:29 PM
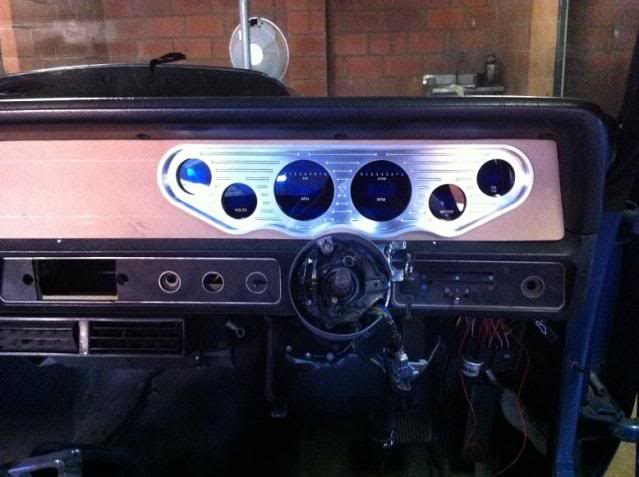
Hehe yea posting the 2 pics up was the easy part Altho it wasnt that hard actually, Just laid the stock dash panel over the mdf and traced around it, then cut it out, test fit, trim, test fit, trim, test fit, trim, test fit, trim, test fit, sand a little, test fit Yay... Cut gauge hole off center...Bin
Actually was really easy/quick the 2nd time as the template was sorted...
Feel free to photoshop the next pic and add whatever to make it look better... Can send full res version if anyone is keen
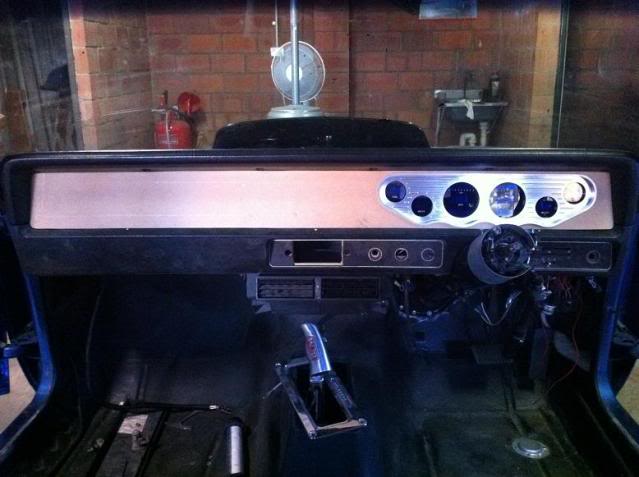
I did a quick one with allen key button head bolts.

Altho it wasnt that hard actually, Just laid the stock dash panel over the mdf and traced around it, then cut it out, test fit, trim, test fit, trim, test fit, trim, test fit, trim, test fit, sand a little, test fit Yay... Cut gauge hole off center...BinActually was really easy/quick the 2nd time as the template was sorted...
Feel free to photoshop the next pic and add whatever to make it look better... Can send full res version if anyone is keen
I did a quick one with allen key button head bolts.
#92
_Liam_
_Liam_
-
- Guests
Posted 12 January 2011 - 09:34 PM
Alternatively you could make a stainless edging that ecompasses the whole fascia like a J mold, and on the flat rear of the J mold, fabricate clips so you dash can be a push in clip type keeping the dash looking free of screws and very neat... Just an idea.
#94
_Liam_
_Liam_
-
- Guests
Posted 12 January 2011 - 10:09 PM
Yes it is a strip of metal channel with one side longer than the other so looks like this.
Cross section of a J Mould*.
I
I_I Imagine as a continuous piece of metal.
Small side goes to the front as a stainless display, the big side, you can fabricate or get some good high grip push clips and tack them to the back of it.
Hope you understand may not be clear enough though?
Cross section of a J Mould*.
I
I_I Imagine as a continuous piece of metal.
Small side goes to the front as a stainless display, the big side, you can fabricate or get some good high grip push clips and tack them to the back of it.
Hope you understand may not be clear enough though?
#95
_nicko61_
_nicko61_
-
- Guests
Posted 12 January 2011 - 10:34 PM
mate this would look really nice with mdf covered in leather
#96
ls2lxhatch
-

- Members
-
- 5,332 posts
- Location:Perth
- Car:LX Hatch
- Joined: 29-May 06
Posted 12 January 2011 - 10:56 PM
I think it would look better with concealed fittings. The method used will depend on the material you use for the panel.
You could have a look at making the panel from 3 or 4.5 mm black leather grain ABS plastic. It is a reasonably close match to the grain in the dash. Mainline Plastics will usually cut sheets to the size you require.
I would also try photoshopping the aluminium panel anodised black or maybe black in the ball milled groves.
Edited by ls2lxhatch, 12 January 2011 - 11:00 PM.
#97
Posted 13 January 2011 - 05:31 AM
I wasn't thinking the fasteners would be quite as obvious as your pic above, this is a quick and dirty shifter surround I made up for my VL with Toyota 5 speed the other day:

Black would definitely be better on the dash of course, the plastic idea is good if you can reinforce it and its cheap enough, would have to cost less than machining aluminium
Black would definitely be better on the dash of course, the plastic idea is good if you can reinforce it and its cheap enough, would have to cost less than machining aluminium
#98
_Viper_
_Viper_
-
- Guests
Posted 13 January 2011 - 11:20 AM
Hmm what do you think of these...

or maybe just polished...

or maybe just polished...
#99
_Liam_
_Liam_
-
- Guests
Posted 13 January 2011 - 12:12 PM
Different is always better, Convo Pros etc look awesome, but I think they have run their course with Torana's, lots of people have used them. New rims are awesome.


0 user(s) are reading this topic
0 members, 0 guests, 0 anonymous users

