
All good Mort.... most of my measuring is based on dimensions, reference points and squareness after the new sections were installed. Matt had previously mentioned to check these things.
I'll wait to see what matt suggests in regard to reinforcement plates. Easily done though and I have some nice metal plate kicking around that will be perfect for the job :-)


PROJECT PAPAYA - A VERY FRUITY RESTO THREAD
Started by
notna
, Jul 27 2010 11:14 PM
703 replies to this topic
#51

notna
-
- Members
-

- 706 posts
Forum Fixture
- Name:Reverse of username
- Location:Sydney
- Car:1976 LX L32 SL/R
- Joined: 21-May 07
Posted 17 January 2011 - 09:39 AM
#52
Mort
 View Garage
-

- Members
-
- 2,760 posts
Lotsa Posts!
- Name:Mort
- Location:Moranbah, QLD.
- Car:74 LH SL/R 4.2, 75 LH 4 door 186
- Joined: 16-December 07
View Garage
Posted 17 January 2011 - 09:51 AM
Cool, wasn't sure as some of the simplest things are over looked sometimes.
#53
_nial8r_
_nial8r_
-

- Guests
Posted 17 January 2011 - 02:47 PM
im thinking it might go something like this but,,,,,, dont take my word for it, its just how i think i would go about it 
Red lines being the plate ( on the inside ) and the black lines the stitch welds
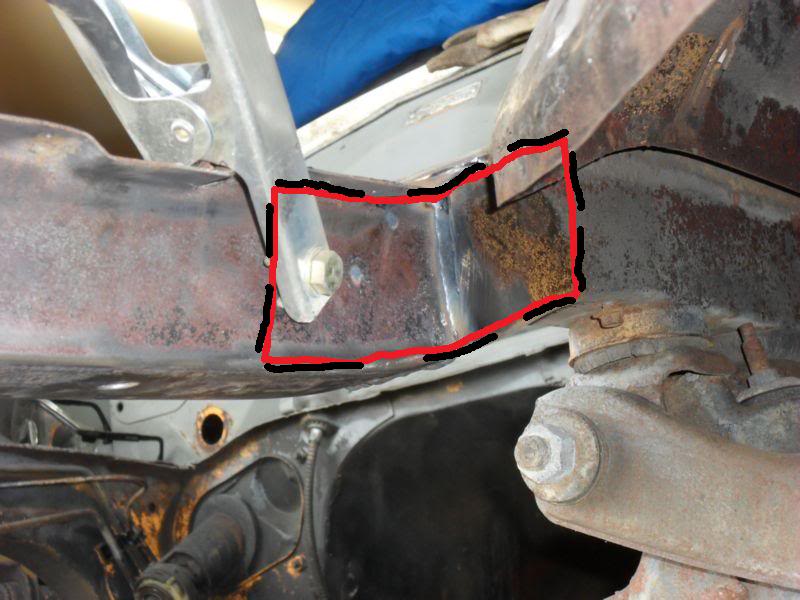
now to wait and see how it should be done, when Matt pulls his finger out so i know and can store it in my memory
Red lines being the plate ( on the inside ) and the black lines the stitch welds
now to wait and see how it should be done, when Matt pulls his finger out
so i know and can store it in my memory
#54
_LH SLR 3300_
_LH SLR 3300_
-
- Guests
Posted 17 January 2011 - 04:32 PM
First day back at work today, so i haven't had a chance to do a couple of mock ups for you, but Lee has the right idea. The thing with MIG or most any welding is the heat generated changes the molecular structure of the steel making it lose it's elasticity (for lack of a better term) & makes the steel directly next to the weld hard & more brittle. Try and bend a MIG weld, the steel will crack before it bends, so naturally a welded join like your chassis rails will be more prone to cracking from body flex from our crap roads & a heavy V8 up front. Especially once you've ground the welds down, so the reinforcing plates will give the rails some of their strength back. When repairing bent rails i very rarely heat them up for this reason & if i have too, i'll do once & no more as continually heating, bending & hitting steel makes it brittle. On some modern cars it's actual dangerous & illegal to heat them at all. Again, Lee has the right idea about stitch welding the plates, not fully welding them. This way some of the elacticity is retained & if one part of the weld cracks, it'll only travel the length of that particular weld, whereas a fully welded seam can crack the entire length of the weld. I really like what you're doing with your car, original theme restos are my favorites, so if i can help you in any way to perform the best & safest repairs possible i will & feel free to PM me with any questions you have. In the mean time, i'll try & do a mock up of how i'd reinforce your chassis rails some time this week & post some pics. Keep up the great work. Cheers Matt
#55
_Kush_
_Kush_
-
- Guests
Posted 17 January 2011 - 09:23 PM
Don't weld those sections out in the same fashion that you drew those marks. You've got to weld into the corners but ......
90 degree angles are the worst enemy of stress-points. Make sure you have a nice gentle radius on each corner.
90 degree angles are the worst enemy of stress-points. Make sure you have a nice gentle radius on each corner.
#56
notna
-
- Members
-
- 706 posts
Forum Fixture
- Name:Reverse of username
- Location:Sydney
- Car:1976 LX L32 SL/R
- Joined: 21-May 07
Posted 19 January 2011 - 09:50 PM
While I think of it, I wanted to share with you all my inspiration behind the resto.
This was my first car in 1990. Purchased as a hot 6 and then converted to a mild 253.
 Torana1.jpg 131.23K
3 downloads
Torana1.jpg 131.23K
3 downloads
In 1991 it was wrapped around a Nissan Pulsar, tree, brick wall and 2 box trailers. I still don't know how I walked away from that one! The other side was just as bad!
Torana2.jpg 99.62K
3 downloads
2 years and 2 more Toranas later, I bought this one from a car yard on Parramatta Rd in Sydney. It was a totally original Mandarin Red L32 manual SL/R, with original donk and all. Sadly I don't have any pics of it until I started to bastardise it.
Out went the 253 and manual box, which sat in my parents garden to rot then be dumped. Out went the original seats for Commodore ones. On went flares. In went a 308 with Stage 2 TH350 trans. On went Chrome Yellow paint.
Torana3.jpg 53.01K
3 downloads
Torana4.jpg 56.44K
2 downloads
Torana5.jpg 25.28K
3 downloads
It looked pretty good when I think about it. It went hard. Used to chirp the rear wheels when shifting. I blew 4 diffs in it, and while changing the last one my spanner slipped off the nut and hit my front tooth, shattering it. That was the final straw and after finishing the diff center replacement, it was promptly sold and I never owned another Torana, until now......
I still feel guilty about bastardising that SL/R..... which is truly why I have chosen to buy another L32 manual SL/R, and restore it back to 100% original condition. When it's all done, nothing will top the amount of pride I will have in it.
So there you go..... the story behind Project Papaya!
This was my first car in 1990. Purchased as a hot 6 and then converted to a mild 253.
Torana1.jpg 131.23K
3 downloadsIn 1991 it was wrapped around a Nissan Pulsar, tree, brick wall and 2 box trailers. I still don't know how I walked away from that one! The other side was just as bad!
Torana2.jpg 99.62K
3 downloads2 years and 2 more Toranas later, I bought this one from a car yard on Parramatta Rd in Sydney. It was a totally original Mandarin Red L32 manual SL/R, with original donk and all. Sadly I don't have any pics of it until I started to bastardise it.
Out went the 253 and manual box, which sat in my parents garden to rot then be dumped. Out went the original seats for Commodore ones. On went flares. In went a 308 with Stage 2 TH350 trans. On went Chrome Yellow paint.
Torana3.jpg 53.01K
3 downloads
Torana4.jpg 56.44K
2 downloads
Torana5.jpg 25.28K
3 downloadsIt looked pretty good when I think about it. It went hard. Used to chirp the rear wheels when shifting. I blew 4 diffs in it, and while changing the last one my spanner slipped off the nut and hit my front tooth, shattering it. That was the final straw and after finishing the diff center replacement, it was promptly sold and I never owned another Torana, until now......
I still feel guilty about bastardising that SL/R..... which is truly why I have chosen to buy another L32 manual SL/R, and restore it back to 100% original condition. When it's all done, nothing will top the amount of pride I will have in it.
So there you go..... the story behind Project Papaya!
#57
_Liam_
_Liam_
-
- Guests
Posted 19 January 2011 - 10:14 PM
Notna thats an awesome story, awesome build too mate. I think its an awesome car.
#58
_ls1lj_
_ls1lj_
-
- Guests
Posted 19 January 2011 - 11:56 PM
Lucky your ok, but i'll give you a 9/10 for effort with the rollover. Some nice progress there keep it up.
Cheers
Ben
Cheers
Ben
#59
notna
-
- Members
-
- 706 posts
Forum Fixture
- Name:Reverse of username
- Location:Sydney
- Car:1976 LX L32 SL/R
- Joined: 21-May 07
Posted 14 February 2011 - 04:20 PM
Today I did this repair. I see MANY people on this forum shaving their chassis rails for that clean and neat look, but I am yet to see someone do THIS ONE..... the reverse...... and replace the standard chassis rail lips on already shaved chassis rails! 
Again, I want this SL/R to be as per factory, circa 1976, so this is the kinda thing I have to do. In all honesty I love this kind of work, so it was a nice job for me to take on.
Shaved rail and standard rail lip held in plce with a couple of spots....
005.jpg 124.3K
2 downloads
The same rail with the lip fully welded in place....
025.jpg 126.73K
3 downloads
And with welds dressed.....
027.jpg 134.75K
2 downloads
And the same on the other side, for good measure....
024.jpg 136.2K
3 downloads
028.jpg 136.4K
4 downloads
Both sides came out just as I had imagined.... PERFECT!
.....next will be the fitting of replacement battery tray and same panel on opposite side of engine bay.
Again, I want this SL/R to be as per factory, circa 1976, so this is the kinda thing I have to do. In all honesty I love this kind of work, so it was a nice job for me to take on.
Shaved rail and standard rail lip held in plce with a couple of spots....
005.jpg 124.3K
2 downloadsThe same rail with the lip fully welded in place....
025.jpg 126.73K
3 downloadsAnd with welds dressed.....
027.jpg 134.75K
2 downloadsAnd the same on the other side, for good measure....
024.jpg 136.2K
3 downloads
028.jpg 136.4K
4 downloadsBoth sides came out just as I had imagined.... PERFECT!
.....next will be the fitting of replacement battery tray and same panel on opposite side of engine bay.
#60
_nial8r_
_nial8r_
-
- Guests
Posted 14 February 2011 - 06:25 PM
Well done mate nothing wrong with wanting it "perfect" i have the same problem  although i havent touched mine is god knows how long now trying to get my 4x4 ready for a trip away with the wife and kids at easter.
The rails have come up very well and with a lick of etch on them i doubt anyone would ever know they have been repaired/replaced except all of use reading and watch your build your doing really well, keep it up and dont forget the pic's
although i havent touched mine is god knows how long now trying to get my 4x4 ready for a trip away with the wife and kids at easter.The rails have come up very well and with a lick of etch on them i doubt anyone would ever know they have been repaired/replaced except all of use reading and watch your build
your doing really well, keep it up and dont forget the pic's
#61
_Leakey_
_Leakey_
-
- Guests
Posted 18 February 2011 - 03:33 PM
Great project Anton. Thanks for the UC centre console too.
As I said to you, I'll keep an eye out for anything that might
be good for your machine, if you dont already have it.
I will certainly be asking for some welding advice!!!
Look forward to the next update.
Cheers, Mark
As I said to you, I'll keep an eye out for anything that might
be good for your machine, if you dont already have it.
I will certainly be asking for some welding advice!!!
Look forward to the next update.
Cheers, Mark
#62
_1ARC_
_1ARC_
-
- Guests
Posted 18 February 2011 - 05:26 PM
Great project and some very interesting and detailed restoration work. Can you please measure the diameter of the hole in the fire wall for the clutch cable to pass through. I am converting from auto to 4 speed and I am interested in this measurement. Cheers
#63
notna
-
- Members
-
- 706 posts
Forum Fixture
- Name:Reverse of username
- Location:Sydney
- Car:1976 LX L32 SL/R
- Joined: 21-May 07
Posted 18 February 2011 - 06:51 PM
Cheers Mark. Always good to meet a fellow PAPAYA owner, even though you saw the very dark side and bought a UC! lol 
John, will do over the weekend OK.
John, will do over the weekend OK.
#64
notna
-
- Members
-
- 706 posts
Forum Fixture
- Name:Reverse of username
- Location:Sydney
- Car:1976 LX L32 SL/R
- Joined: 21-May 07
Posted 04 April 2011 - 12:19 PM
Made some progress over the weekend. I actually had the house to myself for the whole weekend, and I spent all of it in the garage finishing off my engine bay repairs. My SL/R is NOW at teh stage that I thought it would be when I bought it. All of the repairs I have carried out so far I didn't anticipate having to do, as I bought it sight unseen and none of this was mentioned in teh advert.
Anyway..... Welded in a new battery tray.
BEFORE:
PS_before.jpg 82.76K
20 downloads
AFTER:
SDC12291.jpg 91.43K
16 downloads
And the same panel on the opposite side.....
BEFORE:
DS_before.jpg 82.41K
11 downloads
AFTER:
SDC12293.jpg 102.39K
18 downloads
SDC12298.jpg 104.84K
11 downloads
Then I clamped and welded the radiator support back on.
SDC12300.jpg 90.84K
9 downloads
And spot welded aaaaallll the bits and pieces together.
SDC12302.jpg 107.12K
7 downloads
SDC12309.jpg 101.6K
5 downloads
The I rubbed it all back with some wet & dry.....
SDC12327.jpg 94.27K
7 downloads
And gave it a hit of PPG etch Primer.
SDC12335.jpg 102.25K
12 downloads
SDC12332.jpg 93.32K
8 downloads
And now I'm ready to leave it for another month... ... and then remove the subframe nd start stripping the underside and get the whole front end ready for paint. That's for another day......
Anyway..... Welded in a new battery tray.
BEFORE:
PS_before.jpg 82.76K
20 downloadsAFTER:
SDC12291.jpg 91.43K
16 downloadsAnd the same panel on the opposite side.....
BEFORE:
DS_before.jpg 82.41K
11 downloadsAFTER:
SDC12293.jpg 102.39K
18 downloads
SDC12298.jpg 104.84K
11 downloadsThen I clamped and welded the radiator support back on.
SDC12300.jpg 90.84K
9 downloadsAnd spot welded aaaaallll the bits and pieces together.
SDC12302.jpg 107.12K
7 downloads
SDC12309.jpg 101.6K
5 downloadsThe I rubbed it all back with some wet & dry.....
SDC12327.jpg 94.27K
7 downloadsAnd gave it a hit of PPG etch Primer.
SDC12335.jpg 102.25K
12 downloads
SDC12332.jpg 93.32K
8 downloadsAnd now I'm ready to leave it for another month...
... and then remove the subframe nd start stripping the underside and get the whole front end ready for paint. That's for another day......
#65
_Kush_
_Kush_
-
- Guests
Posted 04 April 2011 - 12:31 PM
Nice work, notna
Is that a chassis number I spy? How'd you go about getting that put on there?
Is that a chassis number I spy? How'd you go about getting that put on there?
#66
_mick74lh_
_mick74lh_
-
- Guests
Posted 04 April 2011 - 07:28 PM
Nice work mate. I'm not usually into fully restored original spec cars but can really appreciate what your'e doing with this. It refreshing to see someone turn one of these from a bastardised state back to something just mint. And yeah the chassis number? How did you manage that?
#67
_nial8r_
_nial8r_
-
- Guests
Posted 05 April 2011 - 11:47 AM
Well done Anton, how did ya go getting the support on nice and square ?? much drama's ?? and yes i spotted the number also  Keep up the good work mate.
Keep up the good work mate.
#68
notna
-
- Members
-
- 706 posts
Forum Fixture
- Name:Reverse of username
- Location:Sydney
- Car:1976 LX L32 SL/R
- Joined: 21-May 07
Posted 06 April 2011 - 10:01 AM
Cheers guys.
Rad support lined up really well with the chassis rails and inner skirt / battery tray, and I was pleased with my work ( of course ). The inner guards were a PITA however, as I think they were lower than their true position, which was probbaly a result of the front ender it must have had years ago. I got there though, and trial fitting of the front guards was perfect!
I had a panel beater repair the chassis number panel. All done legit. I didn't want to touch it myself!
Rad support lined up really well with the chassis rails and inner skirt / battery tray, and I was pleased with my work ( of course
). The inner guards were a PITA however, as I think they were lower than their true position, which was probbaly a result of the front ender it must have had years ago. I got there though, and trial fitting of the front guards was perfect! I had a panel beater repair the chassis number panel. All done legit. I didn't want to touch it myself!
#69
notna
-
- Members
-
- 706 posts
Forum Fixture
- Name:Reverse of username
- Location:Sydney
- Car:1976 LX L32 SL/R
- Joined: 21-May 07
Posted 23 April 2011 - 08:30 PM
Massive thanks to forum member 'weedy' who sold me the perfect motor for my SL/R. As you all know, this resto is a factory original one (without getting too carried away, as i have done in the past). Yea it's nice to have massive HP and cubic inches, but sometimes in life it;s also nice to have massively matching numbers and cubic correctness
I wanted an HR block 253 that was cast as close as possible to that which is correct for my car. I had been told that about 3 months prior to compliance date is about right, but finding that would truly be a miracle. This one is an HR engine number block, cast in the same month and year as my SL/R. If you can't find the exact, that that will bloody well do me as "close enough"!!!
PIC.....
IMG_0757.JPG 133.46K
5 downloads
I've also started to strip the interior from my SL/R. All the dash and stuff is pretty straight forward.....
SDC12404.jpg 150.29K
3 downloads
However..... when it comes to wiring and auto-electrics, I panic and think OMFG what have I done. I guess i will worry more about this in years to come when I'm trying to refit it!!
SDC12403.jpg 157.35K
2 downloads
As always.. more to come. Bought some parts from a guy up north and I have to make a road trip to pick them up next weekend
I wanted an HR block 253 that was cast as close as possible to that which is correct for my car. I had been told that about 3 months prior to compliance date is about right, but finding that would truly be a miracle. This one is an HR engine number block, cast in the same month and year as my SL/R. If you can't find the exact, that that will bloody well do me as "close enough"!!!
PIC.....
IMG_0757.JPG 133.46K
5 downloadsI've also started to strip the interior from my SL/R. All the dash and stuff is pretty straight forward.....
SDC12404.jpg 150.29K
3 downloadsHowever..... when it comes to wiring and auto-electrics, I panic and think OMFG what have I done. I guess i will worry more about this in years to come when I'm trying to refit it!!
SDC12403.jpg 157.35K
2 downloadsAs always.. more to come. Bought some parts from a guy up north and I have to make a road trip to pick them up next weekend
#70
_nial8r_
_nial8r_
-
- Guests
Posted 24 April 2011 - 12:59 PM
you'll be right mate with the wiring, there only a few to get em up and running. im really worried with my build when it comes time to wire it up, this is what i have to deal with 
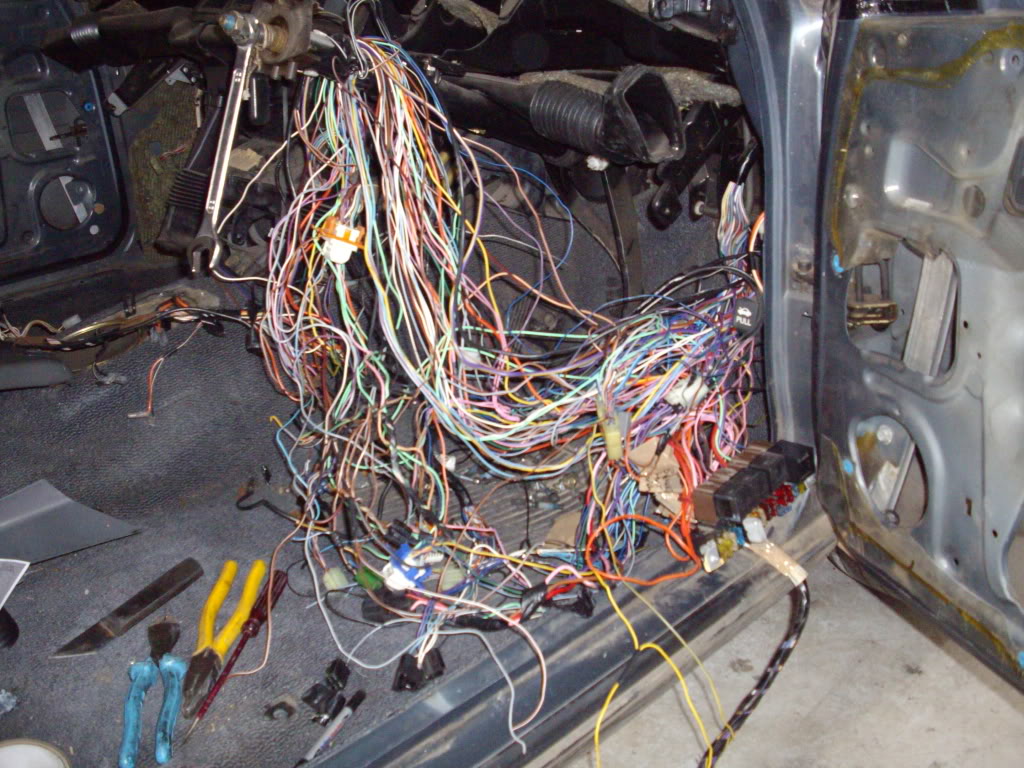
this is what i need
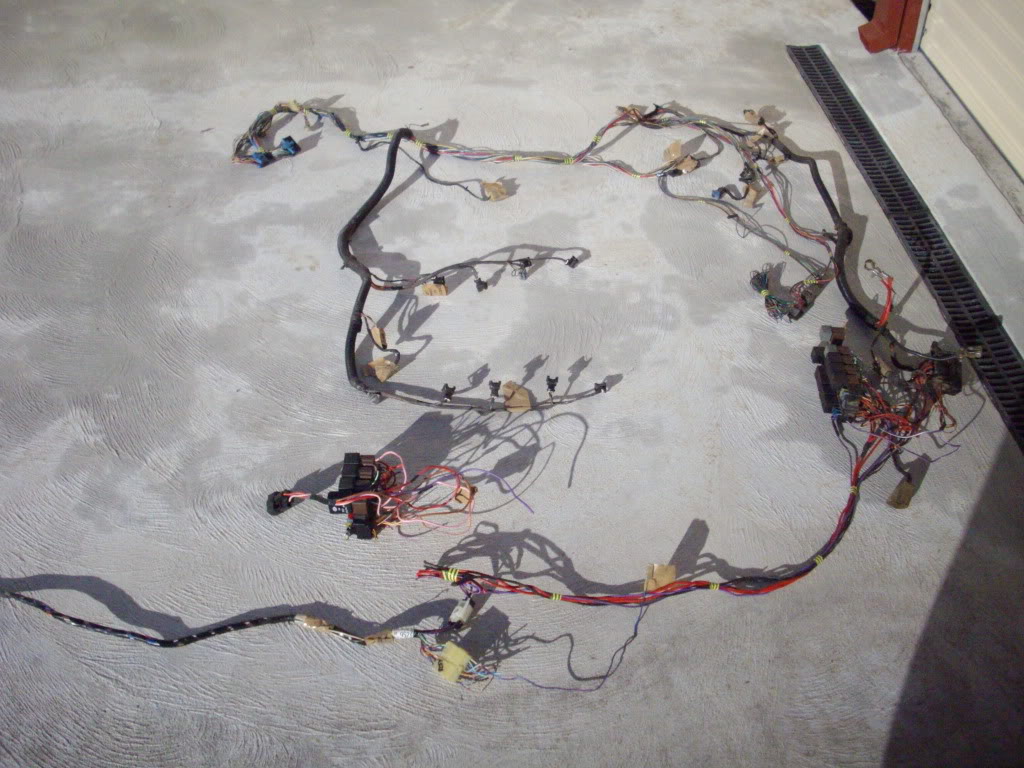
and this is the left overs. theres enought to get 5 Torana's running lol
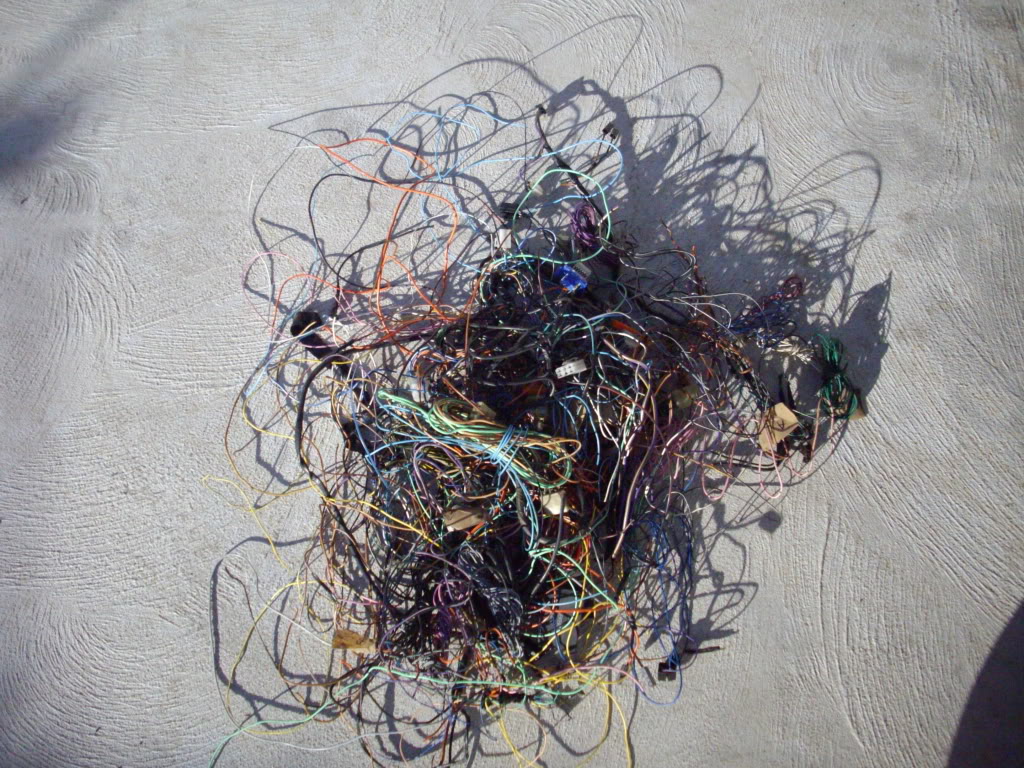
what the plans for the donk ?? just a freshen up or some go fast bits
this is what i need
and this is the left overs. theres enought to get 5 Torana's running lol
what the plans for the donk ?? just a freshen up or some go fast bits
#71
notna
-
- Members
-
- 706 posts
Forum Fixture
- Name:Reverse of username
- Location:Sydney
- Car:1976 LX L32 SL/R
- Joined: 21-May 07
Posted 24 April 2011 - 01:40 PM
Lee, seriously.... that DOES make me feel a whooooole lot better!!!
#72
notna
-
- Members
-
- 706 posts
Forum Fixture
- Name:Reverse of username
- Location:Sydney
- Car:1976 LX L32 SL/R
- Joined: 21-May 07
Posted 14 May 2011 - 07:23 PM
Progress..... yes, Papaya is in season!!
With my engine bay repairs completed and suitably in etch primer until I'm ready to smooth it all out and prime, I felt it necessary to trial fit my front panels. I had been reading a LOT of members resto threads, and doing some research into panel alignment, and I started to get a bit worried about how mine would line up, given the nature of the repairs I had done so far.
My suspicions were true, and I soon found that the front apron didn't like the alignment of the aftermarket radiator support rust repair section. The bolt holes on the very bottom were not lining up too well. A little bit of adjusting soon got that right.
123.JPG 212.55K
8 downloads
Then I decided to hang the front guards. Both guards I had were the originals off the SL/R. Both were rusty and both had the lip rolled in a less than ideal manner. The drivers side guard had shocking panel alignment.... as you can see here...
129.JPG 195.25K
1 downloads
I decided to seek out replacement guards, and soon picked up something half decent off eBay for $50 ish. It looked OK. The lip hadn't been rolled and it only had minor rust in the usual place. An easy repair I thought. Previously I had wrecked a UC, and I wisely cut out the bottom of both front guards, as they were MINT. Here you can see the guard i bought and the decent bit off the UC.
150.JPG 212.85K
3 downloads
Next I maked out the section I wanted to remove from the new guard, and the same from the UC guard. Chop chop and oh oh....
151.JPG 219.78K
1 downloads
The next pic shows the 2 sections of front guard that I had removed. On the top is the UC guard. It was IMMACULATE on the outside, with a little rust on the rear. Below it is the new eBay guard section, rooted on the outside and starting to be on the inside too.

Here is a closer view of the "GOOD" guard section. Despite the corrosion you can see there, this piece of guard is excellent! So from here I had a plan..... to take the best bits from both sections of front guard, and make one totally good section of guard.

So I cut "a piece from here and a piece from there" (a quote from Mad Max)... and this is what I was wanting to achieve....

And this is it.... perfecto!!!!

So I lined up the replacement section with the existing guard, and ......

Welded it in place, obviously!

And while you may think that this is a huge weld with a bit of guard attached, when I trilal fitted it to my SL/R, with front apron, it was SO DAMN PERFECT that I had to crack a beer, sit back and go.... "FWOOORRRRRR!!!"

That'll do me for now..... more to come, when I can be assed! ;-)
With my engine bay repairs completed and suitably in etch primer until I'm ready to smooth it all out and prime, I felt it necessary to trial fit my front panels. I had been reading a LOT of members resto threads, and doing some research into panel alignment, and I started to get a bit worried about how mine would line up, given the nature of the repairs I had done so far.
My suspicions were true, and I soon found that the front apron didn't like the alignment of the aftermarket radiator support rust repair section. The bolt holes on the very bottom were not lining up too well. A little bit of adjusting soon got that right.
123.JPG 212.55K
8 downloadsThen I decided to hang the front guards. Both guards I had were the originals off the SL/R. Both were rusty and both had the lip rolled in a less than ideal manner. The drivers side guard had shocking panel alignment.... as you can see here...
129.JPG 195.25K
1 downloadsI decided to seek out replacement guards, and soon picked up something half decent off eBay for $50 ish. It looked OK. The lip hadn't been rolled and it only had minor rust in the usual place. An easy repair I thought. Previously I had wrecked a UC, and I wisely cut out the bottom of both front guards, as they were MINT. Here you can see the guard i bought and the decent bit off the UC.
150.JPG 212.85K
3 downloadsNext I maked out the section I wanted to remove from the new guard, and the same from the UC guard. Chop chop and
oh oh....
151.JPG 219.78K
1 downloadsThe next pic shows the 2 sections of front guard that I had removed. On the top is the UC guard. It was IMMACULATE on the outside, with a little rust on the rear. Below it is the new eBay guard section, rooted on the outside and starting to be on the inside too.
Here is a closer view of the "GOOD" guard section. Despite the corrosion you can see there, this piece of guard is excellent! So from here I had a plan..... to take the best bits from both sections of front guard, and make one totally good section of guard.
So I cut "a piece from here and a piece from there" (a quote from Mad Max)... and this is what I was wanting to achieve....
And this is it.... perfecto!!!!
So I lined up the replacement section with the existing guard, and ......
Welded it in place, obviously!
And while you may think that this is a huge weld with a bit of guard attached, when I trilal fitted it to my SL/R, with front apron, it was SO DAMN PERFECT that I had to crack a beer, sit back and go.... "FWOOORRRRRR!!!"
That'll do me for now..... more to come, when I can be assed! ;-)
Edited by notna, 14 May 2011 - 07:33 PM.
#73
_nial8r_
_nial8r_
-
- Guests
Posted 14 May 2011 - 07:47 PM
well done mate it came up well.... but no pic's of it dressed and swinging on the front ??? gezz i got all excited lol.
i had a go today on all the pissy little rust holes ( i hate them kind of repairs ) inside the door shuts and to my disbelief i had it knocked over by 1pm from a a 9am start and even with 2K etch back over the repairs i pretty friggin worried when it comes time to put my supprot back on that nothing is going to line up. maybe thats why im avoiding it
i had a go today on all the pissy little rust holes ( i hate them kind of repairs ) inside the door shuts and to my disbelief i had it knocked over by 1pm from a a 9am start and even with 2K etch back over the repairs
i pretty friggin worried when it comes time to put my supprot back on that nothing is going to line up. maybe thats why im avoiding it
#74
notna
-
- Members
-
- 706 posts
Forum Fixture
- Name:Reverse of username
- Location:Sydney
- Car:1976 LX L32 SL/R
- Joined: 21-May 07
Posted 14 May 2011 - 07:53 PM
Nice one Lee! Where's ya pics??? You should fear the rad support mate! It's a bitch!
I didn't get around to dressing my welds. My neighbours HATE me... I do all this shit on the front driveway, and it echo's accross the road badly!
I didn't get around to dressing my welds. My neighbours HATE me... I do all this shit on the front driveway, and it echo's accross the road badly!
#75
_sunburst73-xu1_
_sunburst73-xu1_
-
- Guests
Posted 14 May 2011 - 07:58 PM
Very,very nice work.Will be keeping tabs on this resto. 


1 user(s) are reading this topic
0 members, 1 guests, 0 anonymous users

