


PROJECT PAPAYA - A VERY FRUITY RESTO THREAD
Started by
notna
, Jul 27 2010 11:14 PM
703 replies to this topic
#76
 _nial8r_
_nial8r_
-

- Guests
Posted 14 May 2011 - 08:05 PM
ill have to take some of the finished repairs and have to try and dig some up from what they looked like, not a great deal to see as they were all no bigger than a match box, this is why i hate doing them, mark, cut, shape, weld, clean. mark, cut, shape, weld, clean and having to hold each piece with a magnet until i got the 1st tac on so that i didnt drop bits down inside the sill
#77
_Kush_
_Kush_
-
- Guests
Posted 14 May 2011 - 09:17 PM
Nice one Lee! Where's ya pics??? You should fear the rad support mate! It's a bitch!
I didn't get around to dressing my welds. My neighbours HATE me... I do all this shit on the front driveway, and it echo's accross the road badly!
Yep, my neighbours hate me too, I hope they don't bait my dog in revenge......
I'm really liking your work, man. I wish I could be there to be a sticky-beak when you're doing this stuff

#78
_Liam_
_Liam_
-
- Guests
Posted 14 May 2011 - 09:43 PM
Hey notna good work mate as usual. What build date is the Torana?
#79
notna
-
- Members
-

- 706 posts
Forum Fixture
- Name:Reverse of username
- Location:Sydney
- Car:1976 LX L32 SL/R
- Joined: 21-May 07
Posted 15 May 2011 - 08:02 PM
Cheers for the feedback guys!
Build date is 8/76. Cast date of the L32 I picked up is the same... lol... I kinda like that ;-)
My biggest problem is that I LOOOOVE all the fiddly resto work. I love welding and grinding and perfecting little things..... but when it's all done and finished, I get bored very quick. I'm hoping th break that nasty habbit and keep this one for a looong time. I respect some of you guys on here who have kept your Torries for years and years.
#80
_mick74lh_
_mick74lh_
-
- Guests
Posted 15 May 2011 - 08:28 PM
Awesome repairs. I'm guessing you're using a MIG welder? For the repairs on the lower front guards, how did you avoid putting too much heat into the panel? Did you stitch it up with small sections at a time or something?
#81
_Lx-Torana_
_Lx-Torana_
-
- Guests
Posted 16 May 2011 - 04:17 PM
My biggest problem is that I LOOOOVE all the fiddly resto work. I love welding and grinding and perfecting little things..... but when it's all done and finished, I get bored very quick.
I'm hopefully going to make a proper start on my rebuild soonish.... i could help out with your boredom problem

#82
notna
-
- Members
-
- 706 posts
Forum Fixture
- Name:Reverse of username
- Location:Sydney
- Car:1976 LX L32 SL/R
- Joined: 21-May 07
Posted 19 June 2011 - 07:54 PM
Well folks.... update time! 
This will be the first of many updates over the next month, as I have the next month off work, and no plans other than this RESTO!
I started early, today, as my holiday doesn't officially start till tomorrow (Monday). I just couldn't wait! I bribed my 2 sons to help me scrape off all the crud off the front end. Amazingly, they didn't give up after 2 minutes, and even argued over wanting to do the worst bits! A miracle, I know!
Scraping off the crud (My first car and Torana in the background there, watching over us.... RIP you poor old soul of a Torana)
 SLR_03.jpg 218.58K
1 downloads
SLR_03.jpg 218.58K
1 downloads
Here is the passenger side, post scraping. This was achieved with a paint scraper only. What is the red primer that Holden used under here? It's damn good stuff!
SLR_15.jpg 199.17K
2 downloads
...and this is a mere portion of all of the crud that littered my garage floor. Think of the weight saving achieve here!!
SLR_18.jpg 200.47K
2 downloads
So with all the scraping done, I thought about others on here who have done the same. I drew inspiration from Matt, (aka LH SLR 3300) whom I had the pleasure of meeting recently, along with 2 of his Toranas). I recalled that he used some scotchbrite and paint thinners, or something to that effect, to clean up these surfaces.
I didn't want to waste paint thinners, but I did want to get the 5 year old stale petrol out of my tank, so I figured i would do that AND use it to clean the freshly scraped metal.
SLR_13.jpg 182.58K
1 downloads
At first I tried a wire brush dipped in the stale petrol...... not so effective.
SLR_22.jpg 189.44K
1 downloads
So then I broke out the green scotchbrite pads and went nuts!

....and once I had scrubbed, I wiped. For this process, I chose some Ben 10 flannel PJ's. We all know that nothing can beat Ben 10, right! The perfect super hero for such a tough ask!

Once Ben 10 had conquered this arduous task, and the dust had settled, I was left with this....

Nothing can shift those remaining marks. Clean up nearly complete. I wiped over it all with some RANEX so that surface rust wont appear, while I decide whether to wire wheel it all, or leave it at that and blast with stoneguard. Tomorrow I might drop the crossmember and do the bits that can't be reached with that in place. I was goign to drop it today, then thought no, but since all this was only 1 days work, I now figure I will.
More to come.....
This will be the first of many updates over the next month, as I have the next month off work, and no plans other than this RESTO!
I started early, today, as my holiday doesn't officially start till tomorrow (Monday). I just couldn't wait!
I bribed my 2 sons to help me scrape off all the crud off the front end. Amazingly, they didn't give up after 2 minutes, and even argued over wanting to do the worst bits! A miracle, I know!Scraping off the crud (My first car and Torana in the background there, watching over us.... RIP you poor old soul of a Torana)
SLR_03.jpg 218.58K
1 downloadsHere is the passenger side, post scraping. This was achieved with a paint scraper only. What is the red primer that Holden used under here? It's damn good stuff!
SLR_15.jpg 199.17K
2 downloads...and this is a mere portion of all of the crud that littered my garage floor. Think of the weight saving achieve here!!
SLR_18.jpg 200.47K
2 downloadsSo with all the scraping done, I thought about others on here who have done the same. I drew inspiration from Matt, (aka LH SLR 3300) whom I had the pleasure of meeting recently, along with 2 of his Toranas). I recalled that he used some scotchbrite and paint thinners, or something to that effect, to clean up these surfaces.
I didn't want to waste paint thinners, but I did want to get the 5 year old stale petrol out of my tank, so I figured i would do that AND use it to clean the freshly scraped metal.
SLR_13.jpg 182.58K
1 downloadsAt first I tried a wire brush dipped in the stale petrol...... not so effective.
SLR_22.jpg 189.44K
1 downloadsSo then I broke out the green scotchbrite pads and went nuts!
....and once I had scrubbed, I wiped. For this process, I chose some Ben 10 flannel PJ's. We all know that nothing can beat Ben 10, right! The perfect super hero for such a tough ask!
Once Ben 10 had conquered this arduous task, and the dust had settled, I was left with this....
Nothing can shift those remaining marks. Clean up nearly complete. I wiped over it all with some RANEX so that surface rust wont appear, while I decide whether to wire wheel it all, or leave it at that and blast with stoneguard. Tomorrow I might drop the crossmember and do the bits that can't be reached with that in place. I was goign to drop it today, then thought no, but since all this was only 1 days work, I now figure I will.
More to come.....
#83
_Kush_
_Kush_
-
- Guests
Posted 19 June 2011 - 08:03 PM
Oh dear......... I think I'm getting excited!............... Yep! I'm excited!!!
#84
notna
-
- Members
-
- 706 posts
Forum Fixture
- Name:Reverse of username
- Location:Sydney
- Car:1976 LX L32 SL/R
- Joined: 21-May 07
Posted 19 June 2011 - 08:34 PM
About Ben 10, Kush? 
#85
_Kush_
_Kush_
-
- Guests
Posted 19 June 2011 - 08:56 PM
Dude, I dont even know who Ben is! I'm gettin old......
I know transformers , astro boy and He-man!
So I'm excited like astroboy, optimus prime and He-man fighting Ben-10!
I know transformers , astro boy and He-man!
So I'm excited like astroboy, optimus prime and He-man fighting Ben-10!
#86
_Kush_
_Kush_
-
- Guests
Posted 19 June 2011 - 08:59 PM
By the power of grayskull, I HAVE THE POWERRRRRR!!!!
#87
notna
-
- Members
-
- 706 posts
Forum Fixture
- Name:Reverse of username
- Location:Sydney
- Car:1976 LX L32 SL/R
- Joined: 21-May 07
Posted 19 June 2011 - 09:02 PM
hehehe.... thay's do Ben 10 for sure! He's just a mere boy after all!
#88
_LH SLR 3300_
_LH SLR 3300_
-
- Guests
Posted 19 June 2011 - 09:51 PM
Good to see you're making the most of your time off from work, that factory bitumen coating is horrible stuff to remove, i remember filling two Coles shopping bags with it by the time i'd finished on my car & i still have the rear wheel wells to do. The factory red oxide primer is tough stuff for sure, unless it has evidence of corrosion appearing underneath i leave it on. Keep up the great work, as we are following similar paths with the restoration work on our cars, i'm really looking forward to seeing this car progress.
#89
notna
-
- Members
-
- 706 posts
Forum Fixture
- Name:Reverse of username
- Location:Sydney
- Car:1976 LX L32 SL/R
- Joined: 21-May 07
Posted 20 June 2011 - 06:39 PM
Matt, I most definitely want to pick your brain some more. You do awesome work and it was great to see it with my own eyes.
Today I scraped and scrubbed some more, and after only 2 days at it, my back is killing. Still.... it will get used to it! I got a month of this to go!!
Today I looked at the 'ol bent K frame, and knew it had to come out....
SLR_01.jpg 200.41K
4 downloads
SLR_05.jpg 200.16K
1 downloads
I've done a couple of these recently, but made a meal of this today. It slipped off the jack as I was lowering it, and when it hit the ground, my disc rotor dust shields soon acquired a nice flat on the bottom
SLR_07.jpg 208.99K
3 downloads
Then I had a nice enpty engine bay. Much better for doing a proper job of cleaning and prepping, but the bloody exhaust was in the way now.... out it comes....
SLR_12.jpg 183.71K
1 downloads
Then I siphoned another 10 litres of finely aged 91 RON from the tank, and set to work again underneath and in the tunnel area....
SLR_10.jpg 202.86K
2 downloads
Before, with 35 years worth (not bad when you think about it!)

After being massaged with stale petrol and the missus' scotchbrite pad....

And then a tunnel view after the same treatment.

More cleaning for tomorrow..... then I guess i need to think about putting something over it all, before if gets all cruddy again. Do you spray the stoneguard straight over that? Or should I etch prime, prime, then stoneguard?
Today I scraped and scrubbed some more, and after only 2 days at it, my back is killing. Still.... it will get used to it! I got a month of this to go!!
Today I looked at the 'ol bent K frame, and knew it had to come out....
SLR_01.jpg 200.41K
4 downloads
SLR_05.jpg 200.16K
1 downloadsI've done a couple of these recently, but made a meal of this today. It slipped off the jack as I was lowering it, and when it hit the ground, my disc rotor dust shields soon acquired a nice flat on the bottom
SLR_07.jpg 208.99K
3 downloadsThen I had a nice enpty engine bay. Much better for doing a proper job of cleaning and prepping, but the bloody exhaust was in the way now.... out it comes....
SLR_12.jpg 183.71K
1 downloadsThen I siphoned another 10 litres of finely aged 91 RON from the tank, and set to work again underneath and in the tunnel area....
SLR_10.jpg 202.86K
2 downloadsBefore, with 35 years worth (not bad when you think about it!)
After being massaged with stale petrol and the missus' scotchbrite pad....
And then a tunnel view after the same treatment.
More cleaning for tomorrow..... then I guess i need to think about putting something over it all, before if gets all cruddy again. Do you spray the stoneguard straight over that? Or should I etch prime, prime, then stoneguard?
Edited by notna, 20 June 2011 - 06:40 PM.
#90
_nial8r_
_nial8r_
-
- Guests
Posted 20 June 2011 - 06:54 PM
gezz your not mucking around there Anton with the stone gaurd i flicked a bit of etch over any bare metal spots as i cleaned all of mine with a twist knot wire wheel on the grinder than a coat of Acylic or 2 of primer and then blew the shiltz on. pretty sure you can blow it straight on though but i think i would cover any bare spots with some etch, even a pressure pak just to be safe.
with the stone gaurd i flicked a bit of etch over any bare metal spots as i cleaned all of mine with a twist knot wire wheel on the grinder than a coat of Acylic or 2 of primer and then blew the shiltz on. pretty sure you can blow it straight on though but i think i would cover any bare spots with some etch, even a pressure pak just to be safe.
#91
_mick74lh_
_mick74lh_
-
- Guests
Posted 20 June 2011 - 08:09 PM
Looking good. Looking forward to seeing this progress
#92
_LH SLR 3300_
_LH SLR 3300_
-
- Guests
Posted 20 June 2011 - 08:53 PM
Really getting stuck into it i see, looking good . The stoneguard i used on my car can be applied over bare steel, bog etc but i lightly sanded the wheel wells with P240 & coarse scotchbrite & primed any bare steel as Lee suggested before applying it. I also masked off the whole engine bay & from the chassis rails to the driveway & placed a drop sheet down too as the overspray is a bitch to clean off. What are your plans for the trans tunnel/floorpan? I GMH blacked the floor on my car up to the lower firewall joins & masked it off when i primed/painted my engine bay. Your car being an LX will have a body coloured engine bay right?
. The stoneguard i used on my car can be applied over bare steel, bog etc but i lightly sanded the wheel wells with P240 & coarse scotchbrite & primed any bare steel as Lee suggested before applying it. I also masked off the whole engine bay & from the chassis rails to the driveway & placed a drop sheet down too as the overspray is a bitch to clean off. What are your plans for the trans tunnel/floorpan? I GMH blacked the floor on my car up to the lower firewall joins & masked it off when i primed/painted my engine bay. Your car being an LX will have a body coloured engine bay right?
#93
notna
-
- Members
-
- 706 posts
Forum Fixture
- Name:Reverse of username
- Location:Sydney
- Car:1976 LX L32 SL/R
- Joined: 21-May 07
Posted 21 June 2011 - 09:50 AM
Yes Matt, colour engine bay, not black. I was going to either stoneguard or GMH black the trans tunnel up to the same point you mentioned. Not sure if stoneguard is a good idea here though. What was the tunnel on an LX from the factory? Body colour? Your thoughts?
#94
_LH SLR 3300_
_LH SLR 3300_
-
- Guests
Posted 21 June 2011 - 04:30 PM
I personally don't like stoneguarding floorpans unless they were done like that in the factory. I think the floorpans on LXs were GMH black & they oversprayed body colour onto the trans tunnel etc when they painted the shell. If i were restoring an LX i'd paint the floor pan black up to the lower firewall join & mask it off when painting the bay.
#95
lxsstorana
-

- Members
-
- 2,499 posts
Forum Fixture
- Name:Mick
- Location:Eastwood, Sydney
- Car:SS Hatchback
- Joined: 23-March 06
Posted 21 June 2011 - 05:15 PM
Had a chance to meet Anton today and check out his torry in the flesh and I'm impressed. 
Doing a great job on the car (real labour of love).
Cheers Mick.
Doing a great job on the car (real labour of love).
Cheers Mick.
#96
_Bomber Watson_
_Bomber Watson_
-
- Guests
Posted 21 June 2011 - 05:23 PM
I cant believe i've been missing this project for the last few months.
Fantastic work mate. Loving it.
Cheers.
Fantastic work mate. Loving it.
Cheers.
#97
notna
-
- Members
-
- 706 posts
Forum Fixture
- Name:Reverse of username
- Location:Sydney
- Car:1976 LX L32 SL/R
- Joined: 21-May 07
Posted 21 June 2011 - 05:29 PM
Matt, with that advice, consider it done. It's easy to be lazy and blast the lot with stoneguard, but I kinda like the idea of masking up and making it like the guys on the factory floor did, back in '76.
Mick, was great to meet you today. Thanks for dropping in. You must bring your hatch next time and give my neighbours a taste of what is to come when I finish the Papaya! They all thought my Minis were loud... LOL!!!
Lots more progress today.... will post it up soon.
Mick, was great to meet you today. Thanks for dropping in.
You must bring your hatch next time and give my neighbours a taste of what is to come when I finish the Papaya! They all thought my Minis were loud... LOL!!!Lots more progress today.... will post it up soon.
#98
_Bomber Watson_
_Bomber Watson_
-
- Guests
Posted 21 June 2011 - 05:45 PM
Oh yeah, seeing though im follwoing this thread now, DEFINITELY prime under the stone guard.
Not a lot extra work as your going to be masking up to spray your stone guard anyway, and you can put the stone guard over the primer "wet on wet" ie leave the primer to dry for half hour then put the stone guard on, then also top coat it wet on wet after the stone guard has dried (hour or so depending on the temperature, if its cold there atm then longer) for a nicely stuck finish.
Now back off my soap box, do you care to send me 1/4 of your enthusiasm??? Wish i could get as much done as you do and i dont have a mrs and kids to worry about!!
Cheers.
#99
notna
-
- Members
-
- 706 posts
Forum Fixture
- Name:Reverse of username
- Location:Sydney
- Car:1976 LX L32 SL/R
- Joined: 21-May 07
Posted 21 June 2011 - 05:55 PM
Constructive critisism / tips from well seasoned experts / professional critique / I know bloody everything / ..... is more than welcome. This is how I learn stuff and then become all that myself. I did it with Minis and became a guru who wrote for a Mini magazine for 3 years.... so bring it on and let me soak it up like a sponge!
Will remember all that Mr Watson, and within the next couple of weeks put it into action.
Will remember all that Mr Watson, and within the next couple of weeks put it into action.
Edited by notna, 21 June 2011 - 06:01 PM.
#100
_nial8r_
_nial8r_
-
- Guests
Posted 21 June 2011 - 06:55 PM
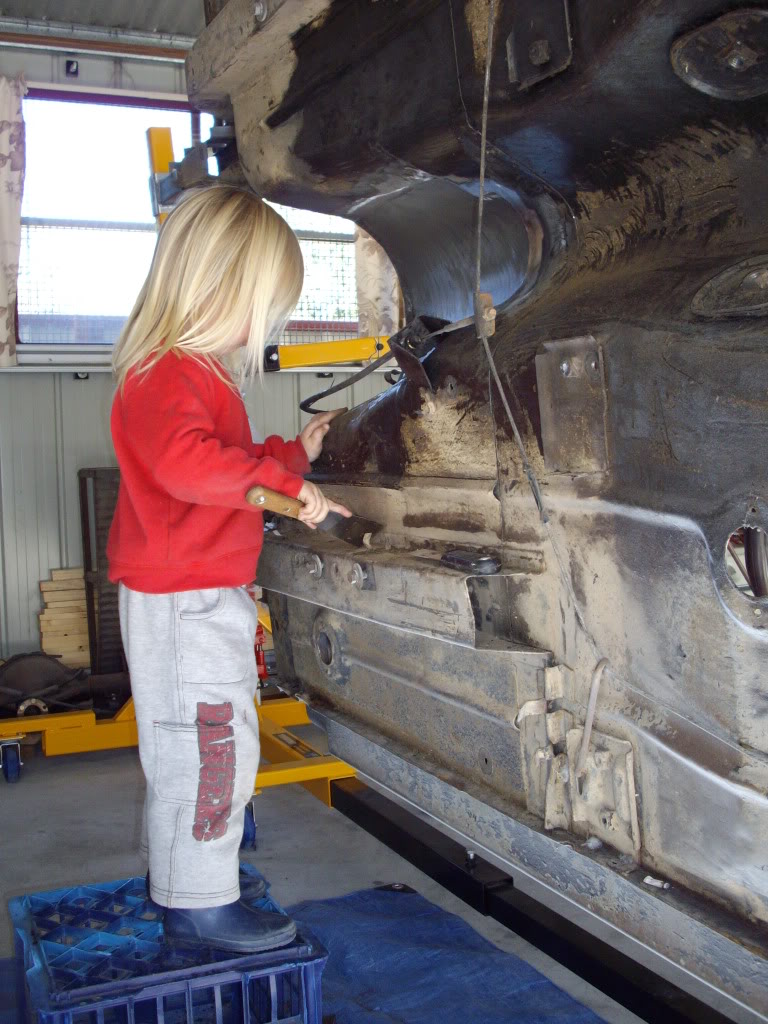
mine was GMH Black over the red oxide primer, here you can see the young bloke working hard for his pocket money lol
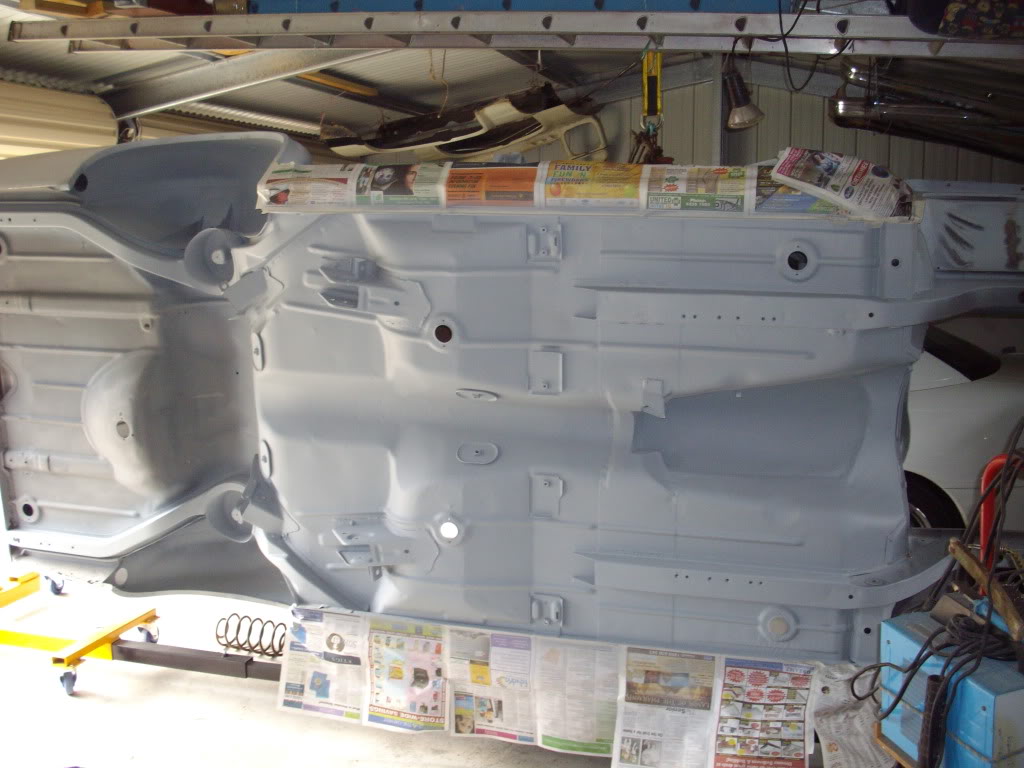
here it is all in primer
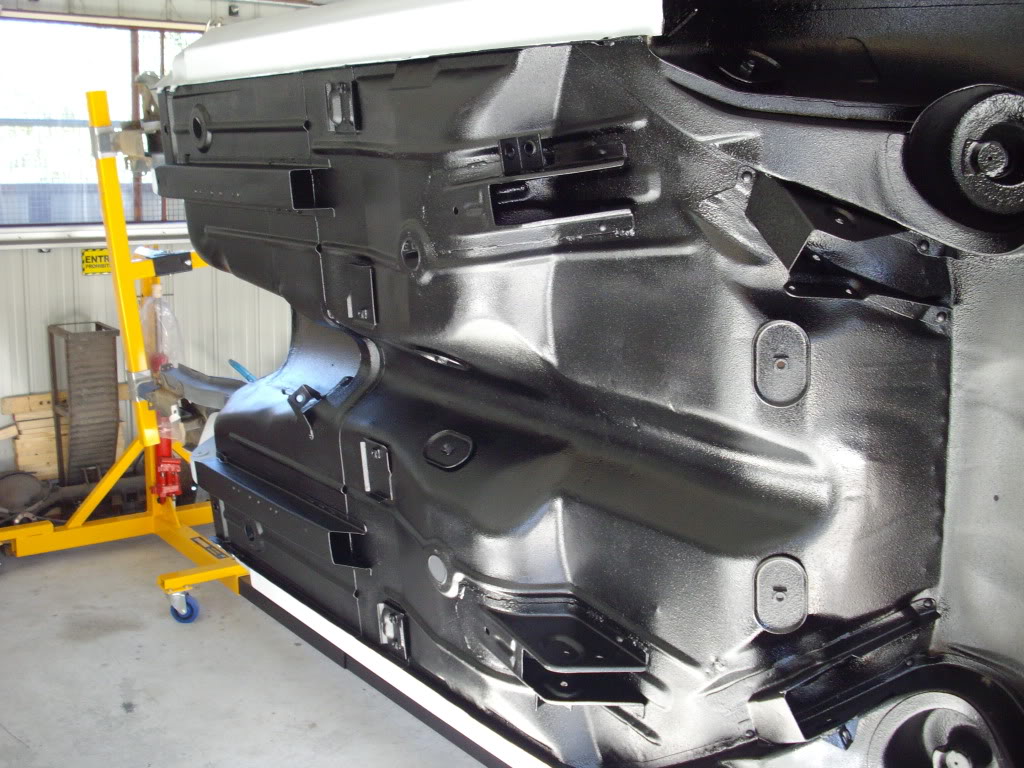
then covered in stone gaurd
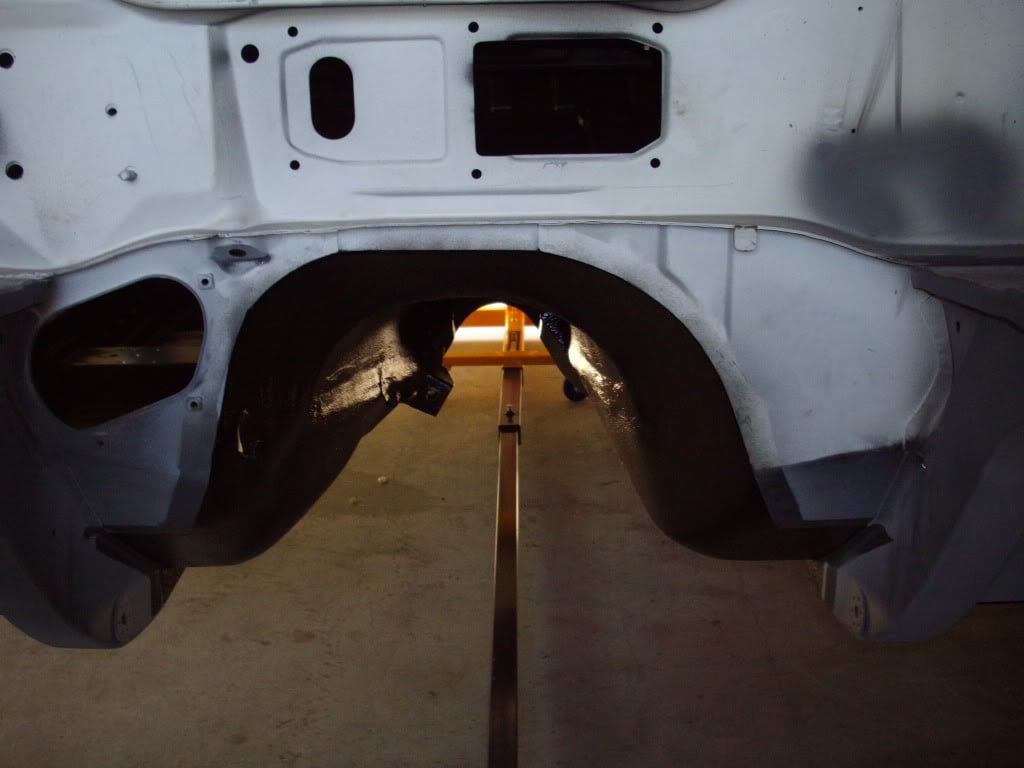
i also stopped at the trans tunnel as the bay will be the same colour as the body.
here it is all in primer
then covered in stone gaurd
i also stopped at the trans tunnel as the bay will be the same colour as the body.
Edited by nial8r, 21 June 2011 - 06:56 PM.


1 user(s) are reading this topic
0 members, 1 guests, 0 anonymous users

