
At least ya havin a go Jase
goodonya

 3 votes
tuff 72 4 door
Started by
madtoranajzedded
, Oct 04 2013 08:06 PM
402 replies to this topic
#176

Ice
-

- Members
-

- 15,218 posts
Cool
- Name:Gene
- Location:Galaxy's away from Ipswich
- Car:77 HZ Sandman Van
- Joined: 03-January 07
Posted 02 March 2017 - 08:59 PM
#177
madtoranajzedded
-
- Members
-
- 2,893 posts
Sir ask alot
- Name:Maz
- Location:Southern Tasmania
- Car:72 LJ SL SEDAN.
- Joined: 30-September 13
Posted 02 March 2017 - 09:12 PM
I'll give it go Geno.i dont mind doing it
just hate it you have to muck about abit to
get it close..i will cut excess off tomorrow
and do other side which is worse.someone
has used a jack there lol...back sills before
the wheel arch have to b done both sides too
lol..
just hate it you have to muck about abit to
get it close..i will cut excess off tomorrow
and do other side which is worse.someone
has used a jack there lol...back sills before
the wheel arch have to b done both sides too
lol..
Edited by madtoranajzedded, 02 March 2017 - 09:13 PM.
#178
_76lxJAS_
_76lxJAS_
-

- Guests
Posted 02 March 2017 - 10:41 PM
As for color choice flat color is so much easier to paint if u don't have much experience with painting. But personally a good metalic or even candy job would win hands down. For me flat colors just don't have the appeal of what is avaliable these days.
Also por15 that area first then flat black or colot it if u want to?
Also por15 that area first then flat black or colot it if u want to?
#179
madtoranajzedded
-
- Members
-
- 2,893 posts
Sir ask alot
- Name:Maz
- Location:Southern Tasmania
- Car:72 LJ SL SEDAN.
- Joined: 30-September 13
Posted 03 March 2017 - 07:51 PM
Went to do other side and the frOcking shit
rares part is worse than the other.you
Cunning Stunts are absolute frOcksticks.
how do you let such crap out the door.
was looking forward to doing other side but
no rares have to take the fun away.ive shut
up shop because I cant b #@$^%&.i have 2 rear sills to get and i wont b getting it from you
cnuts..out of all the stuff i get 80 % goes
back.what the frOcks wrong with yas.
Never again will i get shit from yous..
Edited by madtoranajzedded, 03 March 2017 - 07:56 PM.
#180
grumpy xu1
-

- Members
-
- 2,812 posts
Lotsa Posts!
- Name:Gary
- Location:Queensland
- Car:lj xu1
- Joined: 01-February 10
Posted 03 March 2017 - 09:26 PM
Maz, you can draw a profile on some cardboard accurately & get a decent sheet metal shop to bend it out of .8 mm panel steel mate. It will make a lot better job of it. & yes someone had to say that half of the Rares holden repro patches are absolutely shit ! There's a fair few repro products from different companies, that need to be brought up in quality that's for sure & that's very common talk. Please no more bloody colour coded engine bays, surely they've been done to death. The original black to me really suits them. Gary.
#181
madtoranajzedded
-
- Members
-
- 2,893 posts
Sir ask alot
- Name:Maz
- Location:Southern Tasmania
- Car:72 LJ SL SEDAN.
- Joined: 30-September 13
Posted 03 March 2017 - 09:48 PM
Yeah. she was all bent up other side really bad Gaz where its spotted to the bottom.
Im going to ask a couple guys i know if
They have a lhs guard thats buggered at
front but bottom is good..
I want to do bay in satin but i dont think
i can as its spose to be ..well not easy to
paint..me having stuff all experience
(Near zilch) in the plenum area it was
chataeu mauve but didnt look like it had
clear on it..how the hell did they spray it
in there..im thinking of just putting
Por15 like Jase said and use por15 top coat
thats in a can...can youget chateau mauve in
a solid color in 2 pack so i could paint it?
Edited by madtoranajzedded, 03 March 2017 - 09:52 PM.
#182
Ice
-
- Members
-
- 15,218 posts
Cool
- Name:Gene
- Location:Galaxy's away from Ipswich
- Car:77 HZ Sandman Van
- Joined: 03-January 07
Posted 03 March 2017 - 10:14 PM
You can get gun extension nozzles to spray in the plenum area Jase
#183
grumpy xu1
-
- Members
-
- 2,812 posts
Lotsa Posts!
- Name:Gary
- Location:Queensland
- Car:lj xu1
- Joined: 01-February 10
Posted 03 March 2017 - 11:07 PM
Chatue is a metallic colour not a solid. You can buy very small gravity fed spray guns about a 150 ml pot size, ask at your paint shop maz. The thing to check is the fan size the more adjustment the better, probably cost around $120 mate. Gary. Ps make sure that you use 2 pack epoxy etch in there too.
#184
madtoranajzedded
-
- Members
-
- 2,893 posts
Sir ask alot
- Name:Maz
- Location:Southern Tasmania
- Car:72 LJ SL SEDAN.
- Joined: 30-September 13
Posted 03 March 2017 - 11:42 PM
Cool ill have a geezer Gene..thanks
Yeah i know its metalic Gazza.just wanted to
Know if could get in solid color so its
easier to paint.im a very long way off
doing the body .if i can get it in solid i
can spray it in plenum area..
 20170122_183434.jpg 711.37K
6 downloads
20170122_183434.jpg 711.37K
6 downloads
Yeah i know its metalic Gazza.just wanted to
Know if could get in solid color so its
easier to paint.im a very long way off
doing the body .if i can get it in solid i
can spray it in plenum area..
20170122_183434.jpg 711.37K
6 downloads
#185
Ice
-
- Members
-
- 15,218 posts
Cool
- Name:Gene
- Location:Galaxy's away from Ipswich
- Car:77 HZ Sandman Van
- Joined: 03-January 07
Posted 04 March 2017 - 12:35 AM
Check Martys thread he shows how he painted in there
#186
madtoranajzedded
-
- Members
-
- 2,893 posts
Sir ask alot
- Name:Maz
- Location:Southern Tasmania
- Car:72 LJ SL SEDAN.
- Joined: 30-September 13
Posted 04 March 2017 - 12:41 AM
Will do ..thanks again Gene ☺ ..i used
Martys build thread the other day actually
seeing how he welded brackets to the rotisserie.
Marty to the rescue once again..
Martys build thread the other day actually
seeing how he welded brackets to the rotisserie.
Marty to the rescue once again..
Edited by madtoranajzedded, 04 March 2017 - 12:42 AM.
#187
grumpy xu1
-
- Members
-
- 2,812 posts
Lotsa Posts!
- Name:Gary
- Location:Queensland
- Car:lj xu1
- Joined: 01-February 10
Posted 04 March 2017 - 05:30 PM
Maz, why can you not paint a metallic colour in there, but you can a solid ? I'll break it down for you mate.
(1) prep & apply epoxy etch primer & let it dry. Use weld through primer where the welds are going to be run, approximately 20 mm wide same size as you masking tape width, brands like roberlo ect you can epoxy over it around the edges,
(2) rub it down & prep for any style of paint & obviously mask it off. 3 mix the 2 pack metalic chatue base coat, apply 3 wet coats 20 minute flash times & then 3 wet coats of clear & let it dry for 2 days. Or mix up some 2 pack solid black & apply 3 wet coats and allow to dry for 2 days. Put the idea of solid chatue out of your head it's like saying i have a potato but i want it to be a tomato has anyone seen a potato turn into a tomato ? It's totally different paint.
(3) When you go to the paint shop you can get some flattening base mixed in with the black say 25 % mixed volume & you decant the amount of colour you need after stiring,add the hardener stir it & then add the thinners & re stir & you're good to go my friend, Simples
#188
grumpy xu1
-
- Members
-
- 2,812 posts
Lotsa Posts!
- Name:Gary
- Location:Queensland
- Car:lj xu1
- Joined: 01-February 10
Posted 04 March 2017 - 05:39 PM
Ps everywhere you use that flap wheel will require the use of filler or lead ect to smoothen it to make it not visible after paint. Gary
#189
madtoranajzedded
-
- Members
-
- 2,893 posts
Sir ask alot
- Name:Maz
- Location:Southern Tasmania
- Car:72 LJ SL SEDAN.
- Joined: 30-September 13
Posted 04 March 2017 - 08:10 PM
Thanks grumps ...whats easier to paint
Metalic or a solid purple color
Is this metalic as i might go this
2085.jpg 44.1K
4 downloads
Metalic or a solid purple color
Is this metalic as i might go this
2085.jpg 44.1K
4 downloads
Edited by madtoranajzedded, 04 March 2017 - 08:19 PM.
#190
grumpy xu1
-
- Members
-
- 2,812 posts
Lotsa Posts!
- Name:Gary
- Location:Queensland
- Car:lj xu1
- Joined: 01-February 10
Posted 04 March 2017 - 09:04 PM
Honestly Maz, that's probably a candy or special effects colour, great if you want to never drive it & rebuild it every time a new look comes along. New chatue looks pretty smart and similar. The major difference between solid & metalic is the solid requires 3 coats all up & the metalic requires 3 of base coat & 3 of clear. The hardest part of the metalic, is laying the metalic particles properly, you need to be able atomise them evenly that's what makes it look great. Gary.
#191
madtoranajzedded
-
- Members
-
- 2,893 posts
Sir ask alot
- Name:Maz
- Location:Southern Tasmania
- Car:72 LJ SL SEDAN.
- Joined: 30-September 13
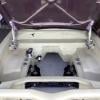
Posted 18 March 2017 - 10:35 PM
What ive been doing past week..i will get
back to those lower fender replacements
another day..right now .with a little bit of
a clean i can prime the front up..
Old pics its a little cleaner than this..
Just done the plenum with first coat of
por..put it on a little too thick and shes
running..doesnt matter wont see it..
20170317_192840.jpg 659.72K
7 downloads
20170317_193020.jpg 614.91K
5 downloads
#192
madtoranajzedded
-
- Members
-
- 2,893 posts
Sir ask alot
- Name:Maz
- Location:Southern Tasmania
- Car:72 LJ SL SEDAN.
- Joined: 30-September 13
Posted 19 March 2017 - 11:55 AM
Thought id reweld the lip from inside for
more strength .wasnt really happy with it
to start with.by weldeing the inside has
actually helped pull the panel back out.
Heeeps better than it was.little more to
do..pic..
20170319_124633.jpg 1.04MB
5 downloads
more strength .wasnt really happy with it
to start with.by weldeing the inside has
actually helped pull the panel back out.
Heeeps better than it was.little more to
do..pic..
20170319_124633.jpg 1.04MB
5 downloads
#193
madtoranajzedded
-
- Members
-
- 2,893 posts
Sir ask alot
- Name:Maz
- Location:Southern Tasmania
- Car:72 LJ SL SEDAN.
- Joined: 30-September 13
Posted 19 March 2017 - 12:03 PM
Just noticed a little something that has
happened...more work lol.must of happened
couple days ago.as ive been keeping an eye
on it and making sure i have the spit lined
up at the ends when moving..
i hope its not too bad..
1489888899143-192765975.jpg 591.21K
6 downloads
happened...more work lol.must of happened
couple days ago.as ive been keeping an eye
on it and making sure i have the spit lined
up at the ends when moving..
i hope its not too bad..
1489888899143-192765975.jpg 591.21K
6 downloads
#194
madtoranajzedded
-
- Members
-
- 2,893 posts
Sir ask alot
- Name:Maz
- Location:Southern Tasmania
- Car:72 LJ SL SEDAN.
- Joined: 30-September 13
Posted 19 March 2017 - 07:44 PM
First real go of priming got some nice runs
in the bay but as i went done few adjustments
to gun and shes good..
Theres a few spots that need a little more
Primer.butoverall im reasonably happy with
myrushed effort
Jesus that stuff is potent
20170319_202726.jpg 676.52K
5 downloads
20170319_202715.jpg 567.3K
5 downloads
20170319_202615.jpg 624.38K
7 downloads
Edited by madtoranajzedded, 19 March 2017 - 07:49 PM.
#195
madtoranajzedded
-
- Members
-
- 2,893 posts
Sir ask alot
- Name:Maz
- Location:Southern Tasmania
- Car:72 LJ SL SEDAN.
- Joined: 30-September 13
Posted 19 March 2017 - 09:49 PM
How long do you have to wait to rub back
some areas. i cleaned and cleaned and
cleaned before priming and still some
aluminium oxide has came out from
somewhere when i rotated it.
What grade dry sandpaper should i use guys..
240-320?
Cheers maz
some areas. i cleaned and cleaned and
cleaned before priming and still some
aluminium oxide has came out from
somewhere when i rotated it.
What grade dry sandpaper should i use guys..
240-320?
Cheers maz
Edited by madtoranajzedded, 19 March 2017 - 09:53 PM.
#196
madtoranajzedded
-
- Members
-
- 2,893 posts
Sir ask alot
- Name:Maz
- Location:Southern Tasmania
- Car:72 LJ SL SEDAN.
- Joined: 30-September 13
Posted 26 March 2017 - 10:59 PM
Tidied up a few areas in the bay where the aluminium oxide blew onto a panel when
priming ..found where it was coming from.
was in the rotisserie ends and the bit i
fabbed up to bonnet latch.blew some out and
taped it up
Looks heaps better now.
20170326_160454.jpg 543.3K
6 downloads
priming ..found where it was coming from.
was in the rotisserie ends and the bit i
fabbed up to bonnet latch.blew some out and
taped it up
Looks heaps better now.
20170326_160454.jpg 543.3K
6 downloads
#197
madtoranajzedded
-
- Members
-
- 2,893 posts
Sir ask alot
- Name:Maz
- Location:Southern Tasmania
- Car:72 LJ SL SEDAN.
- Joined: 30-September 13
Posted 26 March 2017 - 11:11 PM
Started on the side.the por15 i put it the
Plenum is still not set on the runs.i didnt
think i put it on too thick,but after id
done it could see it slowly moving downwards.
Couldnt brush it ae would of pulled it out
and would of looked really crap..will
definately spray it on nxt time..
20170323_161523.jpg 689.18K
5 downloads
20170325_173832.jpg 692.63K
5 downloads
#198
_GMH-001_
_GMH-001_
-
- Guests
Posted 29 March 2017 - 12:08 AM
If you're rubbing primer to paint in an area you dont see 320 dry is fine. For everywhere else you see you need to decide if you're using a solid colour or metallic. Solid you can rub with 600 wet and paint over, for metallic you need to sand with minimum 800/1200 wet so you dont see the scratches from rubbing. Metallic is very thin compared to a solid. Not sure the spray gun you have but you want a 1.3/1.4mm tip gravity gun, screw the fluid needle all the way in (not too hard or you'll damage the needle tip) then screw out 2 1/4 - 2 1/2 turns, open the fan and test spray against paper. Hold gun about 200mm from paper in a still position and give a quick squirt of paint. Should result in a cigar shape approx 150mm high with even coverage throughout with a bit of misting towards the upper/lower edges. Too thick an application then screw fluid in approx 1/4 turn, not enough coverage screw out same amount and fine tune within that range. Spray at PSI about 30-40psi if using a HVLP gun. Definately practice painting something first about 600mm x 600mm that sits vertical (you'll find the run limit compared to laying flat) and overlap each pass by about 1/3, after that its just lots of practice to perfect it. Hope this can help you out
Oh and if you decide metallic, make your last coat a medium/wet coat to get the metallics sitting up properly, a wet coat as final will flood them and they lay flat which is no good. Also recommend youtube videos by TheGunman, he has a lot of very knowledgeable how-to videos for the inexperienced on gun set up, movement etc
#199
madtoranajzedded
-
- Members
-
- 2,893 posts
Sir ask alot
- Name:Maz
- Location:Southern Tasmania
- Car:72 LJ SL SEDAN.
- Joined: 30-September 13
Posted 29 March 2017 - 08:50 PM
Thanks for the tips Tony.thats great info.
They will help me out plenty when the time
comes..
Im still undecided which way to go.lol.
I have an devilbiss gti pro .with 1.3 and
came with a 1.2 tip also which i havnt used.
Looks a great gun..
1490784430900-61586234.jpg 583.62K
4 downloads
They will help me out plenty when the time
comes..
Im still undecided which way to go.lol.
I have an devilbiss gti pro .with 1.3 and
came with a 1.2 tip also which i havnt used.
Looks a great gun..
1490784430900-61586234.jpg 583.62K
4 downloads
#200
_GMH-001_
_GMH-001_
-
- Guests
Posted 29 March 2017 - 11:48 PM
Yep top gun unfortunately it's all about the painter when you use that equipment lol I was undecided between that gun and the iwata wbx400 but went iwata as its made for the waterbourne paints aswell. TheGunman uses the devilbiss and has videos on the gti pro too so well worth checking when you're up to it. As for indecision a solid is easier to paint and buff up later compared to basecoats, look forward to your progress


1 user(s) are reading this topic
0 members, 1 guests, 0 anonymous users

