Jump to content


Photo
* * * - - 3 votes

tuff 72 4 door


  • Please log in to reply
402 replies to this topic

#201 madtoranajzedded

madtoranajzedded

    Sir ask alot

  • Members
  • PipPipPipPipPipPip
  • 2,891 posts
  • Name:Maz
  • Location:Southern Tasmania
  • Car:72 LJ SL SEDAN.
  • Joined: 30-September 13

Posted 31 March 2017 - 08:30 PM

Thanks Tony..

Agree.but a good gun will help me a little.

Watched a few vids of the gunman .he makes
it look soo easy.i think i might have to go
solid color hmmm..

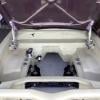
Weathers changing here fast had to prime
dr jams and rear qtr.roofs still not done
it needs conditioning a bit better with
something like those scotch brite on a roloc
Fitting that goes on an air disc sanders..
Shes had some rust in roof and needs to skim
It slightly everything else seems a little
too aggresive to use.can see the dents.will
have a go at some once shes all in epoxy.
The hard ones ill see if o can get dexter
kertez to do them.some pics
Attached File  20170331_184359.jpg   539.38K   5 downloads
Attached File  20170331_202710.jpg   604.64K   6 downloads

#202 _GMH-001_

_GMH-001_
  • Guests

Posted 31 March 2017 - 10:54 PM

Hmmm well let me ask where you located?. Im in northern subs (sunbury) if you're not too far away I could give you a days crash course on things if you're willing. I have a roloc and am aware of the scotch pads  however they create a condensed heat area (2" pad at 16,000rpm 'shivers'") I prefer the 8" 'scotch type' strip-it disc that adapts to a buff. I did a resto on an XW falcon incl. roof/boot/bonnet to bare metal with this pad with no warpage/damage to panels and cut time by over 50%.


Also dont be scared by metallics, if its too cold for you to use basecoat/clear then its also too cold to paint a solid. After all 2pac is 2pac lol And yes gunman makes it look easy but same rules apply to everything, its all about foundation/preparation, laying on the paint is the same for both. It's really not that hard you just need to know the basics then its down to you and the gun to how it comes out


#203 madtoranajzedded

madtoranajzedded

    Sir ask alot

  • Members
  • PipPipPipPipPipPip
  • 2,891 posts
  • Name:Maz
  • Location:Southern Tasmania
  • Car:72 LJ SL SEDAN.
  • Joined: 30-September 13

Posted 02 April 2017 - 11:18 AM

Im not that far really..a hop skip jump and
a little swim and im there..im in New
Norfolk Tas lol...they call it the valley
of love haha...thanks for the offer though..

I do have a buffer here my brother bought
me and still in its box .its just a
supercheap one so should work ok..i did go
to trade aid now robayne down here looking
to purchase an 4" air sander one that
compressor can run with a trigger so i didnt
have to rev its head off and suck the life
out of the comp..Tom did say use a buffer but
i didnt think there was those scotch brites
for it.. i havnt come across one down here.
would you know where i could source one from
Melb...

#204 _GMH-001_

_GMH-001_
  • Guests

Posted 05 April 2017 - 10:12 AM

Well I get them from a couple of different paint shops but they are readily available on ebay


Eg: http://www.ebay.com....iybRvo_6WL1c4ag


An adjustable speed buff is ideal but a set speed buff will still work well. These things rip off everything and I love them. Next best thing to using a blaster


#205 madtoranajzedded

madtoranajzedded

    Sir ask alot

  • Members
  • PipPipPipPipPipPip
  • 2,891 posts
  • Name:Maz
  • Location:Southern Tasmania
  • Car:72 LJ SL SEDAN.
  • Joined: 30-September 13

Posted 05 April 2017 - 01:22 PM

Yeah we are very limited in our paint supply
stores here we have buggerall gear..
Most times ive had to source from mainland
and Tom from Robayne has been kind enough
to get it in for me.i use the same ones but
for drill.i seen everything else when
searching on ripbay and didnt see them...

Thanks Tony

Edited by madtoranajzedded, 05 April 2017 - 01:24 PM.


#206 madtoranajzedded

madtoranajzedded

    Sir ask alot

  • Members
  • PipPipPipPipPipPip
  • 2,891 posts
  • Name:Maz
  • Location:Southern Tasmania
  • Car:72 LJ SL SEDAN.
  • Joined: 30-September 13

Posted 06 April 2017 - 10:56 PM

What have you guys used to replace that white
sealer in drip channels.i asked a question
little while back to no reply.looks like
same stuff used to fill gap between
lower valance panel to guard.ive taken abit
of it out with wire wheel to clean.found
some rust in there aswell..

Should i replace it with??? or dont worry
about it and just epoxy?

Cheers Maz
Attached File  20170406_223947~3.jpg   314.64K   6 downloads

#207 _GMH-001_

_GMH-001_
  • Guests

Posted 08 April 2017 - 02:15 PM

When I redid the XW I removed all sealant I could access as I found rust staining aswell. I used tereson terostat joint/seam sealant in a normal caulking tube. Any quality automotive seam sealant will do the same thing as long as it has flexibility properties to avoid in cracking along the edges and hence defeating the purpose. Tip too after squirting on a bead, lick your finger first then run it along the bead. Prevents sticking to fingers and gives a better/smooth finish on vehicle


#208 SmacT

SmacT

    Forum Fixture

  • Members
  • PipPipPipPipPip
  • 907 posts
  • Name:Sam
  • Location:Sydney
  • Car:LX 4dr 383, TKX, BW
  • Joined: 24-December 08

Posted 08 April 2017 - 05:07 PM

I'm no expert panel guy, but my thoughts are that you definitely need to seam seal, however I have epoxied first, then added seam sealer. Happy to hear of other methods, but that one made sense to me.

#209 _GMH-001_

_GMH-001_
  • Guests

Posted 09 April 2017 - 09:59 AM

my bad for not mentioning it. DEFINITELY epoxy before applying new sealer, it is always the last thing to do before painting. Make sure it is a sealer that can be painted over (most are but some are not). Thanks SmacT for picking up on this.


#210 SmacT

SmacT

    Forum Fixture

  • Members
  • PipPipPipPipPip
  • 907 posts
  • Name:Sam
  • Location:Sydney
  • Car:LX 4dr 383, TKX, BW
  • Joined: 24-December 08

Posted 09 April 2017 - 01:21 PM

Ah good, was hoping I had that right. Thanks for confirming.

#211 madtoranajzedded

madtoranajzedded

    Sir ask alot

  • Members
  • PipPipPipPipPipPip
  • 2,891 posts
  • Name:Maz
  • Location:Southern Tasmania
  • Car:72 LJ SL SEDAN.
  • Joined: 30-September 13

Posted 09 April 2017 - 02:55 PM

Thanks guys appreciate the help..on further
Examining from the underside it has rusted
through from the top...bugger..

Just looked for that tereson and watched a
Youtube vid of the 9320 tereson using
flatstream nozzles to lay it on a vehicle
thats primed..gee i can think of a few areas
where thay could be used on an unmolested
vehicle..i gather this is the one you used bud
Attached File  images (25).jpg   26.37K   4 downloads
Bit of rust
Attached File  20170409_142831.jpg   592.66K   5 downloads

Edited by madtoranajzedded, 09 April 2017 - 02:56 PM.


#212 madtoranajzedded

madtoranajzedded

    Sir ask alot

  • Members
  • PipPipPipPipPipPip
  • 2,891 posts
  • Name:Maz
  • Location:Southern Tasmania
  • Car:72 LJ SL SEDAN.
  • Joined: 30-September 13

Posted 10 April 2017 - 12:41 AM

Roof is done..she has stripes lol..
Mixed it correct.maybe im not overlapping
enough.cigar pattern is great..
Attached File  20170408_145235.jpg   488.95K   10 downloads

#213 _Bomber Watson_

_Bomber Watson_
  • Guests

Posted 10 April 2017 - 08:59 AM

More overlap. More fan if you can.

#214 madtoranajzedded

madtoranajzedded

    Sir ask alot

  • Members
  • PipPipPipPipPipPip
  • 2,891 posts
  • Name:Maz
  • Location:Southern Tasmania
  • Car:72 LJ SL SEDAN.
  • Joined: 30-September 13

Posted 10 April 2017 - 08:04 PM

Thanks Bomber.i will try more overlap when
I go to do the other qtr panel..i actually
got the same effect on other side.i
slightly adjusted fan and a little flow.
when i done the roof but same effect...
When i first done the bay i must of bumped
the cheater valve (small reg on gun) and
sprayed it at about 10psi lol.it went on
really heavy by the time i went to do a guard
i could see it starting to run and thought
WTF haha..after that little episode i have
been hesitant to go reasonably slow and
hurrying it along.i guess i need to practice
alot but just dont want to waste the
materials...

Im glad im asking as the paint will come
out the same hey if i dont correct it...

Edited by madtoranajzedded, 10 April 2017 - 08:05 PM.


#215 madtoranajzedded

madtoranajzedded

    Sir ask alot

  • Members
  • PipPipPipPipPipPip
  • 2,891 posts
  • Name:Maz
  • Location:Southern Tasmania
  • Car:72 LJ SL SEDAN.
  • Joined: 30-September 13

Posted 21 April 2017 - 06:19 PM

Near ready to do lhs.shes had a hit on the
rear qtr rear door and front guard.lower
qtr section might have to b replaced.its
pitted quite abit with pinholes and the line
is pretty rooted.you could see whoever done
last used tabs and slide hammer.i will see
how i go spot welding them but first i will
get some copper plate to help fill them.
Last time i tried a couple holes just got
bigger and bigger...feck that.can see where the bog was..Attached File  20170406_145900.jpg   710.05K   5 downloads
Attached File  20170418_155859.jpg   633.66K   4 downloads

#216 madtoranajzedded

madtoranajzedded

    Sir ask alot

  • Members
  • PipPipPipPipPipPip
  • 2,891 posts
  • Name:Maz
  • Location:Southern Tasmania
  • Car:72 LJ SL SEDAN.
  • Joined: 30-September 13

Posted 21 April 2017 - 06:27 PM

Shes a little rusty as you can see.i have
since blasted it.just hope i can do the pin
holes.i cut a little section out and
replaced warped it abit.nothing a bit of bog
wont fix.
Attached File  20170418_155201.jpg   664.82K   6 downloads

#217 madtoranajzedded

madtoranajzedded

    Sir ask alot

  • Members
  • PipPipPipPipPipPip
  • 2,891 posts
  • Name:Maz
  • Location:Southern Tasmania
  • Car:72 LJ SL SEDAN.
  • Joined: 30-September 13

Posted 21 April 2017 - 06:43 PM

This is what it looked before from Ian
Kooistras work ..frOcking terrible.i cut lip
off and a piece of the inner wheel well he
left there.there was a few reasons why i
removed it.one was where he bashed the bit
he left there and put outward dents along
the wheel arch on outside..you couldnt
really fix them till it was gone.lip was
missing in areas through sheer tire rubbing
ive tapped them all in.heeeeps better now.
will run some thick guage wire to strengthen
it up a little..Attached File  20170418_140652.jpg   683.02K   5 downloads

Attached File  20170418_161305.jpg   672.22K   3 downloads

Attached File  20170418_160938.jpg   1.2MB   3 downloads

#218 madtoranajzedded

madtoranajzedded

    Sir ask alot

  • Members
  • PipPipPipPipPipPip
  • 2,891 posts
  • Name:Maz
  • Location:Southern Tasmania
  • Car:72 LJ SL SEDAN.
  • Joined: 30-September 13

Posted 21 April 2017 - 06:48 PM

As she sits.wax& grease then ready to go
Attached File  20170421_163847.jpg   596.8K   4 downloadsAttached File  20170421_172850.jpg   607.44K   3 downloads

#219 madtoranajzedded

madtoranajzedded

    Sir ask alot

  • Members
  • PipPipPipPipPipPip
  • 2,891 posts
  • Name:Maz
  • Location:Southern Tasmania
  • Car:72 LJ SL SEDAN.
  • Joined: 30-September 13

Posted 22 April 2017 - 05:02 PM

Done ..aaaaand no streaks 😜.very happy
with my effort.im getting better...
It was only bout 17 deg but was sweating
time i finished lol...
Attached File  20170422_150939.jpg   574.58K   3 downloads

Attached File  20170422_150909.jpg   549.93K   2 downloads

#220 madtoranajzedded

madtoranajzedded

    Sir ask alot

  • Members
  • PipPipPipPipPipPip
  • 2,891 posts
  • Name:Maz
  • Location:Southern Tasmania
  • Car:72 LJ SL SEDAN.
  • Joined: 30-September 13

Posted 27 April 2017 - 06:40 PM

Finally pulled me finger out and put down
final coat of por in plenum.used a foam
Brush this time than those cheapo disposable
brushes.they are no good to use in awkward
areas such as this,its that thick it pulls
the hair out of brush.have a couple imbedded
in paint..put down a rough coat on scuttle
panel couple hrs ago.wont see it but.will
recoat in 4hrs.hopefully put it on sometime
tomorrow.

Attached File  20170427_180028.jpg   521.77K   7 downloads
Attached File  20170427_175836.jpg   775.89K   5 downloads

#221 _shan620_

_shan620_
  • Guests

Posted 06 May 2017 - 08:43 PM

Looks good mate. I'll have to keep an eye on this. Can wait until mines at this stage.


#222 madtoranajzedded

madtoranajzedded

    Sir ask alot

  • Members
  • PipPipPipPipPipPip
  • 2,891 posts
  • Name:Maz
  • Location:Southern Tasmania
  • Car:72 LJ SL SEDAN.
  • Joined: 30-September 13

Posted 10 May 2017 - 09:05 PM

Thanks Shannon.still havnt got that scuttle
panel on yet but i did do the end bits and
weld through primer on areas to b welded.
Got a couple of burn throughs but getting
better...


Slow i know but its progress ☺
Attached File  20170510_180454.jpg   557.17K   8 downloads
Attached File  20170510_193146.jpg   524.3K   7 downloads

Edited by madtoranajzedded, 10 May 2017 - 09:07 PM.


#223 sibhs

sibhs

    Lotsa Posts!

  • Members
  • PipPipPipPipPipPip
  • 2,703 posts
  • Name:Martin
  • Location:Perth
  • Car:LJ Coupe S
  • Joined: 27-July 12

Posted 10 May 2017 - 10:21 PM

Hi Maz, looking great mate.

Painting your own car is very satisfying, I miss spraying the paint, it looks amazing when you get it right.

Keep it up.


Marty


#224 madtoranajzedded

madtoranajzedded

    Sir ask alot

  • Members
  • PipPipPipPipPipPip
  • 2,891 posts
  • Name:Maz
  • Location:Southern Tasmania
  • Car:72 LJ SL SEDAN.
  • Joined: 30-September 13

Posted 13 May 2017 - 11:49 PM

Thanks for the confidence Marty.i cant wait
till that day arrives bud.

Yaay..Ive finally tacked the scuttle down.
i put Lord fusor 109b in between spot welds,
save doing all of them as i only drilled out
Bout half of them.once all welding is
finished i will seal inside plenum with por
15 .plug welds aint bad will fix a couple up.
Havnt quite got it level on right side its extremely tight just need to put something
In iside to lift it up and should b good.
Very happy with my effort..
Attached File  20170513_210418.jpg   663.5K   2 downloads
Attached File  20170513_215945.jpg   583.46K   5 downloads

#225 madtoranajzedded

madtoranajzedded

    Sir ask alot

  • Members
  • PipPipPipPipPipPip
  • 2,891 posts
  • Name:Maz
  • Location:Southern Tasmania
  • Car:72 LJ SL SEDAN.
  • Joined: 30-September 13

Posted 18 May 2017 - 10:18 PM

Hi guys ..i have finally Welded it fully and
have ground welds back.Where i have welded
scuttle both sides near wipers ,it has shrunk
on the curvature and has pulled it upwards creating a high cm wide 2mm high..hmmm tried
to tap it down in one area and split the weld .
Rewelded it.was only a couple spot welds
long.any ideas how to get it down..

Heat and tap?.if thats the case i dont think
i can do it without frocking it.

Cheers Maz
Attached File  20170514_205640.jpg   620.4K   6 downloads
Attached File  20170518_213530.jpg   561.86K   6 downloads


0 user(s) are reading this topic

0 members, 0 guests, 0 anonymous users