Jump to content


- - - - -

The Sally Report

LC GTR Restoration 1971 The Marty Report Girl Power

  • Please log in to reply
982 replies to this topic

#301 sibhs

sibhs

    Lotsa Posts!

  • Members
  • PipPipPipPipPipPip
  • 2,703 posts
  • Name:Martin
  • Location:Perth
  • Car:LJ Coupe S
  • Joined: 27-July 12

Posted 16 August 2020 - 07:10 PM

Here's a repair on the tail light holders. One had a few holes and the other a fair bit of rust.


Attached File  IMG_2183.jpeg   49.18K   11 downloads


Attached File  IMG_2191.jpeg   68.12K   12 downloads


Attached File  IMG_2192.jpeg   50.49K   10 downloads


Attached File  IMG_2195.jpeg   77.2K   10 downloads


Attached File  IMG_2196.jpeg   50.25K   11 downloads


Attached File  IMG_2197.jpeg   42.48K   8 downloads


Attached File  IMG_2203.jpeg   73.25K   8 downloads


Attached File  IMG_2204.jpeg   50.85K   8 downloads


Attached File  IMG_2219.jpeg   48.82K   7 downloads


#302 rodomo

rodomo

    To advertise here, call 13TORANA

  • Members
  • PipPipPipPipPipPipPip
  • 17,999 posts
  • Name:R - O - B Dammit!
  • Location:Way out west of Melbourne Awstraylya
  • Joined: 10-December 05

Posted 16 August 2020 - 10:45 PM

Resto of the year :spoton:


#303 sibhs

sibhs

    Lotsa Posts!

  • Members
  • PipPipPipPipPipPip
  • 2,703 posts
  • Name:Martin
  • Location:Perth
  • Car:LJ Coupe S
  • Joined: 27-July 12

Posted 17 August 2020 - 10:15 PM

With the boot floor about to go in it's an exciting stage. 

Stripped the panels with paint stripper then applied KBS to the under side. Copper coated the bits that will be hidden and welded.

Test fitted the fuel tank and found it wouldn't sit back enough on the left side. Did some investigating and found the panel lips were differant sizes. Had to cut and adjust lip to match.


Attached File  IMG_2189.jpeg   82.58K   7 downloads


Attached File  IMG_2222.jpeg   89.96K   7 downloads


Attached File  IMG_2223.jpeg   84.4K   8 downloads


Attached File  IMG_2224.jpeg   79.09K   6 downloads


Attached File  IMG_2225.jpeg   59.5K   6 downloads


Attached File  IMG_2226.jpeg   59.02K   6 downloads


Attached File  IMG_2229.jpeg   59.33K   6 downloads


Attached File  IMG_2230.jpeg   85.17K   8 downloads


Attached File  IMG_2227.jpeg   69.25K   6 downloads


Marty


#304 Shiney005

Shiney005

    Oh My, Don't you post alot

  • Members
  • PipPipPipPipPipPipPip
  • 9,052 posts
  • Name:Laurie
  • Location:Dubya Hay
  • Car:Toyota Mirai
  • Joined: 19-January 12
Garage View Garage

Posted 18 August 2020 - 09:39 AM

Resto of the year :spoton:

X 2. 

20 years ago, a body that needed that much work would have only ended up on the tip.  

Are you keeping track of the hours you are spending on it Marty?


Edited by Shiney005, 18 August 2020 - 09:40 AM.


#305 Rockoz

Rockoz

    Lotsa Posts!

  • Members
  • PipPipPipPipPipPip
  • 3,969 posts
  • Name:Rob
  • Location:Cowra NSW
  • Joined: 21-September 08

Posted 18 August 2020 - 12:33 PM

Why are you not doing the KBS inside the rails.

I used copper coat on a few bits that were left in the weather, and it didnt stand up too well.

Rust started coming through after a while, where the KBS beside it remained rust free.


Cheers


Rob


#306 sibhs

sibhs

    Lotsa Posts!

  • Members
  • PipPipPipPipPipPip
  • 2,703 posts
  • Name:Martin
  • Location:Perth
  • Car:LJ Coupe S
  • Joined: 27-July 12

Posted 18 August 2020 - 01:08 PM

X 2. 

20 years ago, a body that needed that much work would have only ended up on the tip.  

Are you keeping track of the hours you are spending on it Marty?

Hi Laurie, I'm not keeping track of hours spent, just enjoying it. 


Why are you not doing the KBS inside the rails.

I used copper coat on a few bits that were left in the weather, and it didnt stand up too well.

Rust started coming through after a while, where the KBS beside it remained rust free.


Cheers


Rob

Hi Rob,

I've KBS'd the internal bottom and sides of rails and a lot of that copper is over spray. It's the boot floor that only has the copper for welding purposes. Once this is on a rotisserie I'll treat all the dodgy areas with KBS.  The internal chassis rails 360º will be flooded with cavity wax.


Attached File  IMG_2218.jpeg   59.43K   8 downloads


Edited by sibhs, 18 August 2020 - 01:11 PM.


#307 sibhs

sibhs

    Lotsa Posts!

  • Members
  • PipPipPipPipPipPip
  • 2,703 posts
  • Name:Martin
  • Location:Perth
  • Car:LJ Coupe S
  • Joined: 27-July 12

Posted 18 August 2020 - 11:20 PM

These pics show the floor tek screwed down, the original fuel pipe hole section fitted in place. Then the plug welding.


Attached File  IMG_2228.jpeg   61.83K   8 downloads


Attached File  IMG_2232.jpeg   59.38K   8 downloads


Attached File  IMG_2233.jpeg   55.54K   7 downloads


Using the panel LED for extra lighting really helps.

Attached File  IMG_2234.jpeg   59.89K   7 downloads


Tack welded in position.

Attached File  IMG_2235.jpeg   67.24K   8 downloads


Attached File  IMG_2239.jpeg   48.55K   7 downloads


Attached File  IMG_2246.jpeg   61.25K   9 downloads


Attached File  IMG_2247.jpeg   62.01K   8 downloads


Attached File  IMG_2249.jpeg   46.74K   8 downloads


Attached File  IMG_2250.jpeg   56.64K   8 downloads


Attached File  IMG_2251.jpeg   41.78K   7 downloads


This is what happens to a plug weld when you run out of gas.

Attached File  IMG_2253.jpeg   62.06K   7 downloads


Always keep a spare ready for these times.

Attached File  IMG_2252.jpeg   66.61K   7 downloads


Attached File  IMG_2254.jpeg   61.25K   8 downloads


Having a rest after a big day.

Attached File  IMG_2256.jpeg   98.22K   10 downloads


Marty


#308 _2ELCS_

_2ELCS_
  • Guests

Posted 19 August 2020 - 11:22 AM

Brilliant job Marty...Admire your enthusiasm...


#309 sibhs

sibhs

    Lotsa Posts!

  • Members
  • PipPipPipPipPipPip
  • 2,703 posts
  • Name:Martin
  • Location:Perth
  • Car:LJ Coupe S
  • Joined: 27-July 12

Posted 19 August 2020 - 07:47 PM

Brilliant job Marty...Admire your enthusiasm...

Hi Wayne, while the enthusiasm is flowing I'm running with it! 'Cause sure as hell it runs dry every so often.


Cheers


Marty


#310 sibhs

sibhs

    Lotsa Posts!

  • Members
  • PipPipPipPipPipPip
  • 2,703 posts
  • Name:Martin
  • Location:Perth
  • Car:LJ Coupe S
  • Joined: 27-July 12

Posted 19 August 2020 - 07:57 PM

A little tip for all the grinders out there.


I've only recently discovered quality grinding discs. I've been using various brands from Bunnings and Makita ones that come free with the grinders.  They all started of well but soon become clogged and less effective wasting heaps of time and heating up the metal more than necessary. 


I tried these a couple of months ago and they've been fantastic, wish I'd known about them earlier. A24R is the compound hardness which is the same number on my crappy discs so don't rely on that as a guide.


Attached File  IMG_2260.jpeg   68.71K   10 downloads


A heap of grinding done here.


Attached File  IMG_2261.jpeg   59.9K   11 downloads


Marty


#311 rodomo

rodomo

    To advertise here, call 13TORANA

  • Members
  • PipPipPipPipPipPipPip
  • 17,999 posts
  • Name:R - O - B Dammit!
  • Location:Way out west of Melbourne Awstraylya
  • Joined: 10-December 05

Posted 19 August 2020 - 11:01 PM

Use flap wheels mate. Way quicker. :spoton:

https://www.google.c...iw=1024&bih=707

Edited by rodomo, 19 August 2020 - 11:03 PM.


#312 sibhs

sibhs

    Lotsa Posts!

  • Members
  • PipPipPipPipPipPip
  • 2,703 posts
  • Name:Martin
  • Location:Perth
  • Car:LJ Coupe S
  • Joined: 27-July 12

Posted 20 August 2020 - 12:08 AM

Thanks Rob.

I was told by an old school body repair guy who seemed to know his stuff. Use thinish grinding discs and use them on their edge and only grind weld. Flap discs will take extra metal from the sheet metal next to weld. The weld is harder so the flap disc tends to curve over the weld and hit the sheet. I've used both and feel this way is better for the strength of the repair.

I'm happy to hear other peoples opinions and change my mind. I'm still learning all this stuff.


Marty


#313 claysummers

claysummers

    Lotsa Posts!

  • Members
  • PipPipPipPipPipPip
  • 3,336 posts
  • Name:Clay
  • Location:Willunga
  • Car:186 FB Ute, 3.3 EK sedan
  • Joined: 13-December 18

Posted 20 August 2020 - 07:52 AM

I was told use 32# sanding disc on grinder when repairing spotlight hole in the roof of my Ute but yes mainly use grinder disc on edge. When I used the flap discs I loved them until I started going through the sheet.

Sent from my SM-G973F using Tapatalk

#314 sibhs

sibhs

    Lotsa Posts!

  • Members
  • PipPipPipPipPipPip
  • 2,703 posts
  • Name:Martin
  • Location:Perth
  • Car:LJ Coupe S
  • Joined: 27-July 12

Posted 20 August 2020 - 06:33 PM

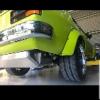
This is the work that went into the rear join and especially the fuel pipe hole section.

The original lumpy lines didn't quite marry up with the replacement panels. Mine had been abused when the other skin was fitted decades ago.

I used a barbell weight to hammer the two sides to match.

You'll see a rounded chisel from a jack hammer, I bought a couple from Bunnings because they where cheap, 50c down from $50. Had now idea what I'd do with them but found they fit the boot lumpy lines.

There was also a section missing at the front of the pipe hole section, I neatened the gap and made some filler sections.

Attached File  IMG_2232 (1).jpeg   59.38K   9 downloads


Attached File  IMG_2235 (1).jpeg   67.24K   10 downloads


Attached File  IMG_2262.jpeg   59.72K   8 downloads


Attached File  IMG_2264.jpeg   93.51K   8 downloads


Attached File  IMG_2265.jpeg   100.74K   8 downloads


Attached File  IMG_2266.jpeg   84.56K   8 downloads


Attached File  IMG_2270.jpeg   74.09K   8 downloads


Attached File  IMG_2271.jpeg   93.08K   7 downloads


Attached File  IMG_2272.jpeg   61.25K   7 downloads


Attached File  IMG_2274.jpeg   75.05K   8 downloads


Attached File  IMG_2277.jpeg   70.36K   7 downloads

Attached File  IMG_2278.jpeg   70.64K   8 downloads


Attached File  IMG_2279.jpeg   67.76K   7 downloads


Attached File  IMG_2280.jpeg   60.2K   7 downloads


Attached File  IMG_2281.jpeg   90.25K   7 downloads


Attached File  IMG_2282.jpeg   101.03K   7 downloads


Attached File  IMG_2283.jpeg   63.68K   8 downloads


Attached File  IMG_2284.jpeg   75.25K   6 downloads


Attached File  IMG_2285.jpeg   53.75K   7 downloads


Attached File  IMG_2286.jpeg   58.27K   7 downloads


Attached File  IMG_2287.jpeg   68.68K   7 downloads


Attached File  IMG_2288.jpeg   69.84K   7 downloads


Attached File  IMG_2289.jpeg   68.59K   7 downloads


Attached File  IMG_2290.jpeg   69.73K   6 downloads


Attached File  IMG_2291.jpeg   70.49K   7 downloads


Attached File  IMG_2293.jpeg   67.38K   8 downloads


Marty


#315 lctriples

lctriples

    Forum Fan

  • Members
  • PipPipPipPip
  • 405 posts
  • Name:paul
  • Location:melbourne
  • Car:LC 2 door, HR prem wagon
  • Joined: 02-April 15

Posted 20 August 2020 - 07:55 PM

Hey Marty great bit of ingenuity there!, For what it's worth, I found the flap discs worked much better for grinding back welds as you could use different grits to fine tune certain areas. More expensive way to go but I tended to get a better result, plus my neighbours certainly appreciated is as you prob found grinding disc are a lot noisier.  Keep up the great work, paul.


#316 sibhs

sibhs

    Lotsa Posts!

  • Members
  • PipPipPipPipPipPip
  • 2,703 posts
  • Name:Martin
  • Location:Perth
  • Car:LJ Coupe S
  • Joined: 27-July 12

Posted 20 August 2020 - 10:14 PM

Hi Paul, appreciate the feedback. Yes! I forgot about the noise difference, I'm always wearing the ear muffs. I agree the metal looks better after using a flap disc.


Cheers

Marty


#317 Mitchyboy

Mitchyboy

    Forum Fan

  • Members
  • PipPipPipPip
  • 390 posts
  • Name:Mitch
  • Location:Sydney
  • Car:Lh torana
  • Joined: 18-March 18

Posted 20 August 2020 - 10:25 PM

Im with you Marty
I've also been told by an old fella and even watched many welding/grinding videos on you tube that say using a 2.5mm disc to grind down your welds is the way to go first then you finish up with the flap disc.
I have found that the flap discs just wear out too fast on welds and as mentioned they wear down the steel around aswell.(plus they are expensive)
Also if you take your welds back too flush/perfect level you have issues also. Just recently after getting my car blasted some floor welds I had previously completed and grinded smooth the blaster blew through in parts and I have had to fix it up/re weld.
Going to leave them a little bit proud this time around


Sent from my SM-G965F using Tapatalk

#318 sibhs

sibhs

    Lotsa Posts!

  • Members
  • PipPipPipPipPipPip
  • 2,703 posts
  • Name:Martin
  • Location:Perth
  • Car:LJ Coupe S
  • Joined: 27-July 12

Posted 20 August 2020 - 11:08 PM

Im with you Marty
I've also been told by an old fella and even watched many welding/grinding videos on you tube that say using a 2.5mm disc to grind down your welds is the way to go first then you finish up with the flap disc.
I have found that the flap discs just wear out too fast on welds and as mentioned they wear down the steel around aswell.(plus they are expensive)
Also if you take your welds back too flush/perfect level you have issues also. Just recently after getting my car blasted some floor welds I had previously completed and grinded smooth the blaster blew through in parts and I have had to fix it up/re weld.
Going to leave them a little bit proud this time around


Sent from my SM-G965F using Tapatalk

Spot on Mitch, it all comes with experience and hopefully every one learns some new tips and tricks. 

I think I've become a pretty good grinder through all this. There is a fair bit of finesse required with gentle passes just touching the high bits of the weld.


Marty


#319 CI 0308

CI 0308

    Forum Fixture

  • Members
  • PipPipPipPipPip
  • 736 posts
  • Name:Brett
  • Location:Perth W.A
  • Car:77 LX SS, VX SS
  • Joined: 19-January 06
Garage View Garage

Posted 21 August 2020 - 05:34 AM

Marty have you tried grinding back the welds using those 3m Cubitron 11 sanding disk's that were recommended in either Trevs Blog or Fitzys YouTube videos.

Sent from my SM-A705YN using Tapatalk

#320 sibhs

sibhs

    Lotsa Posts!

  • Members
  • PipPipPipPipPipPip
  • 2,703 posts
  • Name:Martin
  • Location:Perth
  • Car:LJ Coupe S
  • Joined: 27-July 12

Posted 21 August 2020 - 10:05 AM

No I haven't. Does it look like this? (as in hard non flexible disc)?


When I googled there was also a flexible style which I would expect to flex around weld. 


Attached File  Screen Shot 2020-08-21 at 8.01.32 am.png   870.37K   8 downloads


#321 CI 0308

CI 0308

    Forum Fixture

  • Members
  • PipPipPipPipPip
  • 736 posts
  • Name:Brett
  • Location:Perth W.A
  • Car:77 LX SS, VX SS
  • Joined: 19-January 06
Garage View Garage

Posted 21 August 2020 - 10:11 AM

That's the hard version the flexible version is apparently created just for the task of grinding back spot welds. And I think that Fitzy guy who is the panel repair guy on YouTube recommends them as they last twice as long and are twice as quick. Also twice the price I suppose being 3m. I think BOC carry them.

Sent from my SM-A705YN using Tapatalk

#322 CI 0308

CI 0308

    Forum Fixture

  • Members
  • PipPipPipPipPip
  • 736 posts
  • Name:Brett
  • Location:Perth W.A
  • Car:77 LX SS, VX SS
  • Joined: 19-January 06
Garage View Garage

Posted 21 August 2020 - 12:12 PM

Marty take a look at these.


https://www.youtube....h?v=ULCbsww_Ar4


https://www.youtube....h?v=pDTln6BnIX0


Edited by CI 0308, 21 August 2020 - 12:16 PM.


#323 gtrboyy

gtrboyy

    Lotsa Posts!

  • Members
  • PipPipPipPipPipPip
  • 3,141 posts
  • Location:SYDNEY,NSW
  • Joined: 07-November 05

Posted 21 August 2020 - 02:15 PM

Admire the skill & patience required in a build like this...If I had 1/2 those skills my gtr be back on road years ago.


#324 sibhs

sibhs

    Lotsa Posts!

  • Members
  • PipPipPipPipPipPip
  • 2,703 posts
  • Name:Martin
  • Location:Perth
  • Car:LJ Coupe S
  • Joined: 27-July 12

Posted 21 August 2020 - 07:07 PM

Brett, I checked out those video's. Sure looks faster but they are restricted for versatility. There are so many times when the edge of the disc is the only part of disc that'll reach or do the job so that Cubricon becomes a bit limited.  I think I'm stubborn.


Thanks gtrboyy and Brett.


Marty


#325 Com_VC

Com_VC

    Forum Fan

  • Members
  • PipPipPipPip
  • 411 posts
  • Joined: 09-January 06

Posted 21 August 2020 - 07:23 PM

yeah those 3m cubitron II are the best out there as far as sanding discs go, I rate the grinding discs as well.  They last so long.  They used to be about $5 for the sanding discs and $10 for the grinding discs.  I've used 100's of them.


Looks like you've done a good job with what you have used though.


Those 10mm air belt sanders are good for tight access areas as well, just make sure you use a decent belt on them.


Also tagged with one or more of these keywords: LC GTR, Restoration, 1971, The Marty Report, Girl Power

0 user(s) are reading this topic

0 members, 0 guests, 0 anonymous users