
I'm doing the same job on mine. What size hole are you drilling for the plug welds? I'm using 8mm

The Sally Report
Started by
_The Handbrake_
, Jun 23 2019 10:29 PM
LC GTR Restoration 1971 The Marty Report Girl Power
1003 replies to this topic
#176

rodomo
-

- Members
-

- 18,063 posts
To advertise here, call 13TORANA
- Name:R - O - B Dammit!
- Location:Way out west of Melbourne Awstraylya
- Joined: 10-December 05
Posted 18 April 2020 - 11:23 PM
#177
madtoranajzedded
-
- Members
-
- 2,893 posts
Sir ask alot
- Name:Maz
- Location:Southern Tasmania
- Car:72 LJ SL SEDAN.
- Joined: 30-September 13
Posted 18 April 2020 - 11:47 PM
I got mine from adel tools also..ive been using theHi Maz,
Yeah great welder. Plug welding I set it to around your markings, butt welding old metal to new is about half that.
UPol copper weld through primer. I still like to drill out hole where primer is to get fresh metal for plug weld. I soon learnt that you may think you've done a good plug weld but it pops apart. Theres a few tips in doing good strong ones i've worked out.
Hi Clay, I was looking at the same price $1000 7 years ago when I found this one second hand with helmet, trolley gloves, apron, magnets etc for $600 and it had only been used to build a bench.
Marty
Zinc weld through but not for the holes,just for the
back of the panel and around hole just to stop the
rusting.keen to try the copper as the zinc takes a good
24hrs before you can weld as it will just scratch off.
I drill my holes to 5mm and when i plug they end
up 8mm.try a couple on 5mm marty doing circular
motion and see what you think.
Cheer maz
Edited by madtoranajzedded, 18 April 2020 - 11:48 PM.
#178
claysummers
-

- Members
-
- 3,716 posts
Lotsa Posts!
- Name:Clay
- Location:Willunga
- Car:186 FB Ute, 3.3 EK sedan
- Joined: 13-December 18
Posted 19 April 2020 - 07:49 AM
Bit slack I suppose but I use the zinc, spray on, clamp and drill 8mm hole well in to rear panel then weld dead centre. The zinc will melt in the weld pool and protect the weld. Exposed paint will often ignite but just squirt more on when cool.
Sent from my SM-G973F using Tapatalk
Sent from my SM-G973F using Tapatalk
#179
sibhs
-

- Members
-
- 2,724 posts
Lotsa Posts!
- Name:Martin
- Location:Perth
- Car:LJ Coupe S
- Joined: 27-July 12
Posted 19 April 2020 - 01:14 PM
I drill 8mm in my welding side then use a 5mm to drill part way into receiving metal. Sometimes I drill 5mm all the way through and even put a weld on the other side to be sure.
I was plug welding 8mm holes straight onto receiver and really giving it a good filling then noticed some of them popping apart. Thats why I'm very cautious now and making sure.
Circular is the go! Quite satisfying getting a full flat weld hey Maz? Those that don't play with metal or paint are missing some very rewarding experiences - a lot of shit ones too. HaHa
Marty
Edited by sibhs, 19 April 2020 - 01:15 PM.
#180
sibhs
-
- Members
-
- 2,724 posts
Lotsa Posts!
- Name:Martin
- Location:Perth
- Car:LJ Coupe S
- Joined: 27-July 12
Posted 19 April 2020 - 08:02 PM
Focused on the left hand front guard that needs the most work. Replaced the rusted top sections and made up a piece for the top corner near door. This bit is tricky due to 3 panels all aligning in the one area. I seem to do work on an area then leave it for a while. Each time going back and improving the result. This area is getting close but I will do a bit more manipulation later.
 IMG_9550 (1).jpg 113.67K
12 downloads
IMG_9550 (1).jpg 113.67K
12 downloads
IMG_9551 (1).jpg 202.55K
9 downloads
IMG_9554 (1).jpg 137.18K
9 downloads
IMG_9549.jpg 141.24K
9 downloads
IMG_9555.jpg 92.51K
9 downloads
IMG_0695.jpg 151.12K
9 downloads
IMG_0696.jpg 138.77K
10 downloads
IMG_0698.jpg 132.85K
12 downloads
IMG_0700.jpg 78.73K
12 downloads
Marty
#181
liswar2
-

- Members
-
- 1,536 posts
Forum Fixture
- Name:Wazza
- Location:WA
- Car:BMW K1200 RS , orange lc coupe
- Joined: 09-July 22
Posted 19 April 2020 - 09:03 PM
Hi Marty,
Good to see your covid-19 down time is going to a good cause.
Stay safe warren
Good to see your covid-19 down time is going to a good cause.
Stay safe warren
#182
gad05
-
- Members
-
- 421 posts
Forum Fan
- Name:Graham
- Location:Brisbane
- Car:73 lj 2 door , 74 lj sedan.
- Joined: 11-January 09
Posted 19 April 2020 - 10:23 PM
Love your work Marty.
l always learn so much from your posts.
Great to see your dedication in restoring these great little cars.
Cheers Graham.
#183
madtoranajzedded
-
- Members
-
- 2,893 posts
Sir ask alot
- Name:Maz
- Location:Southern Tasmania
- Car:72 LJ SL SEDAN.
- Joined: 30-September 13
Posted 20 April 2020 - 01:32 AM
I drill 8mm in my welding side then use a 5mm to drill part way into receiving metal. Sometimes I drill 5mm all the way through and even put a weld on the other side to be sure.
I was plug welding 8mm holes straight onto receiver and really giving it a good filling then noticed some of them popping apart. Thats why I'm very cautious now and making sure.
Circular is the go! Quite satisfying getting a full flat weld hey Maz? Those that don't play with metal or paint are missing some very rewarding experiences - a lot of shit ones too. HaHa
Marty
Thats happened to me once too Marty.on the inner panel
the lower front guard welds to (below flutes) happened
when then surface was not sanded to clean metal and
there was abit of primer there.i only picked it up
because i wasnt happy with it and replaced it..
Love it when its flat with good penetrating welds mean
more time to do other areas than grinding grinding
grinding .the speed that your going i reckon you will
b flowing some jam come nxt summer..i like the color
you have chosen Sally.shes going to look beautiful.
#184
sibhs
-
- Members
-
- 2,724 posts
Lotsa Posts!
- Name:Martin
- Location:Perth
- Car:LJ Coupe S
- Joined: 27-July 12
Posted 20 April 2020 - 09:39 PM
Evening All
Yesterday being Sunday is my work in the back workshop, not the front garage and no welding grinding day.
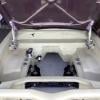
I did a bit more on the heater box assembly. Here's some of the progress pictures so far.
Stripping the box and finding it in pretty good shape. Getting that fan off was a struggle and I left the motor bolts in position because I know they're a bitch too.
IMG_9988.jpg 188.44K
11 downloads
Paint stripping the bottom
IMG_0133 (1).jpg 335.81K
9 downloads
Giving the top a clean and rust blast.
IMG_0297.jpg 209.81K
7 downloads
One of the square fan cover bolt holes had rusted out. This is a new piece of metal I drilled and filed square and then welded in position. If you don't fix this you'll have trouble tightening the fan cover nuts.
IMG_0138 (1).jpg 89.68K
8 downloads
These are counter sunk so used the ball peen hammer.
IMG_0295 (1).jpg 104.73K
9 downloads
The fibreglass lug had busted off so that got Araldited back on.
IMG_0274.jpg 184.09K
9 downloads
The flap was re-zinced so I replaced the tape. I found a plasterer tape to be very similar in feel.
IMG_0623.jpg 138.42K
10 downloads
New material was required and that carpet you cover 4wd drawers and speaker boxes seems a good match.
IMG_0626.jpg 139.23K
9 downloads
Re-zinced the base.
IMG_0327 (1).jpg 99.39K
8 downloads
Pulled apart the motor and cleaned it all out.
IMG_0287 (1).jpg 127.86K
10 downloads
Checking out how it goes back together against another set-up.
IMG_0718.jpg 131.73K
8 downloads
Lubed up and testing the flap operation.
IMG_0720.jpg 156.41K
9 downloads
I've tested the fan operation and direction is correct. Painted the motor zinc colour but left the cool cloth tape as is. I just need to sort out the heater core and fit foam to all the flaps and stuff and she'll be ready to be wrapped up and put away.
Marty
#185
claysummers
-
- Members
-
- 3,716 posts
Lotsa Posts!
- Name:Clay
- Location:Willunga
- Car:186 FB Ute, 3.3 EK sedan
- Joined: 13-December 18
Posted 20 April 2020 - 10:09 PM
Job well done. What’s your zincing process Marty?
Sent from my iPad using Tapatalk
Sent from my iPad using Tapatalk
#186
sibhs
-
- Members
-
- 2,724 posts
Lotsa Posts!
- Name:Martin
- Location:Perth
- Car:LJ Coupe S
- Joined: 27-July 12
Posted 20 April 2020 - 10:21 PM
Hi Clay,
clean-up the part first. Wire brush small bits then drop them off at the zinc platers.
Then pic them up before they lose anything.
IMG_0322.jpg 193.9K
16 downloads
#187
claysummers
-
- Members
-
- 3,716 posts
Lotsa Posts!
- Name:Clay
- Location:Willunga
- Car:186 FB Ute, 3.3 EK sedan
- Joined: 13-December 18
Posted 21 April 2020 - 07:26 AM
Thanks. Thought you were doing it at home.
Sent from my iPad using Tapatalk
Sent from my iPad using Tapatalk
#188
sibhs
-
- Members
-
- 2,724 posts
Lotsa Posts!
- Name:Martin
- Location:Perth
- Car:LJ Coupe S
- Joined: 27-July 12
Posted 21 April 2020 - 08:32 PM
Thanks. Thought you were doing it at home.
Sent from my iPad using Tapatalk
I looked into doing my own but don't have the room and some parts are too big. Plus zincing is cheap to get done anyway.
Heres some work on the passenger door I've been doing. Just cutting out the rust and welding in new steel.
IMG_9813 (1).jpg 106.87K
14 downloads
IMG_9815 (1).jpg 122.18K
12 downloads
IMG_9816 (1).jpg 112.59K
14 downloads
IMG_9817 (1).jpg 115.4K
11 downloads
IMG_9818 (1).jpg 142.59K
13 downloads
IMG_9819 (1).jpg 101.01K
12 downloads
IMG_9820 (1).jpg 101.47K
12 downloads
IMG_9821 (1).jpg 117.3K
13 downloads
IMG_9822 (1).jpg 125.07K
13 downloads
IMG_9823 (1).jpg 129.63K
12 downloads
IMG_9884.jpg 164.42K
13 downloads
IMG_0090 (1).jpg 161.4K
13 downloads
Removed the original welding dags with a cold chisel.
IMG_0095 (1).jpg 94.27K
13 downloads
IMG_0096 (1).jpg 106.19K
13 downloads
Marty
#189
rodomo
-
- Members
-
- 18,063 posts
To advertise here, call 13TORANA
- Name:R - O - B Dammit!
- Location:Way out west of Melbourne Awstraylya
- Joined: 10-December 05
Posted 21 April 2020 - 11:34 PM
These car are a mess with welding debris 
#190
sibhs
-
- Members
-
- 2,724 posts
Lotsa Posts!
- Name:Martin
- Location:Perth
- Car:LJ Coupe S
- Joined: 27-July 12
Posted 23 April 2020 - 10:10 PM
Did a bit of light cleaning.
Firstly the tail light housing needed rejuvenating so I put them in a solution of hydrochloric acid and water for 10 mins. Seemed to work well.
IMG_0650.jpg 279.19K
10 downloads
A bit of a before and after shot.
IMG_0651.jpg 221.44K
10 downloads
Going through my indicator housings to hopefully make a left and right.
IMG_0642.jpg 208.57K
11 downloads
Taking over the kitchen sink while Sally watches Poldark
IMG_0643.jpg 204.48K
10 downloads
Managed to make up one side, I'll need to strip some light blue wire out of an old harness to make the other side.
IMG_0672.jpg 178.98K
13 downloads
These plastic chrome housings looked very ordinary and I was cleaning them up to re-spray them with a chrome paint. I gave them a scrub with one of those stainless steel woolly cleaners you find under the sink. They came up amazing without damaging chrome.
IMG_0645.jpg 217.02K
12 downloads
Marty
#191
claysummers
-
- Members
-
- 3,716 posts
Lotsa Posts!
- Name:Clay
- Location:Willunga
- Car:186 FB Ute, 3.3 EK sedan
- Joined: 13-December 18
Posted 23 April 2020 - 10:41 PM
Great work. It’s amazing how good old chrome, apparently pitted and rusty, comes up with a decent clean.
Now finish those dishes.
Sent from my iPad using Tapatalk
Now finish those dishes.
Sent from my iPad using Tapatalk
#192
sibhs
-
- Members
-
- 2,724 posts
Lotsa Posts!
- Name:Martin
- Location:Perth
- Car:LJ Coupe S
- Joined: 27-July 12
Posted 24 April 2020 - 08:02 PM
Heres a little tip/story about zincing.
Before I drop stuff off to my zinc platers I photograph all the bits next to their bag which has marked what it is. Next it's all taken in bags in a box with colour (Silver, gold or Black) written on it.
I try and take them on a Monday or Tuesday so I can get them back the same week and they're not left in the factory over the week-end. When they're ready I pick them up as soon as possible.
When home I un-wire them and using pictures sort out where they belong.
Well! A couple of weeks ago I got some parts back and was missing the main pin from the gear selector/shifter. I printed out my photo of the parts bag and went back to zinc platers asking if it was lying around the factory somewhere. They couldn't find it so I left them the copy with my ph number.
I dropped by a week later and still no luck. I presumed it had fallen in to the bottom of the acid bath and dissolved. Next day I get a call they had found it sitting on the fork lift still not zinced. They offered to zinc it and be ready tomorrow. I decided to pick it up because I was in the area and it doesn't need zincing and I don't want to push my luck.
It's worth chasing up these parts and if I hadn't left a photo or number it would of been found and they would've had no idea who's it was.
I will just wire brush the pin and it should come up ok.
Marty
IMG_0523.jpeg 218.79K
14 downloads
IMG_0775.jpeg 177.62K
12 downloads
IMG_0323.jpeg 234.25K
10 downloads
Attached Files
-
IMG_0325.jpeg 168.08K
10 downloads
-
IMG_0515.jpeg 151.12K
11 downloads
-
IMG_0320.jpeg 111.48K
12 downloads
#193
sibhs
-
- Members
-
- 2,724 posts
Lotsa Posts!
- Name:Martin
- Location:Perth
- Car:LJ Coupe S
- Joined: 27-July 12
Posted 28 April 2020 - 08:18 PM
Painted the silver on to the tail lights. Little tricky getting the lines correct and avoiding over spray at the junctions.
IMG_0300.jpeg 183.95K
12 downloads
IMG_0301.jpeg 195.97K
13 downloads
IMG_0820.jpeg 252.44K
17 downloads
Marty
#194
Cook
-

- Members
-
- 1,534 posts
Forum Fixture
- Location:Melbourne
- Car:LX Hatch
- Joined: 27-February 15
Posted 28 April 2020 - 08:55 PM
Good work as always Marty but I guess when it's the missus car she is keeping an eye on things. Good point about detailing all the items sent away for plating. Another thing I would note is that re-plating does create some brittleness. As example I had my seat frames re-plated, which I was really happy with as they were in a really bad state, but some of the bent up tabs (if that makes sense) that wires fit to were too brittle to reuse. You have done more work in 12 months than I have done in 6 years. Cheers Ron
#195
sibhs
-
- Members
-
- 2,724 posts
Lotsa Posts!
- Name:Martin
- Location:Perth
- Car:LJ Coupe S
- Joined: 27-July 12
Posted 28 April 2020 - 10:16 PM
Good work as always Marty but I guess when it's the missus car she is keeping an eye on things. Good point about detailing all the items sent away for plating. Another thing I would note is that re-plating does create some brittleness. As example I had my seat frames re-plated, which I was really happy with as they were in a really bad state, but some of the bent up tabs (if that makes sense) that wires fit to were too brittle to reuse. You have done more work in 12 months than I have done in 6 years. Cheers Ron
Hi Ron,
I know what you mean about things getting brittle. I have found the clips that hold the heater box together break easily after zincing. I loose about 10% of them to breakage.
I was just going to mention it's been two years today since I started stripping the car. I picked it up last year on Anzac day and got into it a few days later.
Marty
#196
sibhs
-
- Members
-
- 2,724 posts
Lotsa Posts!
- Name:Martin
- Location:Perth
- Car:LJ Coupe S
- Joined: 27-July 12
Posted 29 April 2020 - 08:59 PM
Celebrating one year of restoration on the car with a coffee on the deck.

Sent from my iPhone using Tapatalk
Sent from my iPhone using Tapatalk
#197
S pack
-

- Members
-
- 15,764 posts
Scrivet Counter
- Name:Dave
- Location:Luggage Point
- Car:73 LJ
- Joined: 25-January 10
Posted 29 April 2020 - 09:50 PM
Hi Ron,
.I was just going to mention it's been two years today since I started stripping the car. I picked it up last year on Anzac day and got into it a few days later.
Marty
Nice one Marty. You don't happen to own a Delorean do you? 
Love the coffee cups. Gotta get me some.
Cheers
Dave.
#198
Ice
-

- Members
-
- 15,221 posts
Cool
- Name:Gene
- Location:Galaxy's away from Ipswich
- Car:77 HZ Sandman Van
- Joined: 03-January 07
Posted 29 April 2020 - 10:24 PM
Arh now i know why your selling the Sprintys goin for the factory look on Sals car
#199
sibhs
-
- Members
-
- 2,724 posts
Lotsa Posts!
- Name:Martin
- Location:Perth
- Car:LJ Coupe S
- Joined: 27-July 12
Posted 29 April 2020 - 11:00 PM
Nice one Marty. You don't happen to own a Delorean do you?
Love the coffee cups. Gotta get me some.
Cheers
Dave.
BUGGER! Stuffed that up. Should of said ONE year ago.
Arh now i know why your selling the Sprintys goin for the factory look on Sals car
Yep, Sals will be steelies.
#200
sibhs
-
- Members
-
- 2,724 posts
Lotsa Posts!
- Name:Martin
- Location:Perth
- Car:LJ Coupe S
- Joined: 27-July 12
Posted 30 April 2020 - 09:31 PM
I’ve got a horn on!
Here’s some pics on getting it there.


Marty
Sent from my iPhone using Tapatalk
Here’s some pics on getting it there.
Marty
Sent from my iPhone using Tapatalk


Also tagged with one or more of these keywords: LC GTR, Restoration, 1971, The Marty Report, Girl Power
General →
General Discussion →
Hole for reverse cabling to gearboxStarted by dacastle , 02 Aug 2025 |
|

|
||
Holden Tech →
Electrical →
LC rear indicator screwsStarted by dacastle , 06 Apr 2024 |
|
|
||
General →
General Discussion →
What can you identify from stamped body number onlyStarted by 70 XU-1 , 21 Dec 2018 |
|
|
||
General →
General Discussion →
Resto Rage HelpStarted by Rainman , 16 Sep 2017 |
|

|
||
Holden Tech →
General LH-LX-UC →
LH Torana rear windscreen SpecificationStarted by _Pjabrown_ , 06 Sep 2016 |
|

|
1 user(s) are reading this topic
0 members, 1 guests, 0 anonymous users

