Jump to content


- - - - -

The Sally Report

LC GTR Restoration 1971 The Marty Report Girl Power

  • Please log in to reply
982 replies to this topic

#151 sibhs

sibhs

    Lotsa Posts!

  • Members
  • PipPipPipPipPipPip
  • 2,703 posts
  • Name:Martin
  • Location:Perth
  • Car:LJ Coupe S
  • Joined: 27-July 12

Posted 13 April 2020 - 08:47 PM

One of the doors on this car is an LJ version so it needs the ash tray deleted and the stainless trim holes counter sunk.


Attached File  IMG_9597 (1).jpg   140.6K   15 downloads


Attached File  IMG_9598.jpg   219.88K   11 downloads


Attached File  IMG_9599 (1).jpg   216.15K   11 downloads


Attached File  IMG_9797.jpg   178.39K   12 downloads


Attached File  IMG_9798 (1).jpg   220.34K   11 downloads


Attached File  IMG_0091 (1).jpg   128.97K   11 downloads


To counter sink I heated the holes up with oxy and knocked them down with punch. Then the holes needed welding up and redrilling to make a smaller hole for genuine screws, not wood screws.


Attached File  IMG_9802 (1).jpg   153.65K   13 downloads


Attached File  IMG_9803 (1).jpg   186.9K   9 downloads


Marty


ps Thanks Dazm, I'll keep that as a back-up plan.


#152 Indy Orange

Indy Orange

    Lotsa Posts!

  • Members
  • PipPipPipPipPipPip
  • 2,850 posts
  • Name:Paul
  • Location:Australia
  • Joined: 03-July 09

Posted 13 April 2020 - 09:47 PM

Wouldn't have bothered with the LJ ashtray aperture , the LCGTR front door card will cover that , good job though.

Edited by Indy Orange, 13 April 2020 - 09:47 PM.


#153 sibhs

sibhs

    Lotsa Posts!

  • Members
  • PipPipPipPipPipPip
  • 2,703 posts
  • Name:Martin
  • Location:Perth
  • Car:LJ Coupe S
  • Joined: 27-July 12

Posted 15 April 2020 - 09:13 PM

Evening,

The drivers side chassis mount had rusted out so it was time to chop it out and see what's required.

Firstly I had to cut the support off from my car stand to access it.

There wasn't much left inside so it was a full rebuild of crush tube and its supports. I made one of these on the LJ using 3 pieces of steel, this time I've made it from one piece, so a lot less welding.

I had cut the floor pan out so once this piece was welded in I treated it internally with KBS.


Marty


Attached File  IMG_0412 (1).jpg   153.27K   12 downloads


Attached File  IMG_0416 (1).jpg   143K   9 downloads


Attached File  IMG_0418 (1).jpg   134.18K   11 downloads


Attached File  IMG_0421 (1).jpg   164.89K   10 downloads


Attached File  IMG_0423 (1).jpg   151.52K   10 downloads


Attached File  IMG_0425 (1).jpg   199.2K   10 downloads


Attached File  IMG_0442.jpg   208.19K   10 downloads


Attached File  IMG_0444.jpg   192.33K   11 downloads


Attached File  IMG_0445.jpg   125.43K   12 downloads


Attached File  IMG_0448.jpg   129.49K   13 downloads


Attached File  IMG_0449.jpg   133.34K   12 downloads


#154 claysummers

claysummers

    Lotsa Posts!

  • Members
  • PipPipPipPipPipPip
  • 3,336 posts
  • Name:Clay
  • Location:Willunga
  • Car:186 FB Ute, 3.3 EK sedan
  • Joined: 13-December 18

Posted 15 April 2020 - 09:30 PM

Bottom of the a pillar, Achilles heel of the earlies. Well certainly FE to EK and early Torana by the looks too.

Sent from my SM-G973F using Tapatalk

#155 sibhs

sibhs

    Lotsa Posts!

  • Members
  • PipPipPipPipPipPip
  • 2,703 posts
  • Name:Martin
  • Location:Perth
  • Car:LJ Coupe S
  • Joined: 27-July 12

Posted 15 April 2020 - 09:48 PM

The floor pans had been replaced and didn't look in too bad condition so I was going to cut the over lap off and butt weld them in. As I was cutting it I decided to remove the floor pan and I'm glad I did. There was heaps of crap in there.

The bit below had been smashed up and needed the layers peeling back and new steel fitted.


Attached File  IMG_0356 (1).jpg   197.91K   10 downloads


Attached File  IMG_0358 (1).jpg   166.76K   13 downloads


Attached File  IMG_0366 (1).jpg   168.19K   10 downloads


Attached File  IMG_0368 (1).jpg   111.94K   12 downloads


Attached File  IMG_0373 (1).jpg   116.57K   11 downloads

Cleaned the threads while here.


Attached File  IMG_0376 (1).jpg   118.07K   14 downloads


Attached File  IMG_0379 (1).jpg   138.35K   11 downloads


Attached File  IMG_0381 (1).jpg   301.33K   11 downloads


Attached File  IMG_0382 (1).jpg   314.95K   11 downloads


Attached File  IMG_0386 (1).jpg   117.96K   11 downloads


Attached File  IMG_0388 (1).jpg   123.68K   10 downloads


#156 claysummers

claysummers

    Lotsa Posts!

  • Members
  • PipPipPipPipPipPip
  • 3,336 posts
  • Name:Clay
  • Location:Willunga
  • Car:186 FB Ute, 3.3 EK sedan
  • Joined: 13-December 18

Posted 15 April 2020 - 09:59 PM

Seek and yea shall find

Sent from my SM-G973F using Tapatalk

#157 Ice

Ice

    Cool

  • Members
  • PipPipPipPipPipPipPip
  • 15,126 posts
  • Name:Gene
  • Location:Galaxy's away from Ipswich
  • Car:77 HZ Sandman Van
  • Joined: 03-January 07

Posted 15 April 2020 - 10:01 PM

I think i just found my panel beater

#158 Indy Orange

Indy Orange

    Lotsa Posts!

  • Members
  • PipPipPipPipPipPip
  • 2,850 posts
  • Name:Paul
  • Location:Australia
  • Joined: 03-July 09

Posted 16 April 2020 - 12:32 AM

WOW ! Awesome work!

#159 madtoranajzedded

madtoranajzedded

    Sir ask alot

  • Members
  • PipPipPipPipPipPip
  • 2,891 posts
  • Name:Maz
  • Location:Southern Tasmania
  • Car:72 LJ SL SEDAN.
  • Joined: 30-September 13

Posted 16 April 2020 - 03:39 AM

Wow Marty/sally.now i know why you wont sell me any
mojo 😂its all right here for me to see..a big job you
have taken on and your flying making it look easy.
I admire your dedication 100% ..so many things i can
learn from you..im in for the ride.love your work

Cheers Maz

#160 sibhs

sibhs

    Lotsa Posts!

  • Members
  • PipPipPipPipPipPip
  • 2,703 posts
  • Name:Martin
  • Location:Perth
  • Car:LJ Coupe S
  • Joined: 27-July 12

Posted 16 April 2020 - 09:16 PM

This car is pushing me into areas I haven't done before, such as guards off, pillars remade and inner sills replaced or fixed.

The passenger innersill is rooted and at first I was going to make one. But after much thought I decided to buy the Patch Maker copy. I felt this is an important part that connects the floor to the sill and is crucial to be correct. Also hard to copy something that has rusted away.

First I had to repair the drivers inner sill so I used the one i'd bought as a guide and made up a patch fix.


Attached File  IMG_9665 (1).jpg   178.24K   15 downloads


Attached File  IMG_0353.jpg   150.36K   9 downloads


Attached File  IMG_0374 (1).jpg   189.94K   9 downloads


Attached File  IMG_0392.jpg   123.64K   8 downloads


Attached File  IMG_0394 (1).jpg   147.34K   8 downloads


Attached File  IMG_0409 (1).jpg   140.24K   8 downloads


Attached File  IMG_0410 (1).jpg   194.6K   8 downloads


Attached File  IMG_0437.jpg   147.93K   9 downloads


Paint brush on a pole to get into the sill end.

Attached File  IMG_0441.jpg   137.34K   9 downloads


Attached File  IMG_0443.jpg   140.1K   9 downloads


Attached File  IMG_0469.jpg   120.26K   12 downloads


Thanks to Clay, Gene, Paul and Maz for replies.  

I'll be free in two years Gene.


Marty


#161 claysummers

claysummers

    Lotsa Posts!

  • Members
  • PipPipPipPipPipPip
  • 3,336 posts
  • Name:Clay
  • Location:Willunga
  • Car:186 FB Ute, 3.3 EK sedan
  • Joined: 13-December 18

Posted 17 April 2020 - 08:05 AM

You’ve never had guards off or repaired sills and pillars?? You are a fast learner.


Sent from my iPad using Tapatalk

#162 jd lj

jd lj

    Forum Fixture

  • Members
  • PipPipPipPipPip
  • 2,100 posts
  • Name:James D
  • Location:in the shed
  • Car:LJ SVO
  • Joined: 03-December 10

Posted 17 April 2020 - 09:06 AM

Any LC or LJ getting restored should have the guards removed to be done properly. You'd be surprised what you'd miss if you don't, even on a goid body.

Great work as usual Marty.

#163 sibhs

sibhs

    Lotsa Posts!

  • Members
  • PipPipPipPipPipPip
  • 2,703 posts
  • Name:Martin
  • Location:Perth
  • Car:LJ Coupe S
  • Joined: 27-July 12

Posted 17 April 2020 - 03:12 PM

You’ve never had guards off or repaired sills and pillars?? You are a fast learner.


Sent from my iPad using Tapatalk

First time Guards off is this car and I've only done outer sills and patched the pillars before.


Any LC or LJ getting restored should have the guards removed to be done properly. You'd be surprised what you'd miss if you don't, even on a goid body.

Great work as usual Marty.

Too right James, I don't think anyone can say their GTR is rust free unless every panel has been disassembled. When this is finished it'll be 98% rust free.


Marty


#164 sibhs

sibhs

    Lotsa Posts!

  • Members
  • PipPipPipPipPipPip
  • 2,703 posts
  • Name:Martin
  • Location:Perth
  • Car:LJ Coupe S
  • Joined: 27-July 12

Posted 17 April 2020 - 06:55 PM

While the floor is up I noticed a few dents in the chassis. I had to cut back a little more to gain access then it was heated up with oxy and knocked back into place.


Attached File  IMG_0451.jpg   153.92K   10 downloads


Attached File  IMG_0452.jpg   158.23K   9 downloads


Attached File  IMG_0454.jpg   124.09K   9 downloads


Next the rail was prepped and KBS applied.

Attached File  IMG_0456.jpg   206.36K   13 downloads


Test fitting the floor and trimming to suit a butt join. It's very easy to over trim and be left with a gap.

Attached File  IMG_0457.jpg   203.57K   11 downloads


Attached File  IMG_0459.jpg   194.23K   12 downloads


Attached File  IMG_0461.jpg   189.4K   11 downloads


Attached File  IMG_0463.jpg   123.26K   11 downloads


Attached File  IMG_0467.jpg   224.58K   14 downloads


Attached File  IMG_0468.jpg   135.75K   12 downloads


Attached File  IMG_0462.jpg   164.87K   10 downloads


I have since fully welded the two sides and it feels rock solid now and I'lll clean up welds when the car is on rotisserie.


Cheers


Marty


#165 Mitchyboy

Mitchyboy

    Forum Fan

  • Members
  • PipPipPipPip
  • 390 posts
  • Name:Mitch
  • Location:Sydney
  • Car:Lh torana
  • Joined: 18-March 18

Posted 17 April 2020 - 11:16 PM

Killing it Marty
How good is Torana Virus haha

Sent from my SM-G965F using Tapatalk

#166 bat 53

bat 53

    Forum Fan

  • Members
  • PipPipPipPip
  • 492 posts
  • Name:albert
  • Location:perth
  • Car:lc gtr
  • Joined: 17-December 17

Posted 18 April 2020 - 10:00 AM

great work marty 

if we stay locked down for a couple of more months it could be finnished :driving:


#167 u1 71

u1 71

    Forum Fan

  • Members
  • PipPipPipPip
  • 467 posts
  • Name:peter
  • Location:nsw
  • Car:torana
  • Joined: 15-April 11

Posted 18 April 2020 - 10:04 AM

You've got serious talent Marty

#168 lctriples

lctriples

    Forum Fan

  • Members
  • PipPipPipPip
  • 405 posts
  • Name:paul
  • Location:melbourne
  • Car:LC 2 door, HR prem wagon
  • Joined: 02-April 15

Posted 18 April 2020 - 06:36 PM

Hey Marty, how are you going to attach spark plug leads after outer sill has been welded up (last photo 16/04/20) Seriously you are doing an awesome job and an inspiration to us all!


Edited by lctriples, 18 April 2020 - 06:38 PM.


#169 S pack

S pack

    Scrivet Counter

  • Members
  • PipPipPipPipPipPipPip
  • 15,541 posts
  • Name:Dave
  • Location:Luggage Point
  • Car:73 LJ
  • Joined: 25-January 10

Posted 18 April 2020 - 08:10 PM

Marty, I seem to remember Sally saying one of the things that attracted her to you was how damn you are good with your hands. ;)

Keep up the high standards of craftsmanship. :spoton:

And stay safe mate.


Cheers

Dave


#170 sibhs

sibhs

    Lotsa Posts!

  • Members
  • PipPipPipPipPipPip
  • 2,703 posts
  • Name:Martin
  • Location:Perth
  • Car:LJ Coupe S
  • Joined: 27-July 12

Posted 18 April 2020 - 09:03 PM

Killing it Marty
How good is Torana Virus haha

Sent from my SM-G965F using Tapatalk

Hey Mitchyboy, I'm so glad I have this car to keep me busy. This lock-down could shave a year off the build time.

Cheers

Marty


great work marty 

if we stay locked down for a couple of more months it could be finnished :driving:

Thanks Bat, as I said above, this will really help get it finished.


You've got serious talent Marty

Thanks u1 71


Hey Marty, how are you going to attach spark plug leads after outer sill has been welded up (last photo 16/04/20) Seriously you are doing an awesome job and an inspiration to us all!

Hi Paul, Geez, I was wondering what you were on about but then noticed the tec screws looked like six spark plug ends.

Thanks mate.


Marty, I seem to remember Sally saying one of the things that attracted her to you was how damn you are good with your hands. ;)

Keep up the high standards of craftsmanship. :spoton:

And stay safe mate.


Cheers

Dave

Hi Dave,  HahaHa.  Sally and I are well here in the west thanks. 

I hope you and your family are well and safe.


Update time!

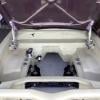
Now that I've finished using the left hand inner sill as a template it's time to fit it. This is a Patch Maker rust replacement panel which is a very professional looking bit of metal work. I did find a couple of things that I had to modify to get it to fit. Firstly the angles of the bends top and bottom required extra bending and the drain hole was in the wrong position. 


Attached File  IMG_0475.jpg   214.32K   12 downloads


Attached File  IMG_0481.jpg   154.13K   11 downloads


Attached File  IMG_0483.jpg   195.07K   12 downloads


Attached File  IMG_0484.jpg   150.29K   11 downloads


Attached File  IMG_0496.jpg   134.21K   10 downloads


Attached File  IMG_0497.jpg   223.42K   12 downloads


Attached File  IMG_0498.jpg   104.85K   11 downloads


Attached File  IMG_0550.jpg   87.06K   10 downloads


Attached File  IMG_0551.jpg   128.05K   12 downloads


Attached File  IMG_0552.jpg   98.79K   11 downloads


Attached File  IMG_0553.jpg   151.9K   12 downloads


Marty


#171 Ice

Ice

    Cool

  • Members
  • PipPipPipPipPipPipPip
  • 15,126 posts
  • Name:Gene
  • Location:Galaxy's away from Ipswich
  • Car:77 HZ Sandman Van
  • Joined: 03-January 07

Posted 18 April 2020 - 09:09 PM

I reckon you need a couple more grinders ✌️

#172 sibhs

sibhs

    Lotsa Posts!

  • Members
  • PipPipPipPipPipPip
  • 2,703 posts
  • Name:Martin
  • Location:Perth
  • Car:LJ Coupe S
  • Joined: 27-July 12

Posted 18 April 2020 - 09:23 PM

I reckon you need a couple more grinders ✌️

Like they say, I'm a grinder not a welder.  

I got sick of changing between, cutting, grinding and nylon scuff so I bought a grinder for each. 


Marty


#173 madtoranajzedded

madtoranajzedded

    Sir ask alot

  • Members
  • PipPipPipPipPipPip
  • 2,891 posts
  • Name:Maz
  • Location:Southern Tasmania
  • Car:72 LJ SL SEDAN.
  • Joined: 30-September 13

Posted 18 April 2020 - 10:08 PM

I have the same welder Marty 😃.what are your spot and
Plug weld settings..best tool ive ever me bought thinks

Is that copper weld through your using..

Cheers maz..

Attached File  20200418_214613.jpg   154.29K   13 downloads

#174 claysummers

claysummers

    Lotsa Posts!

  • Members
  • PipPipPipPipPipPip
  • 3,336 posts
  • Name:Clay
  • Location:Willunga
  • Car:186 FB Ute, 3.3 EK sedan
  • Joined: 13-December 18

Posted 18 April 2020 - 11:09 PM

Got the same unit. Lincoln 180C. $1000 three years ago. Adelaide Tools.


Sent from my iPad using Tapatalk

#175 sibhs

sibhs

    Lotsa Posts!

  • Members
  • PipPipPipPipPipPip
  • 2,703 posts
  • Name:Martin
  • Location:Perth
  • Car:LJ Coupe S
  • Joined: 27-July 12

Posted 18 April 2020 - 11:12 PM

Hi Maz,

Yeah great welder.  Plug welding I set it to around your markings, butt welding old metal to new is about half that.

UPol copper weld through primer. I still like to drill out hole where primer is to get fresh metal for plug weld.  I soon learnt that you may think you've done a good plug weld but it pops apart. Theres a few tips in doing good strong ones i've worked out.


Hi Clay, I was looking at the same price $1000 7 years ago when I found this one second hand with helmet, trolley gloves, apron, magnets etc for $600 and it had only been used to build a bench. 


Marty


Edited by sibhs, 18 April 2020 - 11:15 PM.


Also tagged with one or more of these keywords: LC GTR, Restoration, 1971, The Marty Report, Girl Power

0 user(s) are reading this topic

0 members, 0 guests, 0 anonymous users