
looks like a fun job

Clints LH Project
Started by
_Viper_
, Mar 27 2006 10:51 PM
307 replies to this topic
#177
 _Viper_
_Viper_
-

- Guests
Posted 05 June 2012 - 12:12 AM
Is was actually, I like trying to get things to fit into tight places and figuring out how I'm going to get it in there 
#178
MODNIZD
-

- Members
-

- 460 posts
Forum Fan
- Name:Phil
- Location:Perth WA
- Car:4 Door LC RB25DET
- Joined: 12-November 05
Posted 05 June 2012 - 12:52 PM
Looking good Clint.
Just a quick one from my gas experience in the 4x4 being 500km from sweet frOck all, the plastic coolant angles love to come lose or break, I modified some washers and slipped them over to get more surface area on the screws that hold them in. Especially seeing you have that curve on the hose.
Just a quick one from my gas experience in the 4x4 being 500km from sweet frOck all, the plastic coolant angles love to come lose or break, I modified some washers and slipped them over to get more surface area on the screws that hold them in. Especially seeing you have that curve on the hose.
#179
_Viper_
_Viper_
-
- Guests
Posted 05 June 2012 - 01:58 PM
Are you talking about the 2 at the top of the converter? I have not had a problem with the one in the Gemini, but seeing as this is under the guard and would be Abit of a kent to get to I think I'll take your advice.
#180
MODNIZD
-
- Members
-
- 460 posts
Forum Fan
- Name:Phil
- Location:Perth WA
- Car:4 Door LC RB25DET
- Joined: 12-November 05
Posted 05 June 2012 - 04:09 PM
Yep exactly what I'm talking about. One popped off, and I had to spend about 2 hours modifying the coolant lines to get back to town on the smell of petrol on a rag.
#181
_Viper_
_Viper_
-
- Guests
Posted 05 June 2012 - 05:40 PM
I think mine may actually have a metal ring cast into the flange cos when I rotated it while the screws were still firm the screws scrapped a layer of plastic off and was shiny underneath. But I'll double check that and use the washer method if not
#182
_Viper_
_Viper_
-
- Guests
Posted 10 June 2012 - 11:01 PM
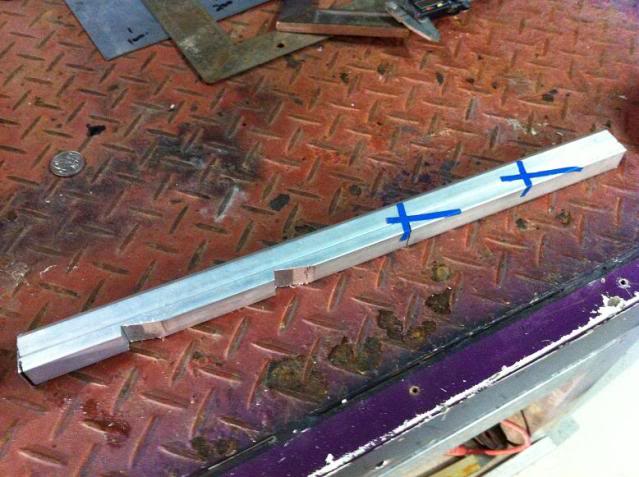
Just about finished the fuel rails... Got some Extrusion from RAGE LPG

#183
_Viper_
_Viper_
-
- Guests
Posted 24 June 2012 - 10:52 PM
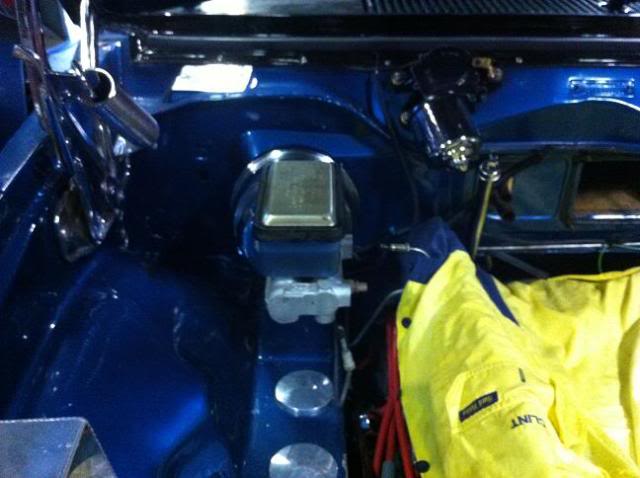
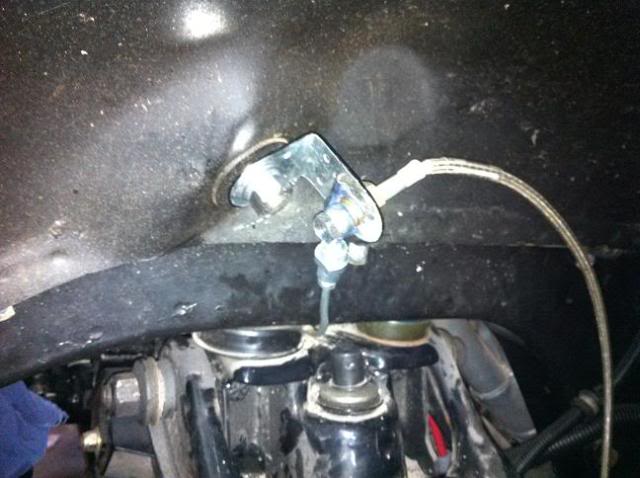
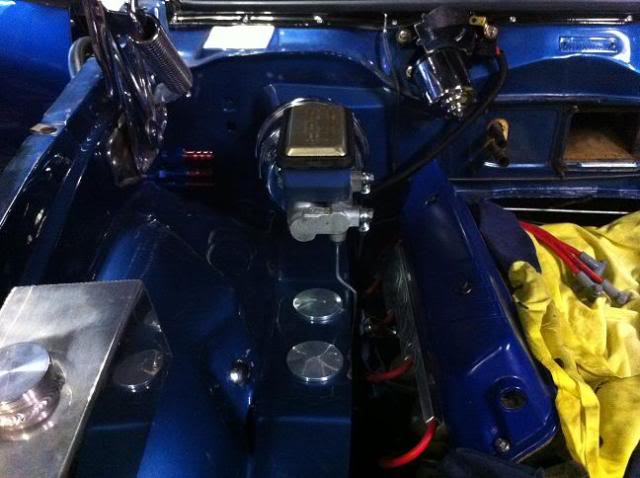
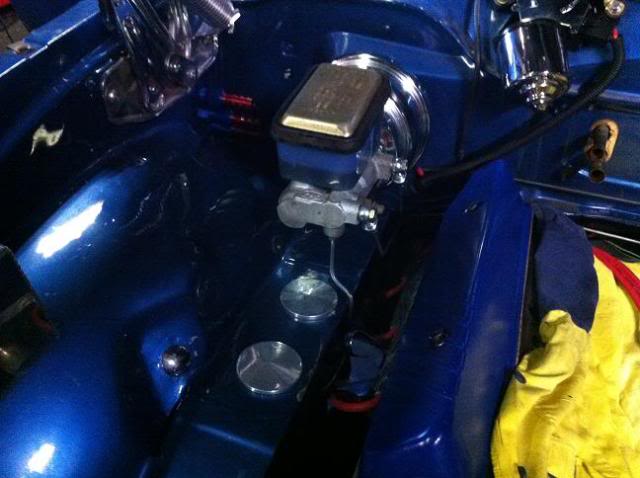
Grabbed a 7" Chrome booster. Had to split it open and rotate to suit my master cylinder, also had to modify the Master cylinder as the bolt pattern was further apart. I think it would be fine as is (see pics) but I may weld on a extra piece to make it look standard.
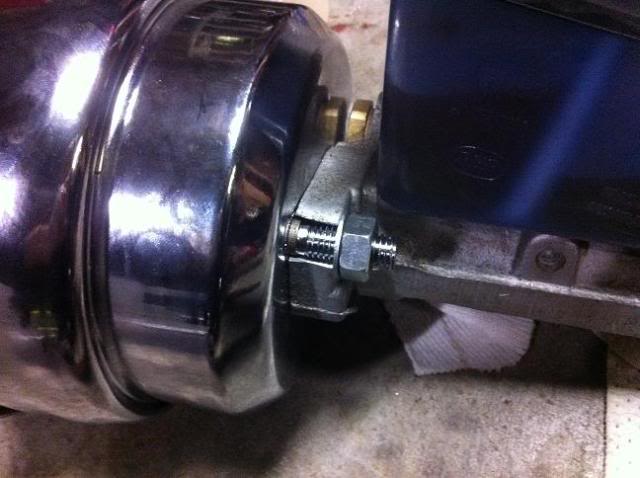
I Cut the pushrod off a old booster, lucky it was a solid rod so I drilled the center out and tapped it to suit the new booster, adjustable pushrod now
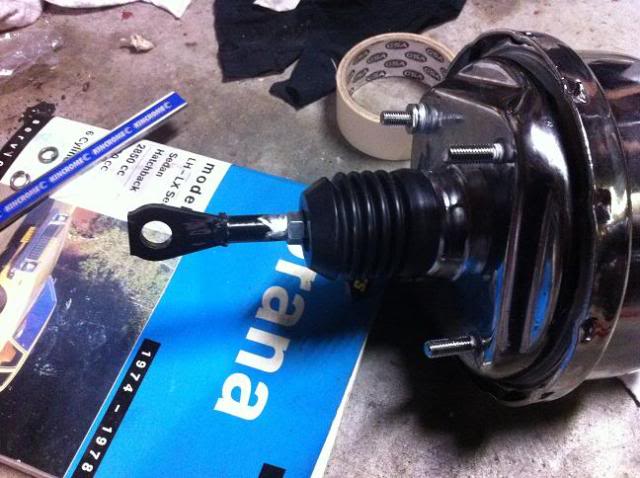
I test fitted the booster and noticed it was on a angle a fair bit... to be honest I never noticed this before with the old booster... Are all toranas like this?
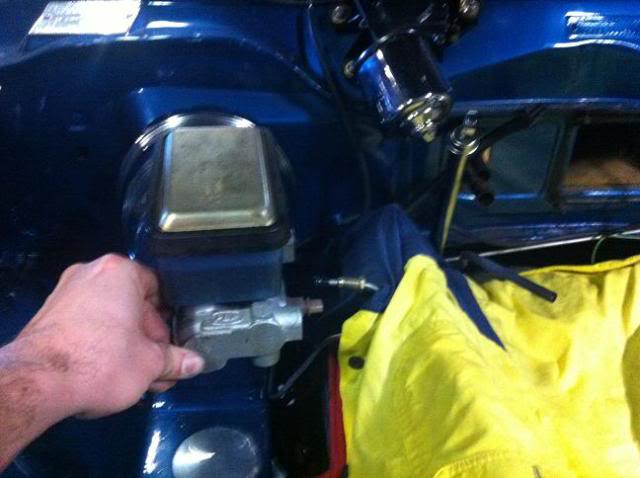
I temporarily put some washers on the passenger side to get it square with the rest of the bay
I have to check to make sure the pedal doesn't bind up or anything since the booster is now at a different angle... Might have to look at using a rose joint?
Also finished fitting all the uh, fittings for one of the LPG converters.
I think ill change the top fitting in the bay to a 45' instead of straight.
Ive started on the passenger side now....
Oh well thats it for now untill next sunday
I Cut the pushrod off a old booster, lucky it was a solid rod so I drilled the center out and tapped it to suit the new booster, adjustable pushrod now
I test fitted the booster and noticed it was on a angle a fair bit... to be honest I never noticed this before with the old booster... Are all toranas like this?
I temporarily put some washers on the passenger side to get it square with the rest of the bay
I have to check to make sure the pedal doesn't bind up or anything since the booster is now at a different angle... Might have to look at using a rose joint?
Also finished fitting all the uh, fittings for one of the LPG converters.
I think ill change the top fitting in the bay to a 45' instead of straight.
Ive started on the passenger side now....
Oh well thats it for now untill next sunday
Edited by Viper, 24 June 2012 - 10:53 PM.
#184
DanWA
-

- Members
-
- 2,440 posts
Forum Fixture
- Location:Southwest W.A
- Car:LS1 LX 4 Door
- Joined: 27-April 06
Posted 24 June 2012 - 10:54 PM
My VH346 booster is on a slight angle, factory one was to...
Good work Clintoris
Good work Clintoris
#185
SHEEL
-
- Members
-
- 316 posts
Forum Fan
- Name:Daniel
- Location:Melbourne
- Joined: 09-October 09
Posted 26 June 2012 - 11:11 AM
Hey Clint can I make a suggestion before you send the manifold off to get coated...
cut out the webbing between the inlet runners...
like this:
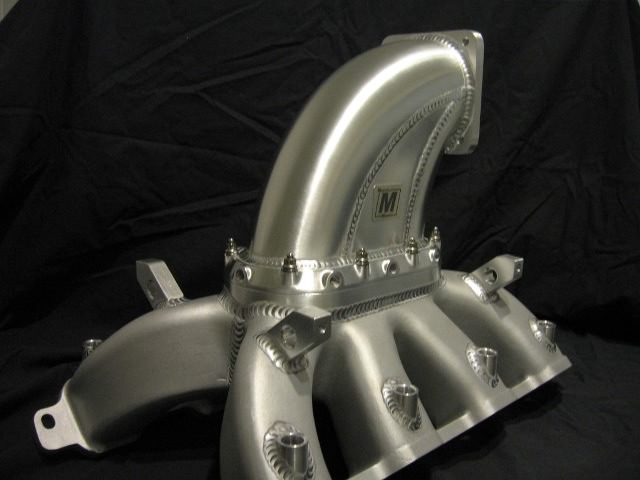
cut out the webbing between the inlet runners...
like this:
#186
_Viper_
_Viper_
-
- Guests
Posted 26 June 2012 - 03:02 PM
Too late, I considered polishing the intake up before getting it coated, but guess I got lazy and just want it done. Didn't want to pay someone else $400-500 to do it either
#187
dattoman
-

- Administrators
-
- 16,472 posts
Do I feel lucky? Well, do ya, punk?
- Name:Neil
- Location:Perth Western Australia
- Car:LX SS , 76 Cadillac , 3 x dattos
- Joined: 04-February 07
Posted 26 June 2012 - 09:58 PM
You commented to me when you first did the brakes that the booster/master sits crooked... and thats how they are
Why did you put that silly little booster on ?
Why did you put that silly little booster on ?
#188
_Viper_
_Viper_
-
- Guests
Posted 27 June 2012 - 12:15 AM
You commented to me when you first did the brakes that the booster/master sits crooked... and thats how they are
Hah that was like 4 years ago? I guess I forgot.
And for extra clearance... Its not the size that matters, but how shiny it is.... Right?
#189
dattoman
-
- Administrators
-
- 16,472 posts
Do I feel lucky? Well, do ya, punk?
- Name:Neil
- Location:Perth Western Australia
- Car:LX SS , 76 Cadillac , 3 x dattos
- Joined: 04-February 07
Posted 27 June 2012 - 01:00 AM
Depends if you actually want to stop or not
I would have personally left the original or even gone the 8"
But I don't expect to be breaking things and need to pull the rocker covers and heads off on a regular basis like you hoons
I would have personally left the original or even gone the 8"
But I don't expect to be breaking things and need to pull the rocker covers and heads off on a regular basis like you hoons
#190
_Viper_
_Viper_
-
- Guests
Posted 27 June 2012 - 09:44 AM
Hah I don't expect to break things, it was for clearance of my LPG gear. I contemplated the 8" but wasnt sure if It would Give me enough room. Won't it just make the pedal a little harder and I'll just have to hit the gym more?
#191
dattoman
-
- Administrators
-
- 16,472 posts
Do I feel lucky? Well, do ya, punk?
- Name:Neil
- Location:Perth Western Australia
- Car:LX SS , 76 Cadillac , 3 x dattos
- Joined: 04-February 07
Posted 27 June 2012 - 08:47 PM
Couple of burgers and 6 packs might fix it
I just think they look alittle small and makes the engine bay look funny
But thats just my useless opinion
I could have used that old booster if you hadn't cut the rod off it... grrr
I just think they look alittle small and makes the engine bay look funny
But thats just my useless opinion
I could have used that old booster if you hadn't cut the rod off it... grrr
#192
_Viper_
_Viper_
-
- Guests
Posted 27 June 2012 - 10:45 PM
Yea I agree they do look a little small. I may squeeze a 8" one in there hopefully
I only cut off the rod from that booster because we are planning to use it in my friends Monaro and will need to modify the pushrod anyway... I could have fabricated it from scratch.. but this was much faster.
I only cut off the rod from that booster because we are planning to use it in my friends Monaro and will need to modify the pushrod anyway... I could have fabricated it from scratch.. but this was much faster.
#193
_Viper_
_Viper_
-
- Guests
Posted 07 July 2012 - 08:32 PM
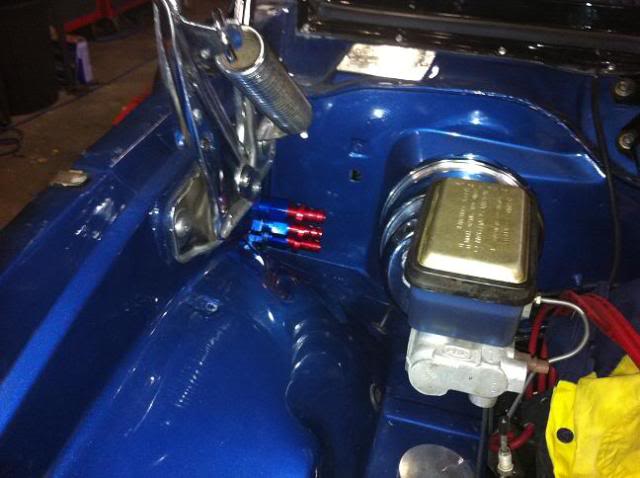
Well got the brake lines sorted today...
This was how the old lines were run:


My original plan was to use some banjo fittings on the end of the caliper hoses in the stock location and run the line through the small opening and under the chassis rails like so.
But the banjo fitting was too long and although I know I can get shorter ones I couldn't get the brake nut through opening anyway...
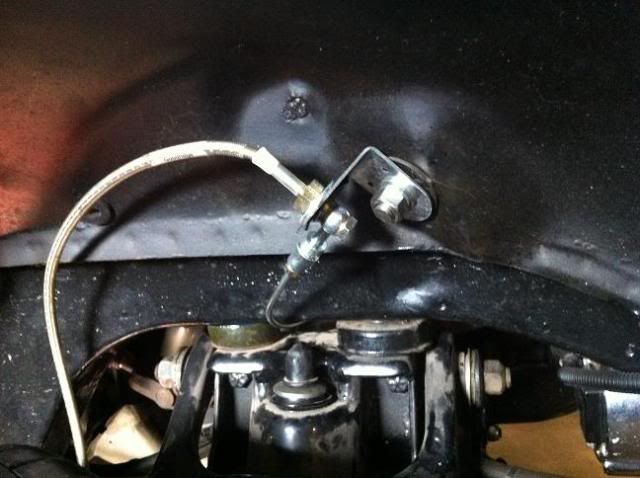
Soooo went down to bunnings and grabbed a couple of Stainless Coach bolts, Gave them a quick polish of course.

Fitted where the stock brake hose used to go (one day when I redo the bay Im going to completely smooth the wheel tubs and this new bracket will just be welded to the underside of the tubs)
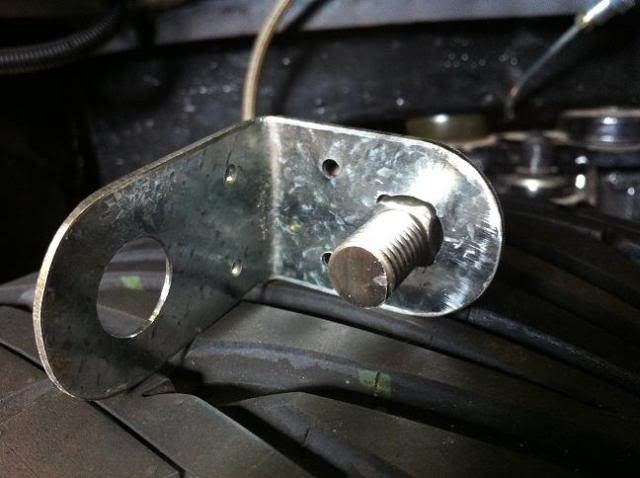
Also grabbed a right angle bracket from bunnings, trimmed it down to a suitible size, rounded the ends and drilled a couple holes. filed out one of the holes corners to stop the coach bolt from spinning.
Brackets all fitted up:
Then made new brake lines
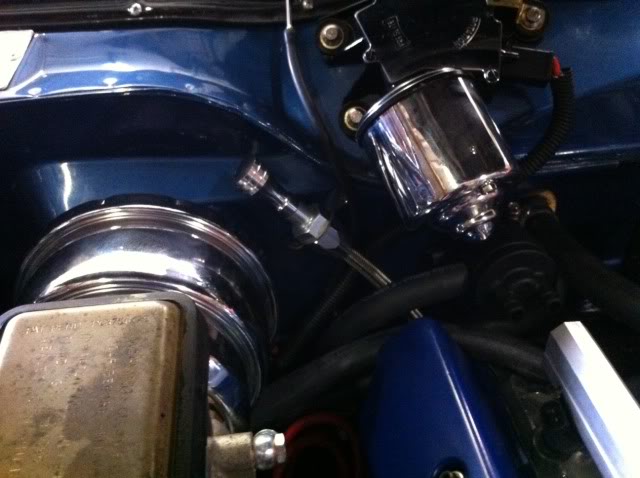
Oh, also fitted the passenger side LPG converter

Pick up my Intake on monday so ill be able to fit that next weekend
This was how the old lines were run:
My original plan was to use some banjo fittings on the end of the caliper hoses in the stock location and run the line through the small opening and under the chassis rails like so.
But the banjo fitting was too long and although I know I can get shorter ones I couldn't get the brake nut through opening anyway...
Soooo went down to bunnings and grabbed a couple of Stainless Coach bolts, Gave them a quick polish of course.
Fitted where the stock brake hose used to go (one day when I redo the bay Im going to completely smooth the wheel tubs and this new bracket will just be welded to the underside of the tubs)
Also grabbed a right angle bracket from bunnings, trimmed it down to a suitible size, rounded the ends and drilled a couple holes. filed out one of the holes corners to stop the coach bolt from spinning.
Brackets all fitted up:
Then made new brake lines
Oh, also fitted the passenger side LPG converter
Pick up my Intake on monday so ill be able to fit that next weekend
#194
_Viper_
_Viper_
-
- Guests
Posted 08 July 2012 - 08:44 PM
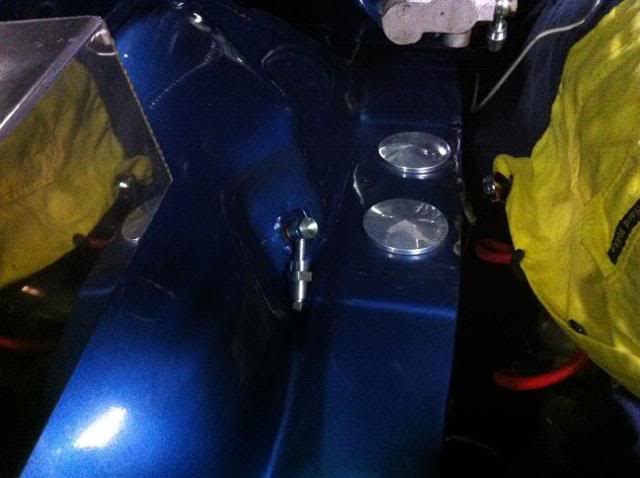
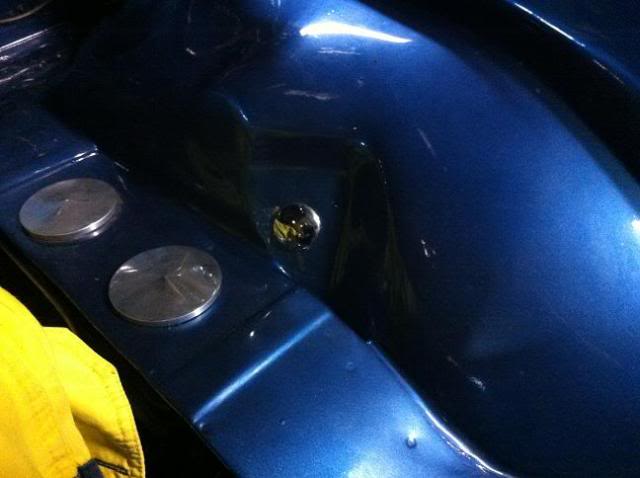
Got abit more done today, made a start on fitting the LPG Tank to the boot.
Before I touched it, had already been plated before with a flat floor.
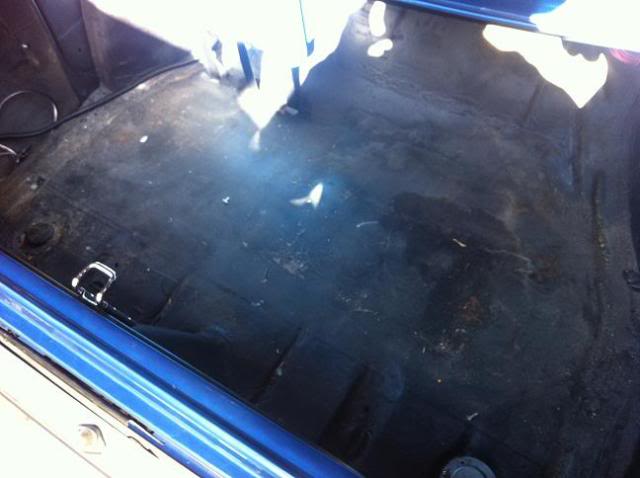
lucky for me the plate was only stiched welded in and seam sealed which made it a little easier to cut out.
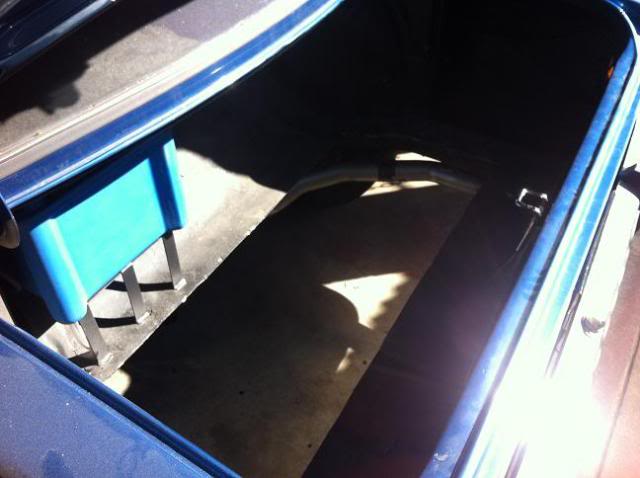
Test fitted the tank to roughly where I want it.

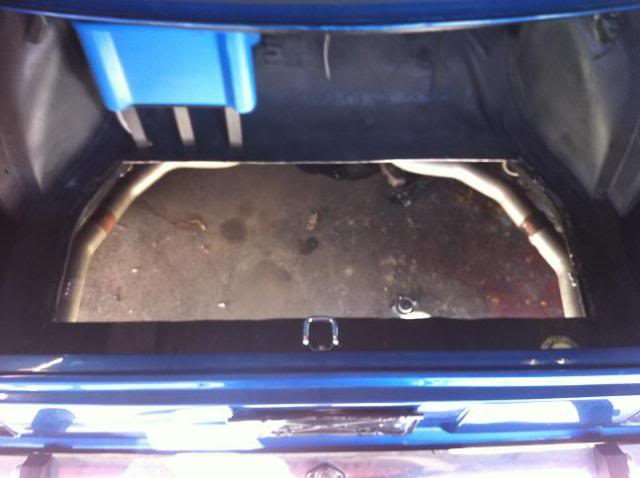
Once its all done I'll fit a false floor to the boot level with the diff hump,
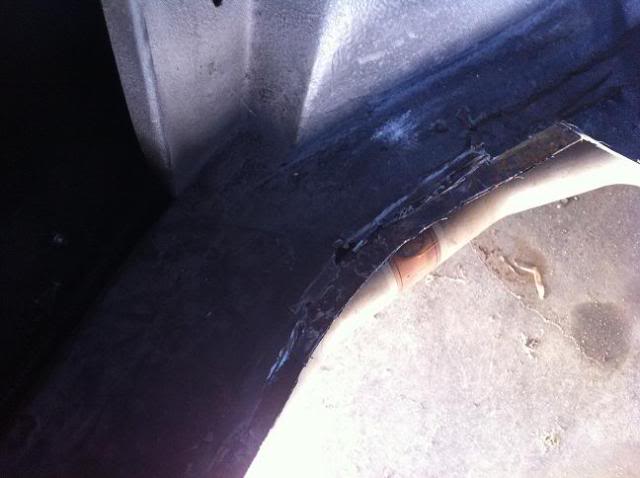
Found a little bit of rust in the passenger side rail under the seam sealant, cant really see it in the pic but it will need attention
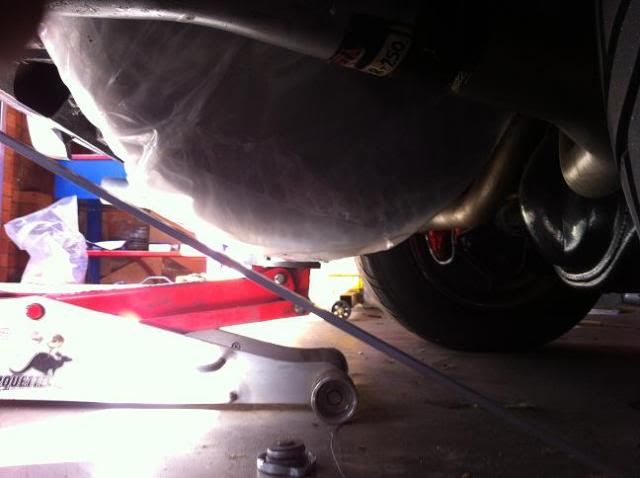
Departure angle... actually going to raise the tank a little higher then this.
Fitted the brackets up to the tank and got it to the right angle.
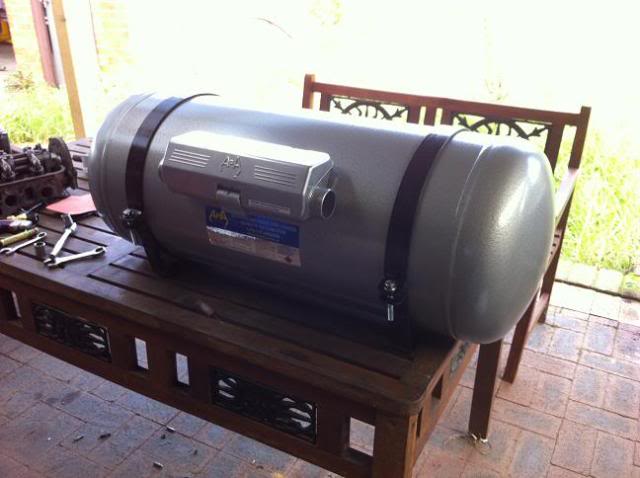
I'll also be making a fake alloy drop tank cover so it looks like a normal towana
Before I touched it, had already been plated before with a flat floor.
lucky for me the plate was only stiched welded in and seam sealed which made it a little easier to cut out.
Test fitted the tank to roughly where I want it.
Once its all done I'll fit a false floor to the boot level with the diff hump,
Found a little bit of rust in the passenger side rail under the seam sealant, cant really see it in the pic but it will need attention
Departure angle... actually going to raise the tank a little higher then this.
Fitted the brackets up to the tank and got it to the right angle.
I'll also be making a fake alloy drop tank cover so it looks like a normal towana
#195
_berro59_
_berro59_
-
- Guests
Posted 09 July 2012 - 10:52 AM
Nice work on the brake lines. That polished coach screw and bracket are a great idea.
I had a VX commodore on lpg. Car used to fly and cost bugger all to run.
I had a VX commodore on lpg. Car used to fly and cost bugger all to run.
#196
_Viper_
_Viper_
-
- Guests
Posted 09 July 2012 - 11:04 AM
Thanks Berro, I sort of stumbled across it by accident, I was planning to use a Button head allen key stainless bolt. I rang the bolt shop and they had them in stock altho only in high-tensile, Figured ill just have to get them chromed... Went down there a couple hours later but they had closed at 11am (saturday) So I thought Ill just goto bunnings and get a normal hex head bolt for now so I can at least do the rest but they didnt have any bolts big enough... Then I spotted the stainless steel Coach bolt and thought Hmm that will work even better!
#197
_Viper_
_Viper_
-
- Guests
Posted 07 August 2012 - 10:42 PM
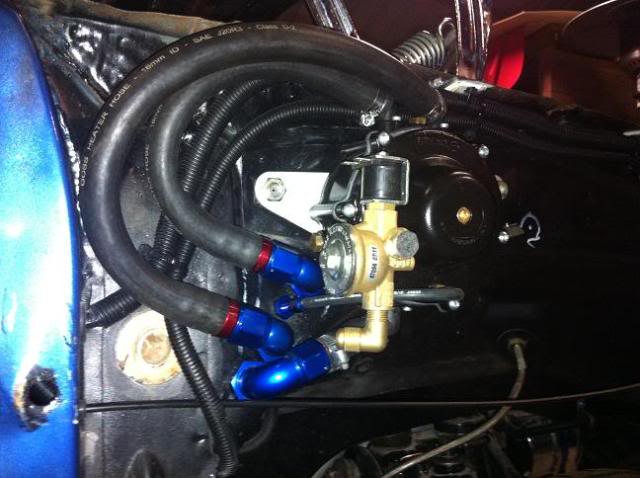
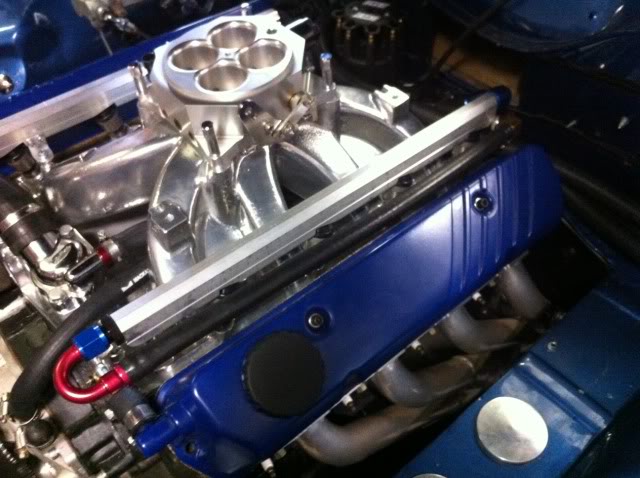
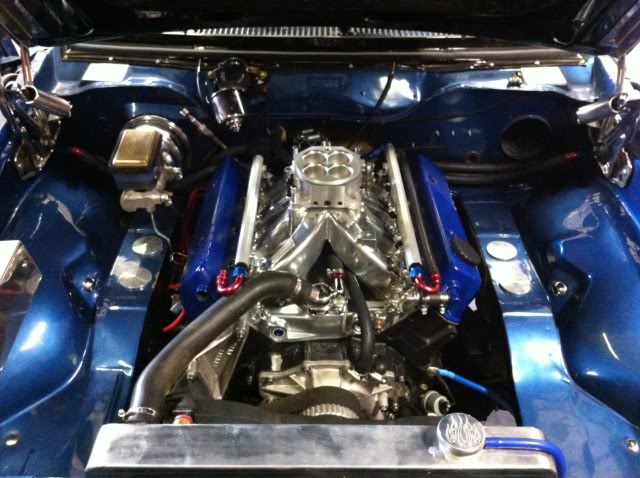
Getting there... I had to fit a flexible dipstick as the original solid dipstick was in the way of the fuel rail... I couldnt for the life of me get the dipstick into the box and had to fit some slightly smaller diameter o-rings. Hope she doesnt leak!
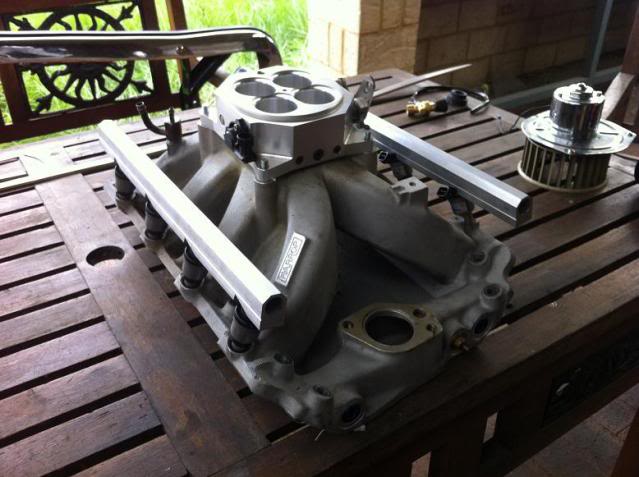
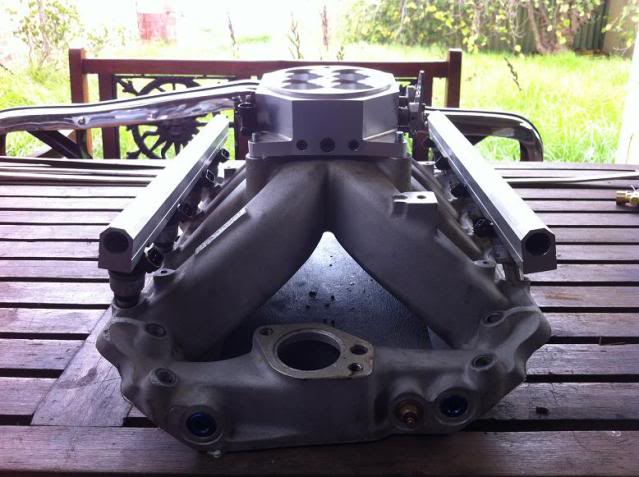
Got the intake manifold back from the ceramic coaters, fitted it up and finished setting up the fuel rails. Just need to give them a polish.
Also finished running the coolant and LPG hoses to the converters
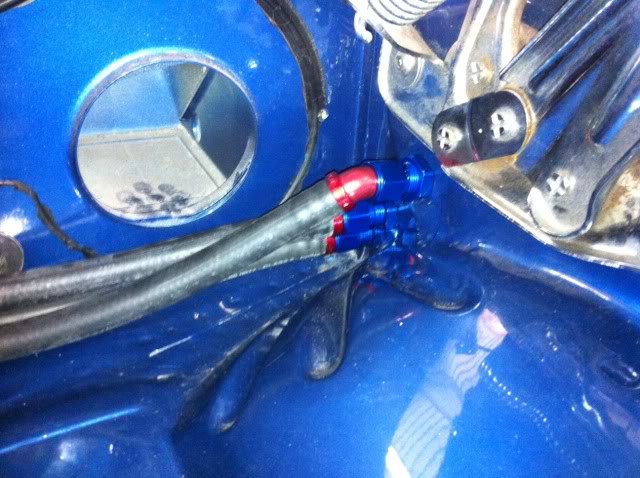
Not too far off now... grabbed a few more fittings from Chris mills on monday. also got one of the billet alternator brackets... fingers crossed it fits on the Torana.
Got the intake manifold back from the ceramic coaters, fitted it up and finished setting up the fuel rails. Just need to give them a polish.
Also finished running the coolant and LPG hoses to the converters
Not too far off now... grabbed a few more fittings from Chris mills on monday. also got one of the billet alternator brackets... fingers crossed it fits on the Torana.
#198
_greenmachine215_
_greenmachine215_
-
- Guests
Posted 07 August 2012 - 11:12 PM
Killer job clint, never thought an LPG setup could look so stealthy untrained eye would say its a petrol jobby.
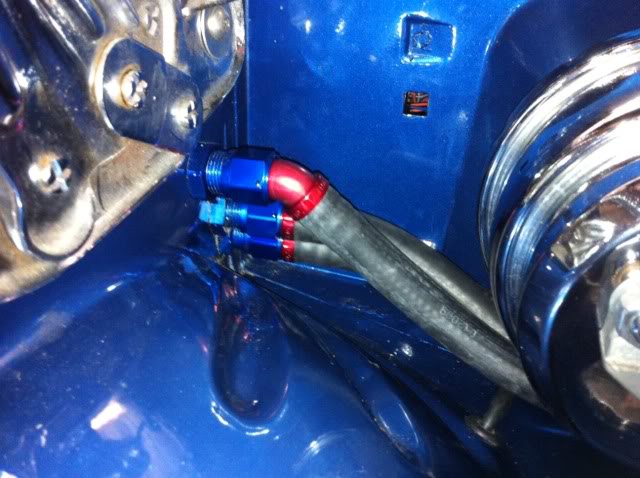
I like how you've used the speedflow connectors and feed throughs, how do you go as far as sealing them to keep the road worthys happy, I know the speedflows are an awesome seal as is, but you have to prove all this bullshite to the transport departments.
Good to see things are moving along again.
Cheers
#199
_Viper_
_Viper_
-
- Guests
Posted 07 August 2012 - 11:37 PM
The LPG guys have to do a final inspection and leak check etc and they will run the main LPG hard line from the Tank to Engine bay and they sign off on it all and give me a little mod plate
And yea is no real sign that its LPG except the slightly different looking injectors and extra hoses altho they are hidden as much as possible.
And yea is no real sign that its LPG except the slightly different looking injectors and extra hoses altho they are hidden as much as possible.


0 user(s) are reading this topic
0 members, 0 guests, 0 anonymous users

