
Looking good Jabba.
You gotta be in front $$$ wise. What a find!
Now, where is that wreckers again?!
- Leakey
My newer Monaro
Started by
_jabba_
, Apr 09 2006 11:22 PM
529 replies to this topic
#152
 _jabba_
_jabba_
-

- Guests
Posted 25 November 2007 - 08:33 AM
its starting to get expensive now, to get where I am atm it has cost...
$1000 - one rolling monaro, almost all chrome doors and side glass.
$600 - Current monaro shell.
$??? - paints and sand paper, i choose not to add that up .
.
$700ish - Rebuild the front end with new ball joints, tie rods and bushes.
$100 - Rust repair two doors.
$800 - Engine
$??? - rebuilt kit for engine, probably $800
$50 - Flexplate
$130 - distributor
$200 - gearbox
$220 - Front power window regs
$350 - parts car, inc GTS dash.
$40 - ARP bolts for the flexplate and torque convertor.
$250 - Front guards
Total = $4740, maybe i shouldnt have added that up. I guess its still worth more than what i've spent so i'm doing well!
$1000 - one rolling monaro, almost all chrome doors and side glass.
$600 - Current monaro shell.
$??? - paints and sand paper, i choose not to add that up
.$700ish - Rebuild the front end with new ball joints, tie rods and bushes.
$100 - Rust repair two doors.
$800 - Engine
$??? - rebuilt kit for engine, probably $800
$50 - Flexplate
$130 - distributor
$200 - gearbox
$220 - Front power window regs
$350 - parts car, inc GTS dash.
$40 - ARP bolts for the flexplate and torque convertor.
$250 - Front guards
Total = $4740, maybe i shouldnt have added that up
. I guess its still worth more than what i've spent so i'm doing well!
#153
_Leakey_
_Leakey_
-
- Guests
Posted 25 November 2007 - 08:38 AM
That's awesome matey.
Will be a great lookin' car.
Will be a great lookin' car.
#154
_jabba_
_jabba_
-
- Guests
Posted 25 November 2007 - 08:43 AM


Edited by jabba, 25 November 2007 - 08:45 AM.
#155
_Leakey_
_Leakey_
-
- Guests
Posted 25 November 2007 - 09:02 AM
Haha, in those pics the a pillars dissappear! Now that would be cool!
I've never done a full resto before, well, not on this scale,
but I really enjoy seeing the 'inside' of cars. Following my old SS
resto that LX5008 is currently doing too. Way cool.
What colour are you thinking of painting it?
- Leakey
I've never done a full resto before, well, not on this scale,
but I really enjoy seeing the 'inside' of cars. Following my old SS
resto that LX5008 is currently doing too. Way cool.
What colour are you thinking of painting it?
- Leakey
#156
_jabba_
_jabba_
-
- Guests
Posted 26 November 2007 - 04:39 PM
Its going to be the blue on the firewall  , the factory green was to... green.
, the factory green was to... green.
#158
_jabba_
_jabba_
-
- Guests
Posted 08 December 2007 - 10:15 PM
I have welded in the first floor rust repair, i ran out of por15 so its a really thin coat to keep the mosture at bay for now. The reason the paint looks really crap is it was dark and i brushed dirt into it, doh. Ill strip it all back and repaint when all the repairs are done.
Its amazing how much easyer welding is when you can see what your doing, my old welding helmet stopped auto switching but this new one is great, bigger lense too. Also put some more primer on the boot lid after welding the badge and spoiler holes up.


Damien
Its amazing how much easyer welding is when you can see what your doing, my old welding helmet stopped auto switching but this new one is great, bigger lense too. Also put some more primer on the boot lid after welding the badge and spoiler holes up.
Damien
Edited by jabba, 08 December 2007 - 10:25 PM.
#159
_jabba_
_jabba_
-
- Guests
Posted 09 December 2007 - 07:55 PM
I started welding in the next small repair, but as soon as i started cleaning up the welds pin holes popped up everywhere. I chopped all the pitted metal out and started trimming up the patch.
This is the first patch job that i ended up cutting out.

Floor cut out, i had to cut off the seat bolt holes

Bolt holes sitting in place

Bolt holes welded in place, just need the welds ground back. I have to cut more of the rear floor pan out, i figured i might aswell get rid of all the pitted metal i can.

The donor floor pan, i've drilled the spot welds out, i just need to seperate the front and rear pan.


This is the first patch job that i ended up cutting out.
Floor cut out, i had to cut off the seat bolt holes
Bolt holes sitting in place
Bolt holes welded in place, just need the welds ground back. I have to cut more of the rear floor pan out, i figured i might aswell get rid of all the pitted metal i can.
The donor floor pan, i've drilled the spot welds out, i just need to seperate the front and rear pan.
#160
_jabba_
_jabba_
-
- Guests
Posted 12 December 2007 - 08:35 PM
Well i managed to finally seperate the two floor pans and i've welded one of them in, i just need to weld up the spot weld holes and grind it all back .


.
Edited by jabba, 12 December 2007 - 08:37 PM.
#161
_TJ253_
_TJ253_
-
- Guests
Posted 12 December 2007 - 08:49 PM
Coming along nice there keep up the good work!
#162
toryman76
-

- Members
-

- 1,082 posts
Forum Fixture
- Location:Melbourne, Vic
- Joined: 16-January 06
Posted 12 December 2007 - 08:53 PM
nice work jabba!!  can i ask though, what are those bolt holes for you have welded in place? i cant work it out! EDIT: dw im just blind! stupid question...
can i ask though, what are those bolt holes for you have welded in place? i cant work it out! EDIT: dw im just blind! stupid question...
Edited by toryman76, 12 December 2007 - 08:54 PM.

#164
_jabba_
_jabba_
-
- Guests
Posted 21 December 2007 - 10:30 PM
One side down, one to go!
The floor isnt as straight as i would like, it will never win any awards but it should do the trick. Atleast its got less holes now.


Damien
The floor isnt as straight as i would like, it will never win any awards but it should do the trick. Atleast its got less holes now
.Damien
#165
Heath
 View Garage
-

- Administrators
-
- 18,403 posts
I like cars.
- Name:Heath
- Location:Eastern Suburbs, Melbourne
- Car:Heavily Modified UC Sunbird Hatchback
- Joined: 07-November 05
View Garage
Posted 21 December 2007 - 11:26 PM
Meh gets covered with carpet and looks like it won't rust so well done
#166
_jabba_
_jabba_
-
- Guests
Posted 22 December 2007 - 10:46 AM
Thats what i figured! Aslong as i dont fall through it haha
#167
_jabba_
_jabba_
-
- Guests
Posted 26 December 2007 - 07:49 PM
What hole .
The middle part of the floor pan also has to go, its rusted out aswell... Should see some more progress over the next few days.

And the floor pan, almost all unpicked... What a bastard of a job.

Here's a new addition to the fish tank, got him for my g/f for chrissie .
.
Glass is a little dirty on the outside...


Damien
.The middle part of the floor pan also has to go, its rusted out aswell... Should see some more progress over the next few days
.And the floor pan, almost all unpicked... What a bastard of a job.
Here's a new addition to the fish tank, got him for my g/f for chrissie
.Glass is a little dirty on the outside...
Damien
Edited by jabba, 26 December 2007 - 07:52 PM.
#168
_jabba_
_jabba_
-
- Guests
Posted 28 December 2007 - 04:08 PM


Almost all welded in, excuse the ugly welds
. Some clown trimmed to much of that center part out near the door jam, and now i cannot weld it up... Ill have to figure something out to bridge the gap. so i can finish that section of the floor. All that remains is to grind back the welds and trim up the next section.
#169
Tiny
-

- Administrators
-
- 10,018 posts
Oh My, Don't you post alot
- Name:Tiny
- Location:Sydney
- Joined: 04-February 07
Posted 29 December 2007 - 09:37 AM
Holy shit dude, Your doing SOOOO much work!
Looks like your making good progress, It'll be all worth it when it's done!
Cheers!
Looks like your making good progress, It'll be all worth it when it's done!
Cheers!
#170
_jabba_
_jabba_
-
- Guests
Posted 29 December 2007 - 09:43 AM
Thanks Tiny, its amazing what a place to work on your car does (even if it is cramped). I've just been trying to do 2 - 3 hours a day, 3 days a week.
#171
Bart
-
- Members
-
- 2,559 posts
Shit a brick
- Location:Sydney
- Car:LJ Torana
- Joined: 20-November 05
Posted 29 December 2007 - 12:25 PM
This is what you call a genuine rebuild.
#172
_jabba_
_jabba_
-
- Guests
Posted 30 December 2007 - 10:44 PM
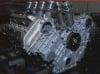
Your car is getting the full treatment too by the looks of it Bart, i havent actually posted in your thread but i love what your doing... Very insperational.
The boss told me to be quiet yesterday so i had to do something to amuse myself, so i mounted the engine into the subframe.
I've found one small issue, the crossmember that came with the gearbox doesnt seem to line up! I've got it sitting over the furthest back mounting holes on the subframe but it doesnt come close to lining up with the part welded onto the bottom. It does line up with the origional holes but id take a guess and say the box will sit too high and hit the floor, plus the sump hits on the crossmember. Any ideas on what the crossmember is actually from, i was told it was done like that from the factory.
Sorry lots more pics, but they might help explain what im blabbing about.


The boss told me to be quiet yesterday so i had to do something to amuse myself, so i mounted the engine into the subframe.
I've found one small issue, the crossmember that came with the gearbox doesnt seem to line up! I've got it sitting over the furthest back mounting holes on the subframe but it doesnt come close to lining up with the part welded onto the bottom. It does line up with the origional holes but id take a guess and say the box will sit too high and hit the floor, plus the sump hits on the crossmember. Any ideas on what the crossmember is actually from, i was told it was done like that from the factory.
Sorry lots more pics, but they might help explain what im blabbing about
.
Edited by jabba, 30 December 2007 - 10:46 PM.
#173
Bart
-
- Members
-
- 2,559 posts
Shit a brick
- Location:Sydney
- Car:LJ Torana
- Joined: 20-November 05
Posted 30 December 2007 - 11:21 PM
Mate i must admit, the extent of your work was like, extreme, i was like thinking what the f*ck, but looking at your latest pic its looking bloody good. You got bigger balls than me mate good on ya. Love Monaro's so its bonus eye candy for me
good on ya. Love Monaro's so its bonus eye candy for me
#174
Bart
-
- Members
-
- 2,559 posts
Shit a brick
- Location:Sydney
- Car:LJ Torana
- Joined: 20-November 05
Posted 30 December 2007 - 11:24 PM
Oh and your cross member is not lining up, could it be because you got the cross member bolted into the wrong holes on ur subframe?? I know with the LJ Torana the subframe/chassis rails have half a dozen holes for the different cross member positions.
#175
rodomo
-

- Members
-
- 18,063 posts
To advertise here, call 13TORANA
- Name:R - O - B Dammit!
- Location:Way out west of Melbourne Awstraylya
- Joined: 10-December 05
Posted 30 December 2007 - 11:49 PM
Can you lift your engine off the front mounts and have the plates that bolt to the engine on the front side of the rubber mounts?
E.g move the engine forward?
This may already be, but I can't see in the pics.
E.g move the engine forward?
This may already be, but I can't see in the pics.


0 user(s) are reading this topic
0 members, 0 guests, 0 anonymous users

