the socket is to be changed, as the electrician didn't have the 15 amp one at that time. ^
http://www.gmh-toran...e-4#entry854131


 3 votes
CABIN ENGINE CONTROLS GALORE


Posted 25 August 2014 - 06:54 PM
the socket is to be changed, as the electrician didn't have the 15 amp one at that time. ^
http://www.gmh-toran...e-4#entry854131
Sir ask alot
Posted 25 August 2014 - 07:00 PM
thanks heaps dave,what will that set me back roughly, a couple 100 ?
that goes back to page 4 lol
Edited by madtoranajzedded, 25 August 2014 - 07:02 PM.
CABIN ENGINE CONTROLS GALORE
Posted 25 August 2014 - 07:06 PM
Get a Mate Electrician do it for a Carton Maz,
as he will have some spare parts around to do the job.
and yes,
when referring to another post,
especially when it disappears to the last page,
I link them to the current post hey.

Posted 25 August 2014 - 08:21 PM
nothing like a tubbed torana!! nice car bud, cant wait to see more progress..
Sir ask alot
Posted 31 August 2014 - 05:17 PM
Thanks Pete slowly getting there  made a little panel to put over the heater hole.not going to weld it in,just going to
weld some small bolts on inside and add a couple in the middle ,will run some lead or bondo around it
incase i put the heater back in down the track.she gets pretty cold down here lol ljzedded 318.jpg 96.74K
6 downloads
ljzedded 320.jpg 46.54K
10 downloads some holes ready to weld up.there's heaps of them to do
ljzedded 318.jpg 96.74K
6 downloads
ljzedded 320.jpg 46.54K
10 downloads some holes ready to weld up.there's heaps of them to do
Edited by madtoranajzedded, 31 August 2014 - 05:19 PM.
Sir ask alot
Posted 24 September 2014 - 03:58 PM
bloody hell thats dear.just had a sparky up here about putting socket and switch on meter box,which he will install nxt tues.
500 bucks for 40mtrs of 30amp lead + socket.and 200 to install the socket.will be able to run a good welder but sheesh i
didnt see that coming
actually the lead must be bigger than 30 cause i said i want it capable of running 30amp welder.i think he said
it drops something like 2volts in 50 mtrs
Edited by madtoranajzedded, 24 September 2014 - 04:11 PM.
Sir ask alot
Posted 01 October 2014 - 04:53 PM
hi guys.sparky just left and now i can weld just a couple pics what he has done.put in a couple circuit breakers.a socket for lead which
i can run through the house at a later date as it was going to cost a fair bit more to do everything straight away .dig trench to shed .
board,fittings and wiring the shed for lights etc.
so now the fun begins.havnt used a welder in a couple decades and only a novice at best.now i need to buy some 0.23 wire, helmet
clamps.and a couple thingy's.just got to pick it up from ole mans. its a cig 200 running argon.
we have kennedy's welding supplies down here and cig.would they have spot welder attachments that you put on end.like
eastwoods have got
ljzedded 352.jpg 577.44K
5 downloads
ljzedded 353.jpg 177.57K
5 downloads cheers
Sir ask alot
Posted 05 October 2014 - 06:27 PM
Hi guys.went on a little trip this morning and headed to northern tasmania to pick up an scuttle panel with my brother peter.it was good to get away for the day even though it was along drive 600 k round trip it was quite enjoyful and couldnt of asked for a better day.once we were there the first thing we spotted was an slr 6 cyl which was pretty much buggered.cancer was right through it pete grabbed the nose cone and rear bumper and i found an lj boot which i grabbed for a spare for $50.also seen a nice worked lj 4dr in lone oranger.and lol and behold there was a march 73 cyan blue xu1.which we wernt alowed to see but 5 mins before we left the young fella went inside and came out with his ole man and opened the dr and there she was .in the build butwhat a beautiful site it was absolutely spotless .hasnt seen the light of day since 89.i think it would be up there with one of the best examples left.didnt take all the covers off.didnt want to push my luck as was pretty lucky to see it as not many have in quarter of a century
torrie pics 024.jpg 95.92K
3 downloads
torrie pics 022.jpg 100.37K
3 downloads
torrie pics 019.jpg 104.02K
3 downloads
torrie pics 020.jpg 134.05K
2 downloads
torrie pics 021.jpg 255.61K
3 downloads
Edited by madtoranajzedded, 05 October 2014 - 06:33 PM.
Sir ask alot
Posted 07 October 2014 - 04:06 PM
Hi guys.got the scuttle panel off today in one piece.took a little while but got there.i now know what you mean mike catts about you didnt want
to sell me the whole scuttle panel.as they are hard to come by and would seem a waste to cut a good one up.i dont want to cut this one
up lol.
torrie pics 030.jpg 135.16K
3 downloads
Edited by madtoranajzedded, 07 October 2014 - 04:07 PM.
Sir ask alot
Posted 18 November 2014 - 05:07 PM
finally my spot weld drill bit rocks up and the wrong size..pffft.anyhow perservered and got the scuttle panel off without any dramas
just needs a tidy up ready to weld in,still got to do one corner. was very important the i got this lined up perfect with the bonnet
very pleased with the outcome  maz's fabricatoin 005.jpg 187.32K
2 downloads
maz's fabricatoin 008.jpg 191.9K
1 downloads
maz's fabricatoin 005.jpg 187.32K
2 downloads
maz's fabricatoin 008.jpg 191.9K
1 downloads
maz's fabricatoin 004.jpg 179.59K
1 downloads
maz's fabricatoin.jpg 176.71K
1 downloads
maz's fabricatoin 002.jpg 189.59K
2 downloads
Sir ask alot
Posted 18 November 2014 - 05:18 PM
couple more
maz's fabricatoin 003.jpg 181.95K
5 downloads
maz's fabricatoin 001.jpg 178.62K
5 downloads
maz's fabricatoin 010.jpg 181.88K
4 downloads cheers
Forum Fan
Posted 18 November 2014 - 10:08 PM
Nice work Maz!
Good to see some solid progress.
Sir ask alot
Posted 19 November 2014 - 06:32 PM
thanks steve.been looking at it for too long mate and thought i better do something.just going around it at things i can do and when i make
the trip to my fathers to pick up welder i will be able to get straight into it.i have some por 15 to do underneath the scuttle.plenum i think its called.
i dont know how the heck im going to get it cleaned in there.a sand blaster would be handy..
will have ago at doing sills under rear dr.. my brother or cuz has used a jack there and pushed it all up ...both sides lol
little corner i done earlier.
maz's fabricatoin 011.jpg 185.02K
3 downloads
Oh My, Don't you post alot

Posted 20 November 2014 - 05:59 PM
I wondered why you didn't use the whole scuttle now I see what you're doing, very nice.
Looks like a great fit.
Sir ask alot
Posted 20 November 2014 - 10:39 PM
thanks craig i think ive fitted it too well lol.i have to have a gap i think between panels for weld to penetrate.
at first was going to buy the window channel off ebay but after my brother bought one it was rather hard to do.for me anyway
and found it much easier just take it all out.i just put the replacement one over the top of the old one and lined it up with the grille vents
worked really well.
i have a sill here from waddingtons but has lines going through it.hopefully heath or mark will give me another one so i can continue
pic of what happens when you dont put the jack under a car properly.same on other side and front guards too lol
maz's fabricatoin 013.jpg 172.12K
4 downloads cheers
CABIN ENGINE CONTROLS GALORE
Posted 04 January 2016 - 03:51 AM
Mate that's not good Maz,
if you didn't need another thing to fix dammit.
What is the distance between the 4 link tubular frame on the inner side of the wheel,
to the outer guard edge?
I measured my standard 4 door from chassis rail to guards edge being 400mm ( 15.75").
Was just curious to see if your frame should be further towards the centre of the Torana to allow wider wheels.
CABIN ENGINE CONTROLS GALORE
Posted 04 January 2016 - 03:53 AM

http://www.gmh-toran...e-3#entry812954
in this picture Maz, the 4 link adjustment position seems offset to the 4 door rails hey:-
http://www.gmh-toran...e-5#entry870377
Edited by NA-PWR, 04 January 2016 - 04:07 AM.
Sir ask alot
Posted 04 January 2016 - 04:14 PM
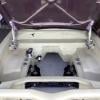
She has been one gigantic stuffup from the get go Dave.all sorts of areas that engineer didnt take into consideration
if i was to mention all, the list would extensive.
heres a few
(1) clip was positioned 2 inches rearward to where it was suppose to be
(2) because of that 4 link arms were too short to reach clip to housing,along with track locator bar
(3) clip was made too wide too allow minium clearance between tire to inner rail
(4) if height is raised tailshaft will hit tailshaft loop lower bar
(5) top coil over tube is in wrong position as top of coil over lean rearward 10 deg.
along with the dodgy work.bird dropping welds.tubs in crooked.gaps filled with offcuts and sikaflexed so i couldnt
see and damage to panels was enough to give me depression.this is why i bought the 2 dr to ellieviate some
buildup in the brain.
You are spot on Dave that the rails should have been shorter ,14'' is the measurement from outside of rail to
inner lip.
there is a measurement back through here somewhere.measured from c pillar to clip and its near exact
maz's fabricatoin 042.jpg 564.12K
2 downloads
Sir ask alot
Posted 04 January 2016 - 04:33 PM
Sir ask alot
Posted 04 January 2016 - 04:37 PM
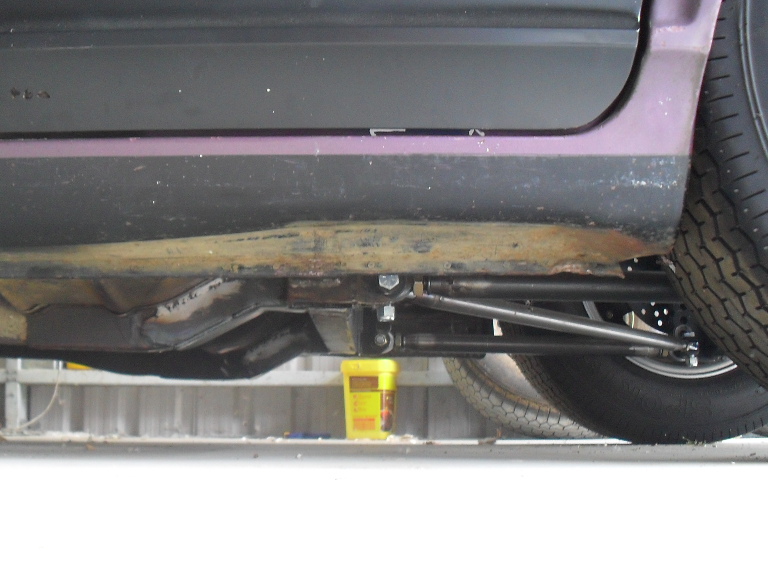
reason for tire not being wider is it was going to be regd and a 10 is all i could go.the tape is where more sheet
steel will be removed to allowa little bit more room
maz's fabricatoin 043.jpg 666.82K
2 downloads
Sir ask alot
Sir ask alot
Posted 04 January 2016 - 05:00 PM
going lower frees up room either side of guard arch.aswell as tail shaft loop melodramas.but mydilemma is whether to stretch guard
either side to allow a 28.this is where im stuck i dont wont to go 2+ inches rearward as then i will be on the 3rd set of 4 link arms.
track locator + top coilover bar will have to protrude into boot to keep the car low..i like the look of the roundness of guard arch and
stretching either side i wont have to get another set of arms .
moving the door arch forward an inch might be a bit hard for engineer if he can do it.
maz's fabricatoin 038.jpg 773.35K
3 downloads
CABIN ENGINE CONTROLS GALORE
Posted 04 January 2016 - 05:09 PM
OK Maz,
thank-you for the pictures and your pain,
great to know the '69 2 door S' is is the stress reliever.
Now if you can do it while she is apart,
get your Engineer to approve the new idea of cutting the clip bar that supports the coil over's out
(as this needs to move anyway to preposition the shocky angle),
and get the clip adjustment area brought closer together, which may effect the shocky position too,
then re-weld the separation bar back in at the new shorter distance, and put the new shocky mounts in,
then you will have heaps of clearance for Rego, and also allow for wider rims as needed in the Future. 
Sir ask alot
Posted 04 January 2016 - 05:26 PM
yeah i was thinking that but i will have to cut off the rear 4 link brackets for link arms and remake brakets for the brake calipers
then slide brackets onto the housing it will all have to be jigged bud.which is money money money.
there will be no rego bud.rta's have looked here and went off at kooistra who done it.+ now laws have tighten up even more that you cant even do full tub 
i will show ya a pic of what i mean
Edited by madtoranajzedded, 04 January 2016 - 05:30 PM.
CABIN ENGINE CONTROLS GALORE
Posted 04 January 2016 - 05:29 PM
Far out,
it was just so the whole assembly is a few inches closer and parallel together.
I don't know how much all this would cost, but in work, it is just cutting, moving and re-welding 10 sections.
Edit:-
I suppose then, just get her Rego, and worry about the finer stuff later. 
Oh and don't do any of this to the 2 door.
Edited by NA-PWR, 04 January 2016 - 05:33 PM.


0 members, 0 guests, 0 anonymous users

